Simple Stack Of Ferrites Shows How Fluxgate Magnetometers Work

Have you ever wondered how a magnetometer works? We sure have, which was why we were happy to stumble upon this article on simple homebrew fluxgate magnetometers.

As [Maurycy] explains, clues to how a fluxgate magnetometer works can be found right in the name. We all know what happens when a current is applied to a coil of wire wrapped around an iron or ferrite core — it makes an electromagnet. Wrap another coil around the same core, and you’ve got a simple transformer.

Now, power the first coil, called the drive coil, with alternating current and measure the induced current on the second, or sense coil. Unexpected differences between the current in the drive coil and the sense coil are due to any external magnetic field. The difference indicates the strength of the field. Genius!

Continue reading “Simple Stack Of Ferrites Shows How Fluxgate Magnetometers Work”

The Apple Watch As An Ammeter

Your shiny new personal electronic device is likely to be designed solely as an app platform to run the products of faceless corporations, so the story goes, and therefore has an ever smaller hacking potential. Perhaps that view is needlessly pessimistic, because here’s [JP3141] with an example that goes against the grain. It’s an Apple Watch, being used as an ammeter. How it does that comes as the result of a delicious piece of lateral thinking.

Like many mobile devices, the device comes with a magnetometer. This serves as an electronic compass, but it’s also as its name might suggest, an instrument for sensing magnetic fields in three axes. With a 3D printed bobbin that slides over the watch, and a few turns of wire, it can sense the magnetic field created by the current, and a measurement can be derived from it. The software on the watch is only a simple proof of concept as yet, but it applies some fairly understandable high-school physics to provide a useful if unexpected measure of current.

We’re surprised to see just how many times the Apple Watch has appeared on these pages, but scanning past projects it was a cosmetic one which caught our eye. Who wouldn’t want a tiny Mac Classic!

Quantum Sensor Uses Synthetic Diamond

Diamonds are nearly perfect crystals, but not totally perfect. The defects in these crystals give the stones their characteristic colors. But one type of defect, the NV — nitrogen-vacancy — center, can hold a particular spin, and you can change that spin with the correct application of energy. [Asianometry] explains why this is important in the video below.

Interestingly, even at room temperature, an NV center stays stable for a long time. Even more importantly, you can measure the spin nondestructively by detecting light emissions from the center.

Continue reading “Quantum Sensor Uses Synthetic Diamond”

Building A Digital Compass With An Arduino

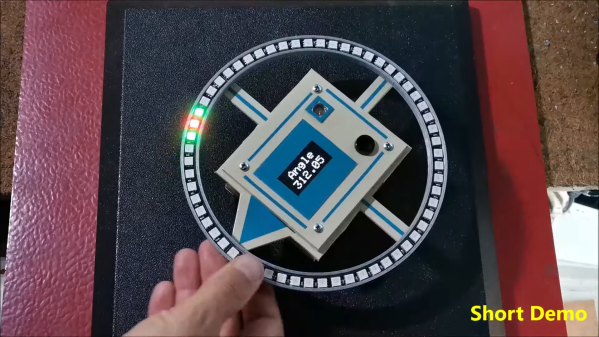
The magnetic compass has been a crucial navigational tool for around a thousand years or so, perhaps longer. While classical versions still work perfectly well, you can now get digital magnetometers that work in much the same way. [mircemk] decided to whip up a digital compass to demonstrate the value of these parts.

The build uses a HMC5883L magnetometer. While this can detect magnetic fields in three axes, just one is necessary for building a device that operates akin to a traditional compass. The output of the device is read by an Arduino Nano, which is hooked up to a string of WS2812B LEDs and a small OLED display. The LEDs display the bearing of magnetic north, while the OLED screen shows the current angle between the compass’s arrow and magnetic north.

It’s a tidy build that would be a great educational resource for teaching both electronics and navigational skills. We’ve seen similar projects before, like the hilarious Pizza Compass. Video after the break.

Continue reading “Building A Digital Compass With An Arduino”

Build A DIY Space Mouse For A More Efficient CAD Workflow

When you find yourself doing a lot of work in 3D modelling, you occasionally wish for something more capable than the humble two-dimensional mouse. A space mouse is a great tool in this regard, and [Salim Benbouziyane] was inspired to build his own.

[Salim] started his work with research, by watching a teardown of a Connexion Space Navigator 3D mouse. This informed him of the basic functionality and the workings inside. The commercial product appears to use an optical sensor setup, but [Salim] decided to go with a magnetic sensor setup instead due to the parts he had on hand. Namely, a 3-axis magnetometer which seemed perfect for the task.

The build uses a motion platform mounted on six springs which translates and rotates in three dimensions as required. The magnetometer is mounted on the platform above a stationary set of neodymium magnets. Thus, when the platform, and thus sensor, moves, the magnetometer’s output can be used to determine the motion of the platform and translate that into useful viewport commands for CAD software. A RP2040 is charged with reading the magnetometer and acting as a USB HID device. It’s all wrapped up in a neat 3D-printed housing.

For now, it’s a little simpler in its operation than a full 6 DOF Spacemouse, but it nonetheless has helped [Salim]’s workflow improve. A good peripheral like this can be a real boon on the desktop; we’ve seen a few DIY projects in this realm for just that reason. Video after the break.

Continue reading “Build A DIY Space Mouse For A More Efficient CAD Workflow”

Pi Pico Calculates Water Usage

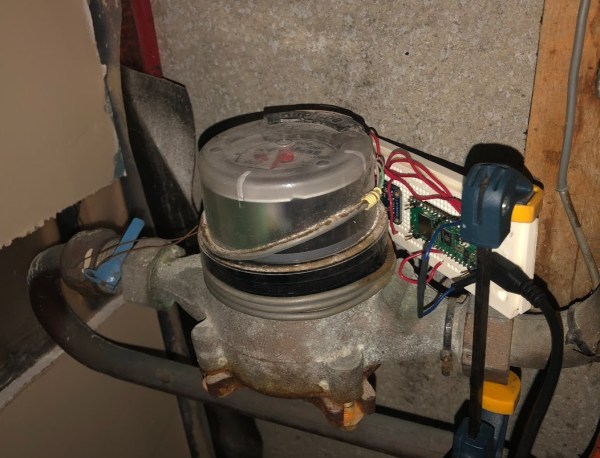
Modern WiFi-enabled microcontrollers have made it affordable and easy to monitor everything from local weather information to electricity usage with typically no more than a few dollars worth of hardware and a little bit of programming knowledge. Monitoring one’s own utility data can be a little bit more difficult without interfering with the metering equipment, but we have seen some clever ways of doing this over the years. The latest is this water meter monitoring device based on a Raspberry Pi Pico.

The clever thing here isn’t so much that it’s based on the tiniest of Raspberry Pis, but how it keeps track of the somewhat obscured water flow information coming from the meter. Using a magnetometer placed close to the meter, the device can sense the magnetic field created as water flows through the meter’s internal sensors. The magnetic field changes in a non-obvious way as water flows through it, so the program has to watch for specific peaks in the magnetic field. Each of these specific waveforms the magnetometer detects counts to 0.0657 liters of water, which is accurate for most purposes.

For interfacing with a utility meter, this is one of the more efficient and elegant hacks we’ve seen in a while. There have, of course, been other attempts to literally read the meter using web cams and computer vision software, but the configuration for these builds is much more complex than something like this. You can interface with plenty of utility meters other than water meters, too, regardless of age.

StarPointer Keeps Scope On Target With Stellarium

On astronomical telescopes of even middling power, a small “finderscope” is often mounted in parallel to the main optics to assist in getting the larger instrument on target. The low magnification of the finderscope offers a far wider field of view than the primary telescope, which makes it much easier to find small objects in the sky. Even if your target is too small or faint to see in the finderscope, just being able to get your primary telescope pointed at the right celestial neighborhood is a huge help.

But [Dilshan Jayakody] still thought he could improve on things a bit. Instead of a small optical scope, his StarPointer is an electronic device that can determine the orientation of the telescope it’s mounted to. As the ADXL345 accelerometer and HMC5883L magnetometer inside the STM32F103C8 powered gadget detect motion, the angle data is sent to Stellarium — an open source planetarium program. Combined with a known latitude and longitude, this allows the software to show where the telescope is currently pointed in the night sky.

As demonstrated in the video after the break, this provides real-time feedback which is easy to understand even for the absolute beginner: all you need to do is slew the scope around until the object you want to look at it under the crosshairs. While we wouldn’t recommend looking at a bright computer screen right before trying to pick out dim objects in your telescope’s eyepiece, we can certainly see the appeal of this “virtual” finderscope.

Then again…who said this technique had to be limited to optical observations? As the StarPointer is an open hardware project, you could always integrate the tech into that DIY radio telescope you’ve always dreamed of building in the backyard.

Continue reading “StarPointer Keeps Scope On Target With Stellarium