Light Painting With An 19th Century Inspired Plotter

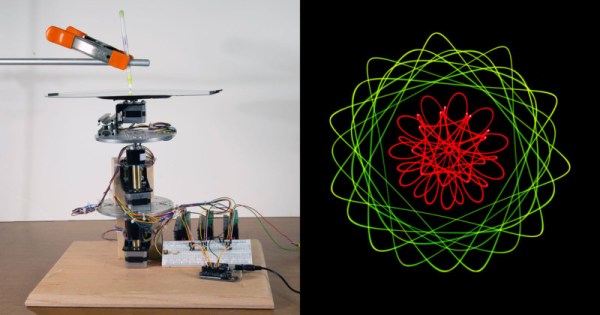
The geometric chuck was a device that stacked up multiple rotating wheels that could vary their speed and their offset to a central shaft, in order to machine ornate designs using a lathe. It’s this piece of machining obscura from the 19th century that inspired this light painting build from [Ted Kinsman].

Rather than the complicated gears and wheels used in the distant past, [Ted] instead elected to use stepper motors. Three stepper motors are stacked on top of each other, each one able to rotate at an independent rate. The design only implements three steppers as the slip rings needed to send power and control signals to each stepper are prohibitively expensive.

An Arduino is programmed to run the show, changing the speed of each motor and thus the patterns the system generates. Put LEDs on the spinning plates, or install a pen to mark a piece of paper, and it’s possible to generate all manner of beautiful spirograph-like patterns. Vary the motor speeds or the positioning of the lights, and the patterns vary in turn.

It’s a fun build for light painting, with some great visuals produced. We also appreciate the use of the Arduino which makes varying the parameters far easier than having to change out gearsets in classical designs.

If you miss the old school spirograph, you can always build one out of Lego. Else, consider experimenting with other light painting techniques. If you’ve built a fancy rig of your own, be sure to let us know!

[Thanks to zit for the tip!]

This Dual Extrusion System Rocks

Dual extrusion systems for 3D printers have been around for quite a few years, but the additional cost, complexity, and hassle of printing with them have kept them off the workbenches of most hackers. [Jón Schone] from Proper Printing has now thrown his own hat in the ring, with a custom dual extrusion rocker system that can swap extruders without any additional actuators.

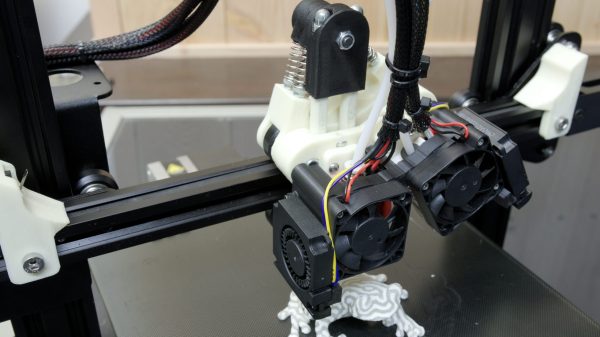
The two extruders are mounted on a spring-loaded rocker mechanism, which holds the inactive extruder up and away from the printing surface. Extruders are swapped by moving the carriage to either end of the x-axis, where the v-wheel rolls a ramp and pops the rocker over, putting the new extruder in the center line of the carriage. There are 3 wheels at the top of the carriage, but only two are in contact with the rail at any time. While this system is more complex than simply mounting two extruders side-by-side, it reduces the chances of the inactive nozzle oozing onto the parts or scraping across the surface. The height of each extruder can be adjusted with a screw,  and any horizontal offset between the nozzles is checked with a calibration procedure and corrected in the firmware. See the full video after the break.

[Jón] is offering the design files and modified firmware to perform this mod on your own Ender 3 Pro (though he notes other Creality printers should be compatible), but you’ll still need to source a control board with the additional stepper driver and heater output for the second extruder. This is yet another in a long list of hacks he’s performed on this popular entry-level printer, such as a modification that allows you to fold the machine up and take it on the go.

Continue reading “This Dual Extrusion System Rocks”

For Your Holiday Relaxation: The Clickspring Sundial Build Megacut

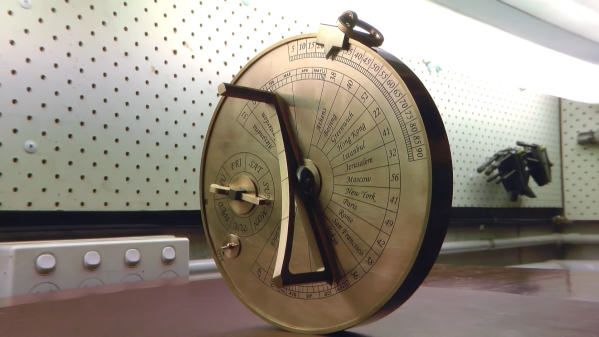
The fortunate among us may very well have a bit of time off from work coming up, and while most of that time will likely be filled with family obligations and festivities, there’s probably going to be some downtime. And if you should happen to find yourself with a half hour free, you might want to check out the Clickspring Byzantine Calendar-Sundial mega edit. And we’ll gladly accept your gratitude in advance.

Fans of machining videos will no doubt already be familiar with Clickspring, aka [Chris], the amateur horologist who, through a combination of amazing craftsmanship and top-notch production values, managed to make clockmaking a spectator sport. We first caught the Clickspring bug with his open-frame clock build, which ended up as a legitimate work of art. [Chris] then undertook two builds at once: a reproduction of the famous Antikythera mechanism, and the calendar-sundial seen in the video below.

The cut condenses 1,000 hours of machining, turning, casting, heat-treating, and even hand-engraving of brass and steel into an incredibly relaxing video. There’s no narration, no exposition — nothing but the sounds of metal being shaped into dozens of parts that eventually fit perfectly together into an instrument worthy of a prince of Byzantium. This video really whets our appetite for more Antikythera build details, but we understand that [Chris] has been busy lately, so we’ll be patient.

Continue reading “For Your Holiday Relaxation: The Clickspring Sundial Build Megacut”

3D Printed Rigid Chain Mechanism

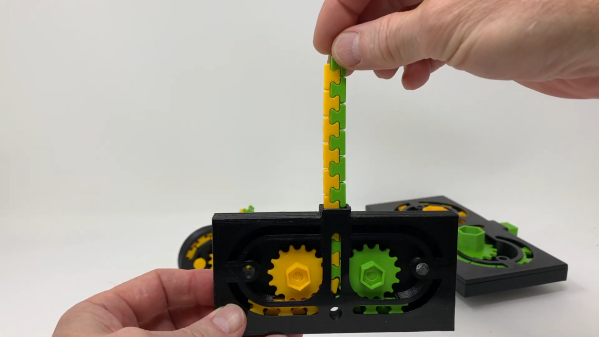
One of the major advantages of 3D printing is the ability to quickly test and then iterate on mechanical designs. [gzumwalt] does a lot of this, and has recently been working on various versions of a rigid chain mechanism. (Video, embedded below.)

A rigid-chain mechanism is one way of fitting a long beam into a small box. It works similar to a zipper, meshing two separate “chains” with specially teeth designed to form a rigid beam. Due to clearances between the teeth, the beam tends to be a bit floppy. [gzumwalt] made various sizes of the mechanism, and also reduced the clearances on later versions to reduce the flop. He also integrated it into a cool “snake in a basket” automaton (second video below) by adding a reversible gearbox and a binary snap-action switch.

One possible use for this type of mechanism is for autonomously assembling long structures in space, as one of the 2017 Hackaday Prize finalist projects, ZBeam, proposed.

[gzumwalt] has not made the files available for download yet, but you can keep and eye on his Instructables pages for updates. He got a number of fascinating 3D printed devices already available, like a domino laying machine or a WiFi controlled rover.

Continue reading “3D Printed Rigid Chain Mechanism”

Linkage Inferring Software Handwaves Away The Hard Stuff

Jokes aside, manually designing linkages that move along specific paths is no easy task. Whether we’re doodling paper sketches or constraining lines in a CAD program, we still need to do the work of actually “imagining” the linkage design. If only there were some sort of tool that would do all that hard imagining work for us! Thankfully, we’re in luck! That’s exactly what researchers [Gen Nishida], [Adrien Bousseau2], and [Daniel G. Aliaga1] at Purdue have done. They’ve designed a software tool that lets us position important bodies in space in particular “key” frames, and then the software simply fills in the linkage for you!

To start the design process, the user inputs a few candidate locations that their solid bodies need to reach in the final linkage path.  From here, these locations get fed to a particle filter. This particle filter seeds thousands of semi-random linkage configurations at small timesteps, selects some of the best-matching ones that most closely approximate the required body locations, removes the lesser-scoring results, re-creates a new set of possible joint configurations based on the best matching ones, and repeats until the tool converges on a linkage that respects our input key frames.

Like a brute force search, this solution takes lots and lots of samples to find a solution, but unlike a brute force search, trials iteratively improve, enabling the software to converge closer and closer to a final solution. Under the hood, the software needs to actually simulate these candidate linkage in order to grade them. It’s in this step that the team wrote in additional checks to remove impossible linkages like self-intersecting joints from this linkage “gene pool” before reseeding them. The result is a tool that does all that trial-and-error scratchwork for you–no brain cycles. For more details, have a peek at their (open access!) paper.

Design software that augments our mechanical design capabilities is a rare gem on these pages, and this one is no exception. If your curious to play with other useful linkages simulating tools, have a go at Linkage Designer. And if you’re in the mood for other tools that fill in the blanks, check out this machine learning algorithm that literally fills in footage between frames in a video feed.

Continue reading “Linkage Inferring Software Handwaves Away The Hard Stuff”

Getting Your Morning Mix Exactly Right, Every Time

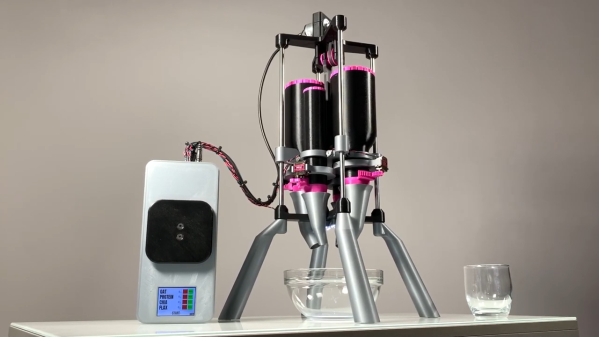
In historical times, before the pandemic, most people had to commute to work in the mornings, and breakfast often ended up being a bit rushed. [Elite Worm] is very serious about getting his breakfast mix exactly right, and o shave a bit of time off the prep, he built a 3D printed automatic ingredient dispenser for his breakfast bowl.

[Elite Worm] breakfast consists of four ingredients, that have either a powder or granular consistency. They are held in 3D printed hoppers, with a screw top for refilling and a servo-operated door with a funnel at the bottom. The hoppers need to be shaken to properly dispense the ingredients, so all four are mounted on a bracket that can slide up and down on linear bearings. The shaking is done by a brushed DC motor with a slider-crank mechanism, which moves bracket and hoppers up and down very vigorously. [Elite Worm] notes that the shaking is probably a bit too violent and can make the entire table shake if it isn’t sturdy enough, and reducing the motor RPM might be a good idea. Below the hopper system sits a movable weighing station with a load cell, a custom ATmega328P based control board and a Nextion touch screen display, which allows for various ingredient combinations to be saved. The load cell is used to keep track of the ingredient quantities by weight, as they are dispensed one at a time.

We really like the ingenuity of the build, but personally, we would have swapped out the hopper for something that’s moulded, since all the crevices in 3D printed parts is a perfect place for bacteria to grow and can be tricky to clean properly Continue reading “Getting Your Morning Mix Exactly Right, Every Time”

Awesome Animation Channel Is An Educational Rabbit Hole

Once [Shabab] clued us in to the brilliant animations of [Jared Owen], we pretty much lost an afternoon exploring this incredible YouTube channel. Self-taught Blender wizard [Jared] combines fantastic animations with clear and concise explanations for the inner workings of everything from Nerf guns and Fisher-Price corn poppers to the International Space Station.

Space nerds and casuals alike should check out [Jared]’s crowning achievement: a three-video Apollo spacecraft series, which covers many details in a short amount of time. Want more Apollo? Here’s a deeper dive into the lunar module. [Jared] uses music to great effect in these videos, especially in the Apollo series.

Several videos are devoted to mechanisms, like the humble gumball machine, the grand piano, and the combination lock. In addition to all the great how-it-works videos, [Jared] explores various noteworthy buildings. You know there’s a bowling alley in the White House, right? [Jared]’s tour shows you exactly where it is.

We love the diversity of the videos, all of which [Jared] researches in great detail. He enjoys working from user suggestions, so let him know what you’re dying to see dissected in detail.

Thanks for the tip, [Shabab].