Watching A Boat Get Welded Together Is Workshop ASMR

If you’ve been on the Internet long enough to know about Hackaday, we’ll wager you’re familiar with the concept of autonomous sensory meridian response (ASMR) — a tingling sensation in the scalp that’s said to be triggered by certain auditory stimuli. There are countless videos on YouTube that promise to give you “the tingles” using everything from feather dusters to overly starched shirts, but for us, the tool of choice is apparently a Lincoln Electric Magnum PRO 100SG spool gun in the hands of [Bob].

You’ll want a friend to help wrangle the panels.

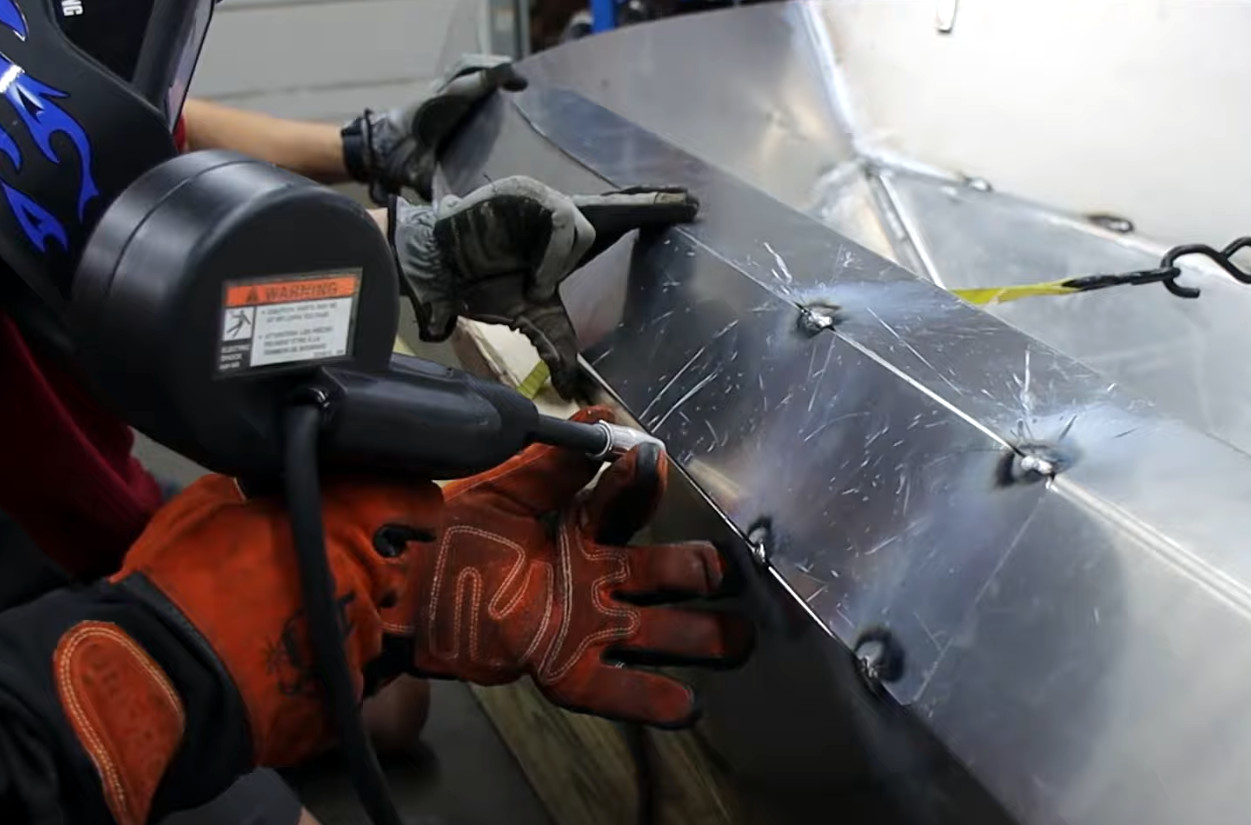
Admittedly we can’t promise the latest Making Stuff video will induce a euphoric physical sensation for all viewers, but at the very least, we think you’ll agree that watching [Bob] and his brother methodically welding together the twelve foot hull of what will eventually be a custom jet boat is strangely relaxing.

While we usually associate [Bob] with scratch builds, this time he’s actually working his way through a commercial kit. Sold by Jet Stream Adventure Boats, the kit includes the pre-cut aluminum panels that make up the hull, stringers, and top deck — niceties like a windshield and seats are offered as extras. The engine and jet drive need to be salvaged from an existing personal watercraft (PWC), but that will have to wait for a future video. For now, there’s a boat-load (get it?) of tack welding to be done.

The build process looks to go pretty smoothly, except for when they attempt to put the bow of the boat together. Unable to get the two side panels to meet properly, [Bob] eventually has to contact the manufacturer. After some back and forth, it turns out that a bit must have broken on the CNC when the hull panel went through, as a key cut was made nearly 8 inches (20 cm) too short. He was able to complete the cut with a jigsaw and continue on with the build, but we’re still scratching our heads at how this wasn’t caught before it got shipped out.

It won’t be the first homemade boat we’ve covered, but given [Bob]’s attention to detail, we’re particularly excited to see how this one develops in future videos. Especially since he’s foolishly bravely asked the commenters to come up with a name for his new craft.

Continue reading “Watching A Boat Get Welded Together Is Workshop ASMR”

Hand-Built Metal Mouse Is Beautifully Engraved

Computer mice, like computers themselves, used to be built almost solely in hideous beige designs. These days, things are a bit more stylish, but they’re still largely following a simple plastic formula. [Uri Tuchman] decided to build a fancy metal engraved computer mouse for a little more style on the desktop.

The build starts by gutting a simple three-button scroll mouse, as there’s really no sense in reinventing the wheel where the electronics is concerned. The PCB inside is pulled out and assembled on a brass baseplate, along with standoffs and supports for the mouse wheel as needed. It’s paired with a hefty brass enclosure with a nice gentle slope to sit well in the hand. Or, as well as it can, given the square  metal edges of the finished product.

The build is full of fun details, like [Uri] trying to form a hex shaft by hand, and the work that goes into the engraving is similarly impressive. In any case, it’s a build that would pair wonderfully with a proper steampunk keyboard. Alternatively, if you hate the idea of having to do all that engraving by hand, think about building your own CNC machine. Video after the break.

Continue reading “Hand-Built Metal Mouse Is Beautifully Engraved”

Tiny Pneumatic Tool Made From A Single(-ish) Bolt

We’ve noticed a couple of things about the “Widget from a Single Bolt” genre of metalworking videos. The first thing is that almost all of them need to use a freakishly large bolt, and many of them also rely on other materials to complete the build. And secondly, these builds all pretty much depend on a lathe to transform the bolt into the intended widget.

While this single-bolt pneumatic graving tool build is guilty on that first count, it somehow manages to avoid needing a lathe. Not that [AMbros Custom] wouldn’t have greatly benefited from a lathe to make this somewhat specialized and unusual tool a reality. A graving tool or graver is used during metal engraving, the art of making controlled cuts into flat metal surfaces to render complicated designs. A powered graver like this can make engraving faster and more precise than a traditional manual graver, which is typically powered by light taps with a special hammer.

The lathe-less build [AMbros] undertook was quite ambitious given the number of moving parts and the tight tolerances needed for a pneumatic tool. The real hero here is the hand drill pressed into service as an impromptu lathe; teamed with various tools from files to emery cloth to even a Dremel and an angle grinder, it did a respectable job turning down the various parts. The entire build is shown in the video below, and it’s worth a watch just to see what ingenuity can accomplish when coupled with sheer persistence.

Hats off to [AMbros] for sticking with what was admittedly a problematic build, and here’s hoping a lathe is in his future. With that, he may be able to pull off other impressive “single-bolt” builds, like this combination padlock. Or throw another bolt or two in and pull off this cryptex-like safe.

Continue reading “Tiny Pneumatic Tool Made From A Single(-ish) Bolt”

World's longest hacksaw

Fail Of The Week: A Bigger Hacksaw Isn’t A Better Hacksaw

If we’re being honest, the main reason to buy a power tool is to avoid the pain of using one’s muscles. Oh sure, we dress it up with claims that a power tool will make us more productive, or give better results, but more often than not it’s the memory of how your forearm feels after a day of twisting a screwdriver that makes you buy a cordless driver.

It appears that [Artisan Makes] has a high tolerance for pain, seeing how the main prep tool in his metal shop is a plain old hacksaw. So in an effort to speed up his stock prep, he turned not to a bandsaw or cutoff saw, but instead built the world’s silliest hacksaw. It’s the metalworking equivalent of the two-man bucksaws that lumberjacks used to fell trees before chainsaws came along, and at a meter and half in length, it’s about the size of one too. Modifying the frame of his trusty hacksaw was easy — he just popped the end pieces off and attached them to an extra-long piece of tube stock. Finding a 1.5-meter hacksaw blade was the main challenge; not exactly a big-box store item, that. So a section of metal-cutting bandsaw blade was modified to fit the frame, and it was off to the races.

Or not. The video below tells the tale of woe, which starts with the fact that [Artisan]’s shop is too small for the hilariously long hacksaw. Solving the fixturing problems didn’t soo much to help, though — there was no way to tension the blade enough to get it to stop wobbling during cutting. It was also clear that the huge saw wasn’t able to apply enough downforce on the stock to get good cuts. Maybe with a second set of hands, though…

There are plenty of ways to improve hacksawing in the shop, and while this isn’t one of them, we sure appreciate the chuckle we got out of it. And you really should check out [Artisan Makes]’ channel — his more serious stuff is really good.

Continue reading “Fail Of The Week: A Bigger Hacksaw Isn’t A Better Hacksaw”

Planning Custom Aluminum Enclosures With OpenSCAD

We’ve seen a number of projects over the years that let you create custom enclosures using OpenSCAD, and for good reason. The parametric CAD tool is ideal for generating 3D models based on user-adjustable variables, and if you leverage its integrated Customizer, producing a bespoke box is as easy as moving some sliders around. The resulting files get sent off to the 3D printer, and you’re set. But what if you’re looking for a custom enclosure that’s not so…plastic?

In that case, AlClosure by [0xPIT] might be the answer. Rather than generating STL files intended for your 3D printer, the code is written to help you design an enclosure made from aluminum sheets. The top and bottom panels are intended to be cut from 1.5 mm – 2.5 mm sheets, while the sides are made from thicker 5 mm – 8 mm stock to accept a machined pocket that holds the front and rear inserts.

Since it’s OpenSCAD, much of the design is governed by variables which you can tweak. Obviously the outside dimensions of the enclosure can be changed in a flash, but it’s just as easy to modify the thickness of the aluminum sheet being used, or the size of the screw holes. [0xPIT] has also done a great job of documenting the code itself, so you’ll know exactly what you’re modifying.

Obviously, you’ll need the ability to cut and machine aluminum to actually utilize this project. The code itself is really just a way to conceptualize the design and get your dimensions figured out ahead of time. But as we were recently reminded by the keynote presentation [Jeremy Fielding] gave at the 2021 Remoticon, this sort of early prototyping can often save you a lot of headaches down the line.

UV sensing amulet

Tiny Talisman Warns Wearer About UV Exposure

Given how important our Sun is, our ancestors can be forgiven for seeing it as a god. And even now that we know what it actually is and how it works, it’s not much of a reach to think that the Sun pours forth evil spirits that can visit disease and death on those who bask too long in its rays. So an amulet of protection against the evil UV rays is a totally reasonable project, right?

As is often the case with [mitxela]’s projects, especially the more bedazzled ones, this one is approximately equal parts electronics and fine metalworking. The bulk of the video below focuses on the metalwork, which is pretty fascinating stuff. The case for the amulet was made from brass and sized to fit a CR2032 coin cell. The back of the amulet is threaded to act as a battery cover, and some fancy lathe work was needed there. The case was also electroplated in gold to prevent tarnishing, and lends a nice look when paired up with the black solder mask of the PCB.

On the electronics side, [mitxela] took pains to keep battery drain as low as possible and to make the best use of the available space, choosing an ATtiny84 to support a TTP223 capacitive sensing chip and a VEML6075 UV sensor. The touch sensor allows the wearer to wake the amulet and cycles through UV modes, which [mitxela] learned were not exactly what the sensor datasheet said they were. This required a few software hacks, but in the end, the amulet does a decent job of reporting the UV index and looks fantastic while doing it.

Continue reading “Tiny Talisman Warns Wearer About UV Exposure”

Building An Aluminum RC Truck From Scratch

These days you can get just about any kind of radio controlled vehicle as a ready-to-run model. Cars, trucks, excavators, you name it. Open the box, charge the batteries, and you’re ready to roll. Even with all these modern conveniences, there is still a special breed of modelers who create their own models using only a few off-the-shelf parts.

[Rini Anita] is exactly that rare breed, creating this aluminum RC truck from scratch. The truck itself is a cab-over — short for Cab Over Engine (COE), a style seen making local deliveries worldwide. He starts with the ladder frame chassis, which is constructed using an extruded aluminum channel. This is the same material you’d normally use for the door tracks in retail store display cases. The electronics and standard RC fare: a receiver, electronic speed control, and a servo for steering. Batteries are recycled lithium cells. The main gearbox and drive axle look to be sourced from another RC vehicle, while leaf springs and suspension components are all custom built.

The truck’s body is a great example hand forming metal. First, a wooden form was created. Sections for the windows and door panels were carved out. Sheet aluminum was then bent over the wood form. Carefully placed hammer blows bend the metal into the carved sections – leaving the imprints of doors, windows, and other panel lines.

Throughout this build, we’re amazed by [Rini]’s skills, and the fact that the entire job was done with basic tools. A grinder, an old drill press, and a rivet gun are the go-to tools; no welder or 3D printer to be found. This puts a project like this well within the means of just about any hacker — though it may take some time to hone your skills! For his next truck, maybe [Rini] can add a self driving option!

Continue reading “Building An Aluminum RC Truck From Scratch”