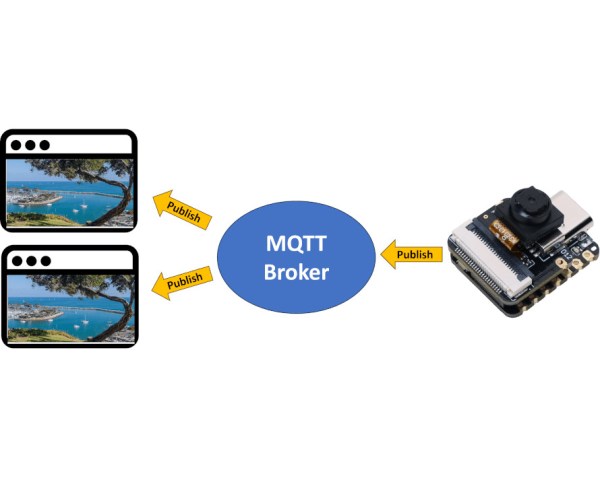
Hack Simple

Here at Hackaday, we definitely love to celebrate the hard hacks: the insane feats of reverse engineering, the physics-defying flights of fancy, or the abuse of cutting edge technology. But today I’d like to raise a rhetorical glass in tribute of the simple hacks. Because, to be perfectly honest, the vast majority of my hacks are simple hacks, and it’s probably the same for you too. And these often go unsung because, well, they’re simple. But that doesn’t mean that something simple can’t be helpful.

Case in point: an ESP8266 press-buttons device that we featured this week. It doesn’t do much. It’s main feature is that it connects to a home automation network over WiFi and enables you to flip three relays. Wires coming off the board are to be soldered to the not-yet-smart device in question, simply connected to each side of the button you’d like to press. In the example, a coffee machine was turned on and the “go” button pressed, automating one of the most essential kitchen rituals. While recording the podcast, I realized that I’ve built essentially this device and have it controlling our house’s heating furnace.

For the experienced hacker, there’s not much here. It’s a simple board design, the software heavily leverages ESPHome, so there’s not much work on that front either. But imagine that you lacked any of the wide-ranging skills that it takes to make such a device: PCB layout, ESP8266 software wrangling, or the nuances of designing with relays. You could just as easily build this device wrong as right. The startup costs are non-trivial.

Making a simple design like this available to the public isn’t a technical flex, and it’s not contributing to the cutting edge. But it just might be giving someone their first taste of DIY home automation, and a sweet taste of success. There’s not much easier than finding a switch and soldering on two wires, but if that’s the spark that pushes them on their path to greater hacks, that’s awesome. And even if it doesn’t, at least it’s another appliance under user control, connected to a private WiFi network rather than spying you out and phoning home to Big Toaster.

So here’s to the simple hacks!

ESP8266 Coaster Keeps Your Drink Warm

Looking for the perfect winter desk accessory? [Wq] has created a beautiful coaster made out of PCBs  that can keep your drink warm with an internal heater. (Chinese).

An ESP8266 sits as the main controller, with an additional MQTT control option, where the whole unit is powered over a USB-C connection. On board PCB traces, in the shape of a Hilbert curve, create the heating element used to heat beverages placed on the coaster, where [Wq] reports a measured resistance of the PCB trace network at 1.2 ohms. [Wq] writes that an AON6324 MOSFET replaces the D4184 that was previously being used, but might need some testing to get working properly. There are two capacitive touch sensors which has a TTP223E capacitive touch controller attached to detect input, with a multi-colored FM-3528 RGB LED for user feedback.

We love the artistry that went into building the coaster. For adventurous hackers wanting to build their own, the bill of materials (BOM), source code and board files are all available. We’ve seen everything from coasters and to PCB reflow boards, so it’s nice to see experimentation with a combination of these ideas.

Arduino Library Brings Rtl_433 To The ESP32

If you have an RTL-SDR compatible radio there’s an excellent chance you’ve heard of the rtl_433 project, which lets you receive and decode signals from an ever-expanding list of supported devices in the ISM radio bands. It’s an incredibly useful piece of software, but the fact that it requires an external software defined radio and a full-fledged computer to run dictated the sort of projects it could realistically be used for.

But thanks to the rtl_433_ESP Arduino library developed by [NorthernMan54], we’re now able to pack that functionality into a much smaller package. All you need is an ESP32 microcontroller and a CC1101 or SX127X transceiver module. If you’re looking for a turn-key hardware platform, the documentation notes the LILYGO LoRa32 V2 board includes the required hardware, plus adds a handy OLED display and microSD slot. It should be noted that the range of these radios don’t compare particularly well to a full-size RTL-SDR device, but that probably won’t come as much of a surprise. Continue reading “Arduino Library Brings Rtl_433 To The ESP32”

Weasley Clock For Magically Low Cost

For those unfamiliar with the details of the expansive work of fiction of Harry Potter, it did introduce a few ideas that have really stuck in the collective conscious. Besides containing one of the few instances of time travel done properly and introducing a fairly comprehensive magical physics system, the one thing specifically that seems to have had the most impact around here is the Weasley family clock, which shows the location of several of the characters. We’ve seen these built before in non-magical ways, but this latest build seeks to drop the price tag on one substantially.

To do this, the build relies on several low-cost cloud computing solutions and smartphone apps to solve the location-finding problem. The app is called OwnTracks and is an open-source location tracker which can report data to any of a number of services. [Simon] sends the MQTT data to a cloud-based solution called HiveMQCloud, but you could send it anywhere in principle. With the location tracking handled, he turns to some very low-cost Arduinos to control the stepper motors which point the clock hands to the correct locations on the face.

While the build does rely on a 3D printer for some of the internal workings of the clock, this does bring the cost down substantially when compared to other options. Especially when compared to this Weasley family clock which was built into a much larger piece of timekeeping equipment, having an option for a lower-cost location-tracking clock face like this one is certainly welcome.

Trigger Your Home Automation Routines With Home Buttons

Home automation systems are all well and good, so long as the person who built it all is around to drive it. Let’s face it, they’re quite often a complex web of interconnected systems, all tied to the specifics of one’s home — and someone less familiar with it all could get a little irritated if, on a chilly day, the interface to the boiler is via a Python script, and something won’t work. Just saying. Home Buttons by [Matej Planinšek] over on Hackaday.IO is a nicely polished project, which aims to take some of the hackiness out of such automation by providing a sleek front end to those automation routines, enabling anyone to rock on over and set one in action without hassle.

Internal PCB shown in the foreground, with the complete unit behind.The PCB is based around the ESP32-S2-mini which deals with WiFi connectivity and integration with Home Assistant using the usual MQTT protocol. We expect integration with other flavors of home automation would not be difficult to achieve. The center of the unit holds a simple E-Ink display, for that low-standby power. Specifically, the unit chosen is a Good Display GDEY029T94 2.9″ which this scribe can confirm is easy to interface and pretty cheap to purchase from the usual Chinese online vendors. This was matched up with six clicky Alps SKRB-series low-profile tact switches, which sit on either side of the display, and corresponds to a flexure-type affair on the 3D printed front casing. Neat and simple.

The PCB design was provided in Altium format, which you can find on the project GitHub page. This shows a straightforward design, with a few nice little details here and there. The internally mounted 18650 cell is reportedly good for at least a year of operation, but when time, it can be charged via USB. A Xysemi XB8608AF (PDF) protection chip provides appropriate limiting for the 18650 cell, shielding it from the perils of overcharging, discharging, and whatnot. Not that that is likely in this current setup. A Sensiron SHTC3 humidity and temperature sensor is also in there, hanging off the I2C bus, which makes sense for this application.

Home Automation hacks are plenty on these pages, like this scroll-wheel interface, for instance. If all this stuff is looking quite overbearingly complicated to get into, how about starting with a Pico W?

This Pico-W IoT Starter Project Gets You Into Home Assistant Quick As A Flash

Many of us hacker types with some hardware knowledge and a smattering of embedded experience would like to get into home automation, but there can be quite a learning curve. If you’re looking for a hackable starting point; something to deploy, learn about and then later expand upon, then look no further than the PicoW Home Assistant Starter project from [Danilo Campos].

The project is based upon the arduino-pico core, which supports a whole pile of RP2040-based boards, so you don’t need to restrict yourself to the “official” Pico-W, so long as you have working networking, Wi-Fi or otherwise. Integration is provided by the arduino-home-assistant library, which acts as the bridge between your sensors and other widgets, MQTT, and thence the network beyond. Events and sensor data on the end-point are packaged up with MQTT and published out to the broker via the network provided, all for minimal initial effort. Once you’ve got the basic connectivity to your Home Assistant instance working, there are many code examples in the arduino-home-assistant GitHub page to give you a helping start to connect whatever tickles your fancy.

It turns out we’ve covered HA quite a bit on these fair pages, like for example, these sweet automated window blinds. Another hack uses load cells under the bed legs to detect if someone is in bed or not, and if this isn’t your thing, maybe your idea of a home assistant is a bit more like this one?

Is This The Oldest Open Source HVAC Project In Existence?

Homebrew HVAC systems are one of those projects that take such a big investment of time, effort and money that you’ve got to be a really dedicated (ideally home-owning) hacker with a wide variety of multidisciplinary skills to pull off an implementation that can work in reality. One such HVAC hacker is [Vadim Tkachenko] with his multi-zone Home Climate Control (HCC) project that we covered first back in 2007. We now have rare opportunity to look at the improvements fifteen years of part-time development can produce, when a project is used all day, all year round in their own home. At the start, things were simple, just opening and closing ventilators with none of those modern MQTT-driven cloud computing stuff. Continue reading “Is This The Oldest Open Source HVAC Project In Existence?”