X-Cube Prism Becomes Dichroic Disco Ball

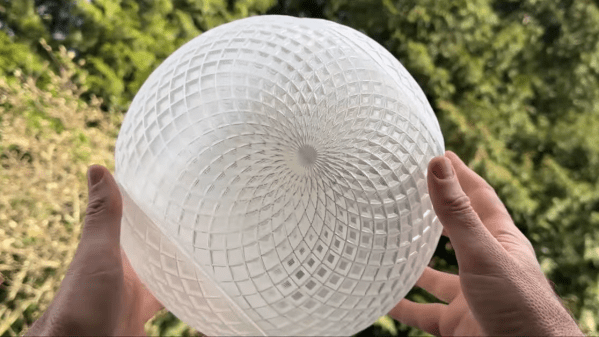
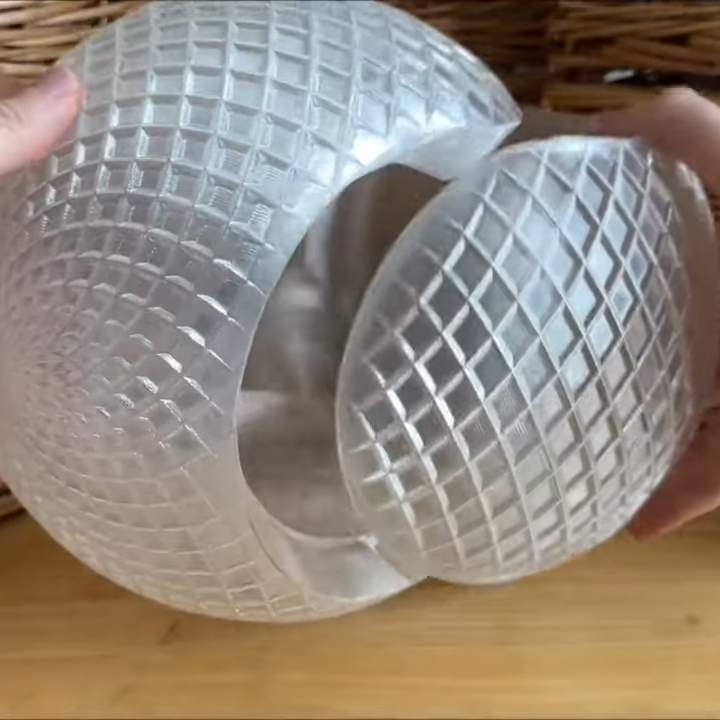
You’ve likely seen an X-cube, a dichroic prism used to split light into its constituent colours–you know, those fun little cubes you get when tearing apart a broken projector. Have you considered that the X-cube need not be a cube for its entire existence? [Matt] at “Matt’s Corner of Gem Cutting” on YouTube absolutely did, which is why he ground one into a 216-facet disco ball. 

That’s the hack, really. He took something many of us have played with at our desks thinking “I should do something cool with this” and… did something cool with it that most of us lack the tools and especially skills to even consider. It’s not especially practical, but it is especially pretty. Art, in other words.

The shape he’s using is known specifically to gemologists as “Santa’s Little Helper II” though we’d probably describe it as a kind of isosphere. Faceting the cube is just a matter of grinding down the facets to create the isosphere, then polishing them to brilliance with increasingly finer grit. This is done one hemisphere at a time, so the other hemisphere can be safely held in place with the now-classic cyanoacrylate and baking soda composite. Yes, jewelers use that trick, too.

We were slightly worried when [Matt] dumped his finished disco ball in acetone to clean off the cyanoacrylate– we haven’t the foggiest idea what optical-quality glue is used to hold the four prisms of an X-cube together and were a little worried acetone might soften the joints. That turned out not to be an issue, and [Matt] now has the most eye-catching sun-catcher we think we’ve ever seen.

We actually have seen suncatchers before, though admittedly it’s not a very popular tag around here. The closest build to this one was a so-called “hypercrystal” that combined an infinitiy mirror with a crystaline shape and dicloric tape for an effect as trippy as it sounds.

We also featured a deep-dive a while back if you want to know how these colourful, hard-to-pronounce coatings work.

Continue reading “X-Cube Prism Becomes Dichroic Disco Ball”

Christmas Ornament Has Hidden Compartment, Clever Design

If you need something clever for a gift, consider this two-part 3D-printed Christmas ornament that has a small secret compartment. But there’s a catch: the print is a challenging one. So make sure your printer is up to the task before you begin (or just mash PRINT and find out).

Want a challenging print that’s also useful? This two-piece ornament has a small gift area inside, and prints without supports.

This design is from [Angus] of [Maker’s Muse] and it’s not just eye-catching, but meticulously designed specifically for 3D printing. In fact, [Angus]’s video (embedded under the page break) is a great round-up of thoughtful design for manufacture (DFM) issues when it comes to filament-based 3D printing.

The ornament prints without supports, which is interesting right off the bat because rounded surfaces (like fillets, or a spherical surface) facing the build plate — even when slightly truncated to provide a flat bottom — are basically very sharp overhangs. That’s a feature that doesn’t generally end up with a good surface finish. [Angus] has a clever solution, and replaces a small section with a flat incline. One can’t tell anything is off by looking at the end result, but it makes all the difference when printing.

There are all kinds of little insights into the specific challenges 3D printing brings, and [Angus] does a fantastic job of highlighting them as he explains his design and addresses the challenges he faced. One spot in particular is the flat area underneath the hang hole. This triangular area is an unsupported bridge, and because of its particular shape, it is trickier to print than normal bridges. The workable solution consists of countersinking a smaller triangle within, but [Angus] is interested in improving this area further and is eager to hear ideas on how to do so. We wonder if he’s tried an approach we covered to get better bridges.

Want to print your own? 3D files are available direct from [Angus]’s site in a pay-what-you-like format. If your 3D printer is up to it, you should be able to make a few before Christmas. But if you’d prefer to set your sights on next year with something that uses power and hardware, this tiny marble machine ornament should raise some eyebrows.

Continue reading “Christmas Ornament Has Hidden Compartment, Clever Design”

3D Printing A Nifty Sphere Without Supports

[DaveMakesStuff] demonstrates a great technique for 3D printing a sphere; a troublesome shape for filament-based printers to handle. As a bonus, it uses a minimum of filament. His ideas can be applied to your own designs, but his Giant Spiralized Sphere would also just happen to make a fine ornament this holiday season.

Printing two interlocking parts and using vase mode ensures a support-free print that uses a minimum of filament.

The trick is mainly to print the sphere in two parts, but rather than just split the sphere right down the middle, [Dave] makes two hollow C-shaped sections, like a tennis ball. This structure allows the halves to be printed in vase mode, which minimizes filament use while also printing support-free.

Vase (or spiral) mode prints an object using a single, unbroken line of extruded filament. The resulting object has only one wall and zero infill, but it’s still plenty strong for an ornament. Despite its size, [Dave]’s giant ball uses only 220 grams of filament.

A video (also embedded below) shows the design in better detail. If you’d like to experiment, we’ve previously covered how PETG’s transparency is best preserved when 3D printing by using vase mode, slightly overextruding, and printing at a higher temperature to ensure solid bonding between each layer. Continue reading “3D Printing A Nifty Sphere Without Supports”

A persons handing holding a pile of generative, laser cut snowflake ornaments

Laser-Cutting A Flurry Of Generative Snowflakes

It’s the holiday season, and what better way to celebrate than to carve out some generative snowflakes on your laser cutter? [Bleeptrack] has developed a web-based tool that creates generative snowflake ornaments which can be exported to SVG files ready-made for laser or vinyl cutting.

True to their namesake, each generated snowflake ornament is (very likely to be) unique, with multiple layers created that can be stacked on top of each other. [Bleeptrack] has showcased a few realizations, using semitransparent paper sandwiched between two top layer cutouts, made out of wood or cardboard.

The snowflakes are a great balance of minimal design while still being beautiful and rich in detail. They can be easily produced on any laser cutter or vinyl cutter that you might have handy. Source code is available on GitHub for those wanting to dive into the details of the web tool. Cutting one of your own would make a perfect addition to a Neodriver ornament or a tiny DOOM playing ornament. Video after the break!

Continue reading “Laser-Cutting A Flurry Of Generative Snowflakes”

3D Printed Suncatcher Shines In The Light

Diffraction gratings create beautiful rainbow patterns when interacting with natural white light, and [audreyobscura] was familiar with their properties.  Thus, she set about producing an attractive 3D-printed suncatcher ornament that positively shines in the sun.

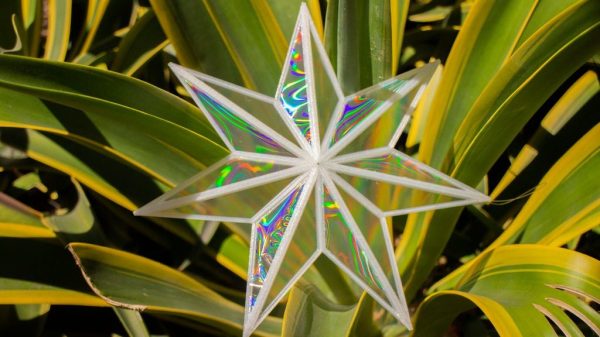
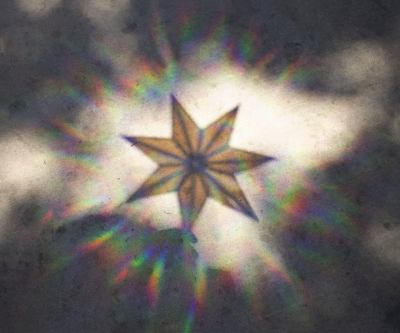
The design is straightforward, consisting of a 3D printed frame made of pieces glued together using QuickGrab glue. The pieces come together into a 7-segment star design, with a subtle 3D structure to it which helps add strength in addition to looking good.

Once assembled, sections of plastic diffraction grating are cut to size using a Curio desktop cutter. These are then glued into each segment of the star. While it’s possible to 3D print pieces with diffraction-grating like effects, using the film in this way allows light to pass through the suncatcher to create a more impressive effect.

On a cloudy day, the suncatcher looks almost entirely unassuming. However, when Earth’s nearest star shines, it projects glorious rainbows throughout the room, and letting it sway in the breeze lets the light play across the walls.

It’s a nice build, and a relatively easy ornament to make even if you’re new to 3D printing. We do like a good bit of decoration around here, especially if it’s a tiny version of a real TV. Video after the break.

Continue reading “3D Printed Suncatcher Shines In The Light”

Have Yourself A Recursive Little Christmas: Ornament That Prints Ornaments

Sure there are the occasional functional Christmas tree ornaments; we had one that plugged into the lights and was supposed to sound like a bird gently trilling its song, but was in fact so eardrum-piercing that we were forbidden from using it. But in general, ornaments are just supposed to be for looks, right? Not so fast — this 3D-printed ornament has a 3D-printer inside that prints other ornaments. One day it might just be the must-have in functional Christmas decor.

Given that [Sean Hodgins] had only a few days to work on this tree-dwelling 3D-printer, the questionable print quality and tiny print volume can be overlooked. But the fact that he got this working at all is quite a feat. We were initially surprised that he chose to build a stereolithography (SLA) printer rather than the more common fused deposition modeling (FDM) printer, but it makes sense. SLA only requires movement in the Z-axis, provided in this case by the guts of an old DVD drive. The build platform moves in and out of a tiny resin tank, the base of which has a small LCD screen whose backlight has been replaced by a bunch of UV LEDs. A Feather M0 controls the build stage height and displays pre-sliced bitmaps on the LCD, curing the resin in the tank a slice at a time.

Results were mixed, with the tiny snowflake being the best of the bunch. For a rush job, though, and one that competed with collaborating on a package-theft deterring glitter-bomb, it’s pretty impressive. Here’s hoping that this turns into a full-sized SLA build like [Sean] promises.

Continue reading “Have Yourself A Recursive Little Christmas: Ornament That Prints Ornaments”

Incredibly Heavy Ornament Likely Inappropriate To Hang On Tree

It’s that time of year again, and the Christmas hacks are flooding in thick and fast. To get into the Christmas spirit,  the FoxGuard team wanted a custom ornament to hang from the tree. They may have gotten more than they bargained for.

It’s a simple build that demonstrates the basic techniques of working with DACs and scopes in a charming holiday fashion. A Tektronix T932A analog oscilloscope is pressed into service as a display, by operating in XY mode. A Teensy 3.5 was then chosen for its onboard digital to analog converters, and used to output signals to draw a Christmas tree and star on the screen.

Old-school coders will appreciate the effort taken to plot the graphics out on graph paper. While the hack doesn’t do anything cutting edge or wild, it’s impressive how quick and easy this is thanks to modern development methods. While the technology to do this has existed for decades, a hacker in 1998 would have spent hours breadboarding a PIC microcontroller with DACs, let alone the coding required. We’ve come a long way.

It’s a bit of fun, but we highly recommend you don’t try and hang an analog scope off your tree at home. These WiFi-controlled ornaments are perhaps more suitable. Video after the break. Continue reading “Incredibly Heavy Ornament Likely Inappropriate To Hang On Tree”