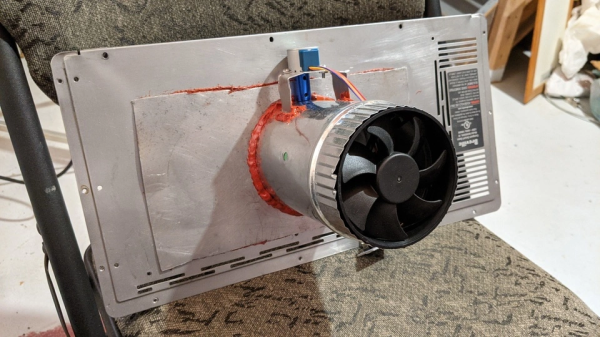
Put The Power Of PCR In Your Pocket With This Open-Source Thermal Cycler

When the first thermal cyclers for the polymerase chain reaction came out in the 1980s, they were as expensive as a market driven by grant money could make them. Things haven’t got much better over the years, largely shutting STEM classes and biohackers out of the PCR market. That may be about to change, though, if the €99.00 PocketPCR thermal cycler takes hold.

PCR amplifies DNA in a three-step process: denaturation, which melts double-stranded DNA into single strands; annealing, which lets small pieces of primer DNA bind to either side of the region of interest; and elongation, where the enzyme DNA polymerase zips along the single strands starting at the primer to replicate the DNA. The cycle repeats and copies of the original DNA accumulate exponentially. Like any thermal cycler, [Urs Gaudenz]’s PocketPCR automates those temperature shifts, using a combination of PCB-mounted heating elements and a cooling fan. The coils rapidly heat a reaction block up to the 99°C denaturation temperature, the fan brings that down to the 68°C needed for annealing, and then the temperature ramps back up to 72°C  for elongation with thermostable DNA polymerase. PID loops keep the reaction temperature precisely controlled. The whole thing is, as the name suggests, small enough to fit in a pocket, and can either be purchased in kit form or scratch-built from the build files on GitHub.

We applaud [Urs]’ efforts to get the power of PCR into the hands of citizen scientists. Quick and dirty thermal cyclers are one thing, but Pocket PCR has a great fit and finish that makes it more accessible.

Thanks to [Abe Tusk] for the tip.

2D-Platform Seeks Balance With A Touch Screen

It’s the [Bruce Land]-iest season of all, when the Cornell professor submits the projects his microcontroller class students have been working on all semester. Imagination does not seem to be in short supply with these students, and we always look forward to these tips this time of year.

[Greg] and [Sam]’s touch-screen two-dimensional ball balancer is a good example of what [Land]’s students turn out. The resistive touch screen is supported by a 3D-printed gimballed platform and tilted in two axes by hobby servos. [Greg] and [Sam] chose to read the voltage outputs from the touch screen directly using the ADC on a PIC32, toggling between the two axes at 2 kHz. Two PID control loops were implemented to keep the ball as centered as possible on the platform, and the video below shows that there’s still some loop tuning to do. But given the positional inaccuracies of hobby servos and the compliance in the gimbal, we’re impressed that they were able to keep the system under control at all.

Of course we’ve seen ball-balancers before, but most of them have closed the loop using either cameras or microphones. Seeing direct sensing on the platform like this is a nice change of pace. Continue reading “2D-Platform Seeks Balance With A Touch Screen”

Long Live Jibo, Our Adorable Robot Companion

Jibo, the adorable robot made by Jibo, Inc., was getting phased out, but that didn’t stop [Guilherme Martins] from using his robot companion for one last hack.

When he found out that the company would be terminating production of new Jibos and shutting down their servers, he wanted to replace the brain of the robot so that it would continue to live on even after all of its software had become deprecated. By the time the project started, the SDK downloads had already been removed the from developer’s site, so they looked at other options for controlling Jibo.

The first challenge was to not break the form factor in order to disassemble Jibo. They only managed to remove the battery from the bottom, realizing that the glass frame held the brain room. From within the robot, they were able to find the endless rotation joint for the head and the heart of the electronics. Jibo uses a DC motor, encoder, and IR sensor at each of three distinct levels to detect reference points.

They decided to use Phidgets modules to interface with these devices. While the DC motor controller handles 2A and has an encoder port, the Phidgets are able to provide software with the encoder and PID built-in. The 4x Digital Input Module was used for detecting the IR switch and connecting the modules to the computer.

[Martins] decided to use LattePanda, a hackable Windows 10 development board, for the brain of the new Jibo. The board was luckily able to fit inside the compartment for Jibo, but since it requires more power the unit is powered with 12V regulated to 5V in order to have less current passing through the wires. The DC motors, meanwhile, run at 12V and the IR switches and encoders at 5V.

A program developed in Unity3D plays the eye animations, and a C# program interfaces with the Phidgets. The final configuration was to fit Jibo onto a robotic arm to augment its behaviors. We previously wrote about Toppi, the robotic arm artist, that was used as the base for Jibo’s new home.

You can check out the result in the video below.

Continue reading “Long Live Jibo, Our Adorable Robot Companion”

Hackaday Podcast 030: Seven Years Of RTL-SDR, 3D Printing Optimized For The Eye, Sega Audiophile, Swimming In Brighteners

Hackaday Editors Mike Szczys and Elliot Williams curate the awesome hacks from the past week. On this episode, we marvel about the legacy RTL-SDR has had on the software-defined radio scene, turn a critical ear to 16-bit console audio hardware, watch generative algorithms make 3D prints beautiful, and discover why printer paper is so very, very bright white.

Take a look at the links below if you want to follow along, and as always tell us what you think about this episode in the comments!

Take a look at the links below if you want to follow along, and as always, tell us what you think about this episode in the comments!

Direct download (60 MB or so.)

Continue reading “Hackaday Podcast 030: Seven Years Of RTL-SDR, 3D Printing Optimized For The Eye, Sega Audiophile, Swimming In Brighteners”

Ping-Pong Ball Makes Great PID Example

It is a common situation in electronics to have a control loop, that is some sort of feedback that drives the input to a system such as a motor or a heater based upon a sensor to measure something like position or temperature. You’ll have a set point — whatever you want the sensor to read — and your job is to adjust the driving thing to make the sensor read the set point value. This seems easy, right? It does seem that way, but in realitythere’s a lot of nuance to doing it well and that usually involves at least some part of a PID (proportional, integral, derivative) controller. You can bog down in math trying to understand the PID but [Electronoobs] recent video shows a very simple test setup that clearly demonstrates what’s going on with an Arduino, a motor, a distance sensor, and a ping-pong ball. You can see the video below.

Imagine for a moment heating a tank of water as an example. The simple approach would be to turn on the heater and when the water reaches the setpoint, turn the heater off. The problem there is though that you will probably overshoot the target. The proportional part of a PID controller will only turn the heater fully on when the water is way under the target temperature. As the water gets closer to the right temperature, the controller will turn down the input — in this case using PWM. The closer the sensor reads to the setpoint, the lower the system will turn the heater.

Continue reading “Ping-Pong Ball Makes Great PID Example”

This Two-Wheeled RC Car Is Rather Quick

Radio control cars have always been fun, it’s true. With that said, it’s hard to deny that true speed was unlocked when lithium polymer batteries and brushless motors came to the fore. [Gear Down For What?] built himself a speedy RC car of his own design, and it’s only got two wheels to boot (Youtube link, embedded below).

The design is of the self-balancing type – if you’re thinking of an angry unmanned Segway with a point to prove, you’re in the ballpark. The brains of the machine come thanks to a Teensy 3.6, which runs the PID loops for balancing and control. An MPU6050 gyroscope & accelerometer provide the necessary sensing to enable the ‘bot to keep itself upright in varied conditions. Performance is impressive, with the car reaching speeds in excess of 40 MPH and managing to handle simple ramps and bumps with ease. It’s all wrapped up in a 3D printed frame which held up surprisingly well to many crashes into tripods and tarmac.

Such builds are not just fun; they’re an excellent way to learn useful control skills that can serve you well in industry and your own projects. You can pick up the finer details of control systems in a university engineering course, or you could give our primer a whirl. When you’ve whipped up your first awesome project, we’d love to hear about it. Video after the break.

Continue reading “This Two-Wheeled RC Car Is Rather Quick”

High-Style Ball Balancing Platform

If IKEA made ball-balancing PID robots, they’d probably look like this one.

This [Johan Link] build isn’t just about style. A look under the hood reveals not the standard, off-the-shelf microcontroller development board you might expect. Instead, [Johan] designed and built his own board with an ATmega32 to run the three servos that control the platform. The entire apparatus is made from a dozen or so 3D-printed parts that interlock to form the base, the platform, and the housing for the USB webcam that’s perched on an aluminum tube. From that vantage point, the camera’s images are analyzed with OpenCV and the center of the ball is located. A PID loop controls the three servos to center the ball on the platform, or razzle-dazzle it a little by moving the ball in a controlled circle. It’s quite a build, and the video below shows it in action.

We’ve seen a few balancing platforms before, but few with such style. This Stewart platform comes close, and this juggling platform gets extra points for closing the control loop with audio feedback. And for juggling, of course.

Continue reading “High-Style Ball Balancing Platform”