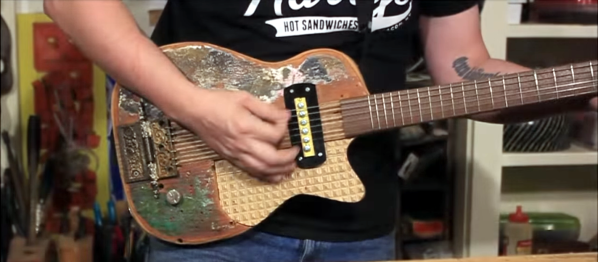
The PlyPad: CNC Machine Yourself A Tiny House

The Maslow CNC project is a CNC mill for sheet woodwork that is designed to be as inexpensive as possible and to be assembled by the end user. They’ve dropped us a line to tell us about a recent project they’ve undertaken as part of a collaboration to produce the PlyPad, a tiny house for Kenton Women’s Village, a project to tackle homelessness among women in part of the City of Portland.

Their write-up is a fascinating look at the issues surrounding the design and construction of a small dwelling using CNC rather than traditional methods. As an example their original design featured an attractive sawtooth roofline with multiple clerestory windows, but sadly a satisfactory solution could not be found to the problem of keeping it waterproof and they were forced to adopt a more conventional look.

The walls of the building are a ply-foam bonded sandwich, and the house is constructed in 4 foot sections to match the width of a sheet of ply. There are several section designs with built-in furniture, for example containing a bed, or storage space.

This house was designed to be part of a community with central washing and sanitary facilities, so it does not incorporate the bathroom you might expect. However it is not impossible to imagine how sections could be designed containing these, and could be added to a full suite of construction choices. We are reminded of its similarity to the WikiHouse project.

We covered the Maslow project back in 2016, it is especially pleasing to see that it has been something of a success.

Print A Plywood Bending Jig

Ever wanted to bend plywood but don’t have the equipment or the space to use it? Whatever the issue, dust off those project ideas and take a look at [Ryo Kosaka]’s experimental bending jig.All you need are some boards, a couple of fasteners, and [Ryo]’s 3-D printed connectors.

This is quite the elegant solution for bending in a small space with little noise. The main departure from standard bending methods is that instead of making the bend by clamping the veneers between a pair of positive and negative mold halves, most of the clamping pressure comes from air pumped into a rubber ball. That’s not even the best part: not only is the mold reconfigurable, it’s modular. Want another bend in your thing? Just print another connector and grab another piece of wood.

[Ryo]’s pivoting connectors screw into the end of one board and move freely along the length of a second board. Once the bend angle is dialed up, he locks it in place with a bolt. For the first test, [Ryo] made a lamp base with two bends.The jig worked great except for a small gap that didn’t get enough clamping pressure from the ball. We wonder if rotating the jig during the process would have let gravity address the issue. For the second test, [Ryo] added another piece to make the jig rectangular and made a floating wall shelf. Bend your way past the break for the video version.

In making the lamp base, [Ryo] found it easier to pre-bend the veneers with a heat gun. If the project were smaller, he could have softened up the wood in a microwave.

Continue reading “Print A Plywood Bending Jig”

Making The Best Plywood For Laser Cut Puzzles

Plywood laser-cuts fairly well but has drawbacks when used in serious production runs, as [Marie] explains in a blog post about a quest for the ultimate laser-cutting plywood. One of the things [Nervous System] makes and sells is generative jigsaw puzzles, and they shared their experience with the challenges in producing them. The biggest issue was the wood itself. They ended up getting a custom plywood made to fit their exact needs, a process that turned out neither as complex nor as unusual as it may sound.

An example of how a dense knot hidden in one of the plywood layers caused the laser to not cut all the way through.

Plywood is great because it’s readily available, but there are some drawbacks that cause problems when trying to do serious production of laser-cut plywood pieces. Laser cutting works best when the material being cut is consistent, but there can be areas of inconsistent density in plywood. If the laser encounters an unexpected knot somewhere in the wood, there is no way to slow down or to increase power to compensate. The result is a small area where the laser perhaps doesn’t quite make it through. A picture of an example from my workshop shows what this looks like.

When doing basic project work or prototyping, this kind of issue is inconvenient but usually some trimming and sanding will sort things out. When doing a production run for puzzles like [Nervous System] was doing, the issue is more serious:

  1. A jigsaw puzzle with a large number of cuts in a relatively small area has a higher chance of running into any problem spots in the material. If they exist, the laser will probably encounter them.
  2. Trouble spots in plywood can be on the inside layers, meaning they can’t be detected visually and are only discovered after they cause an incomplete cut.
  3. Increasing laser power for the whole job is an incomplete solution, as excessive laser power tends to make the cuts uglier due to increased scorching and charring.
  4. An inspection process becomes needed to check each puzzle piece for problems, which adds time and effort.
  5. A puzzle that had even one piece that did not cut properly will probably be scrapped because rework is not practical. That material (and any time and money that went into getting the nice artwork onto it) becomes waste.

Plywood is great stuff and can look gorgeous, but [Marie] says they struggled with its issues for a long time and eventually realized they had gone as far as they could with off-the-shelf plywoods, even specialty ones. They knew exactly what they needed, and it was time for something custom-made to serve those specific needs.

Having your own plywood custom-made may sound a little extreme, but [Marie] assures us it’s not particularly difficult or unreasonable. They contacted a small manufacturer who specialized in custom aircraft plywoods and was able to provide their laser-cut plywood holy grail: a 3-ply sheet, with high quality basswood core with birch veneers, and a melamine-based glue. It cuts better than anything else they have used, and [Marie] says that after four years they had certainly tried just about everything.

Automate The Freight: Front Line Deliveries By Drone

Gen. Robert H. Barrow, USMC, once said that “Amateurs talk about tactics, but professionals study logistics.” That’s true in many enterprises, but in warfare, the side that neglects logistics is likely to be the loser. Keeping soldiers fed, clothed, and armed is the very essence of effectively prosecuting a war, and the long logistical chain from rear supply depots to forward action is what makes that possible.

Armies have had millennia to optimize logistics, and they have always maximized use of new technologies to position supplies where they’re needed. Strong backs of men and beasts sufficed for centuries, supplemented by trains in the 19th century and supplanted by motor vehicles in the 20th. Later, aircraft made an incalculable impact on supply chains, allowing rapid mobilization of supplies and supporting the industrial scale death and destruction of the 20th-century’s wars.

Continue reading “Automate The Freight: Front Line Deliveries By Drone”

Two-Piece Boxes Thanks To Laser-Cut Flex Hinges

It sounds like a challenge from a [Martin Gardner] math puzzle from the Scientific American of days gone by: is it possible to build a three-dimensional wooden box with only two surfaces? It turns out it is, if you bend the rules and bend the wood to make living hinge boxes with a laser cutter.

[Martin Raynsford] clearly wasn’t setting out to probe the limits of topology with these boxes, but they’re a pretty neat trick nonetheless. The key to these boxes is the narrow to non-existent kerf left by a laser cutter that makes interference fits with wood a reality. [Martin]’s design leverages the slot and tab connection we’re used to seeing in laser-cut boxes, but adds a living flex-hinge to curve each piece of plywood into a U-shape. The two pieces are then nested together like those old aluminum hobby enclosures from Radio Shack. His GitHub has OpenSCAD scripts to parametrically create two different styles of two-piece boxes so you can scale it up or (somewhat) down according to your needs. There’s also a more traditional three-piece box, and any of them might be a great choice for a control panel or small Arduino enclosure. And as a bonus, the flex-hinge provides ventilation.

Need slots and tabs for boxes but you’re more familiar with FreeCAD? These parametric scripts will get you started, and we’ll bet you can port the flex-hinge bit easily, too.

Plywood Steals The Show From Upcycled Broken Glass Art Lamps

You can tell from looking around his workshop that [Paul Jackman] likes plywood even more than we do. And for the bases of these lamps, he sandwiches enough of the stuff together that it becomes a distinct part of the piece’s visuals. Some work with a router and some finishing, and they look great! You can watch the work, and the results, in his video embedded below.

The plywood bases also hide the electronics: a transformer and some LEDs. To make space for them in the otherwise solid blocks of wood, he tosses them in the CNC router and hollows them out. A little epoxy for the caps of the jars and the bases were finished. Fill the jars with colored glass, and a transparent tube to allow light all the way to the top, and they’re done.

Continue reading “Plywood Steals The Show From Upcycled Broken Glass Art Lamps”

Cellular Automata Explorer

Well all know cellular automata from Conway’s Game of Life which simulates cellular evolution using rules based on the state of all eight adjacent cells. [Gavin] has been having fun playing with elementary cellular automata in his spare time. Unlike Conway’s Game, elementary automata uses just the left and right neighbors of a cell to determine the next cell ahead in the row. Despite this comparative simplicity, some really complex patterns emerge, including a Turing-complete one.

[Gavin] started off doing the calculations by hand for fun. He made some nice worksheets for this. As we can easily imagine, doing the calculations by hand got boring fast. It wasn’t long before his thoughts turned to automating his cellular automata. So, he put together an automatic cellular automator. (We admit, we are having a bit of fun with this.)

This could have been a quick software project but half the fun is seeing the simulations on a purpose-built ecosystem. The files to build the device are hosted on Thingiverse. Like other cellular automata projects, it uses LED matrices to display the data. An Arduino acts as the brain and some really cool retro switches from the world’s most ridiculously organized electronics collection finish the look of the project.

To use, enter the starting condition with the switches at the bottom. The code on the Arduino then computes and displays the pattern on the matrix. Pretty cool and way faster than doing it by hand.