Flexures Make Robotic Fingers Simpler To Print

Designing an anthropomorphic robotic hand seems to make a lot of sense — right up until the point that you realize just how complex the human hand is. What works well in bone and sinew often doesn’t translate well to servos and sensors, and even building a single mechanical finger can require dozens of parts.

Or, if you’re as clever about things as [Adrian Perez] is, only one part. His print-in-place robotic finger, adorably dubbed “Fingie,” is a huge step toward simplifying anthropomorphic manipulators. Fingie is printed in PLA and uses flexures for the three main joints of the finger, each of which consists of two separate and opposed coil springs. The flexures allow the phalanges to bend relative to each other in response to the motion of three separate tendons that extend through a channel on the palmar aspect of the finger, very much like the real thing.

The flexures eliminate the need for bearings at each joint and greatly decrease the complexity of the finger, but the model isn’t perfect. As [Adrian] points out, the off-center attachment for the tendons makes the finger tend to curl when the joints are in flexion, which isn’t how real fingers work. That should be a pretty easy fix, though. And while we appreciate the “one and done” nature of this print, we’d almost like to see the strap-like print-in-place tendons replaced with pieces of PLA filament added as a post-processing step, to make the finger more compact and perhaps easier to control.

Despite the shortcomings, and keeping in mind that this is clearly a proof of concept, we really like where [Adrian] is going with this, and we’re looking forward to seeing a hand with five Fingies, or four Fingies and a Thumbie. It stands to be vastly simpler than something like [Will Cogley]’s biomimetic hand, which while an absolute masterpiece of design, is pretty daunting for most of us to reproduce.

Continue reading “Flexures Make Robotic Fingers Simpler To Print”

Screwless Eyeballs Are A Lesson In Design-For-Assembly

[Will Cogley] makes eyeballs; hey, everyone needs a hobby, and we don’t judge. Like all his animatronics, his eyeballs are wondrous mechanisms, but they do tend toward being a bit complex, especially in terms of the fasteners needed to assemble them.

But not anymore. [Will] redid his eyeball design to be as easy to assemble as possible, and the results are both impressive and instructive. His original design mimics real eyeballs quite well, but takes six servos and a large handful of screws and nuts, which serve both to attach the servos to the frame and act as pivots for the many, many linkages needed. The new design has snap-fit pivots similar to Lego Technic axles printed right into the linkage elements, as well as snap connectors to hold the servos down. This eliminates the need for 45 screws and cuts assembly time from 30 minutes to about six, with no tools required. And although [Will] doesn’t mention it, it must save a bunch of weight, too.

Everything comes at a cost, of course, and such huge gains in assembly ease are no exception. [Will] details this in the video below, including printing the parts in the right orientation to handle the forces exerted both during assembly and in use. And while it’s hard to beat a five-fold reduction in assembly time, he might be able to reduce that even more with a few print-in-place pivots.

Continue reading “Screwless Eyeballs Are A Lesson In Design-For-Assembly”

3D Printing Your Own Triboelectric Generators

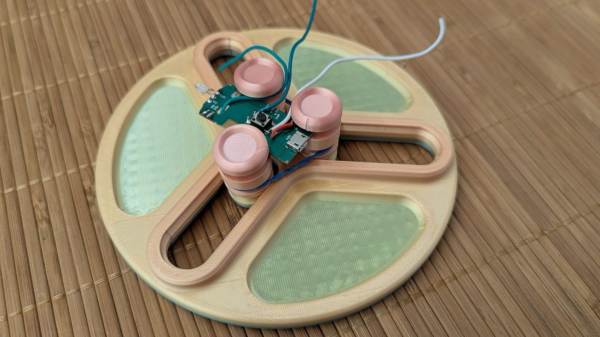
A triboelectric nanogenerator (TENG) certainly sounds like the sort of thing you’d need to graduate from Starfleet Engineering to put together, but it actually operates on the same principle that’s at work when you rub a balloon your head. Put simply, when friction is applied to the proper materials, charges can build up enough to produce a short burst of electrical energy. Do it enough, and you’re on the way to producing useful power.

In a recent paper, [Leo N.Y. Cao], [Erming Su], [Zijie Xu], and [Zhong Lin Wang] describe how a functional TENG can be produced on a standard desktop 3D printer. What’s even more impressive is that the method doesn’t appear to require anything terribly exotic — just some commercially available filaments and a bunch of PTFE beads.

TENGs can be printed in any size or shape.

So how do your print your own TENG? First, you load up an electrically conductive PLA filament and lay down a base into which a series of channels has been designed. At around the half-way point, you pause the print to insert your PTFE beads, and then swap over to standard filament for a few layers to produce an insulator. Finally, you pause again and switch back over to the conductive filament for the rest of the print, encasing the beads inside the structure.

As [Leo N.Y. Cao] demonstrates in the video below, you then clip leads to the top and bottom of the print, and give it a good shake. If everything went right, LEDs wired up to your new high-tech maracas should flash as the PTFE beads move back and forth inside. But there’s a catch. Going back to the balloon-on-the-head example, the effect at play here produces high voltages but low current — the paper says a TENG containing 60 beads should be capable of producing pulses of up to 150 volts.

Naturally, you won’t get very far with just one of these. Like other energy harvesting concepts we’ve covered in the past, such as vibratory wind generators, it would take a bunch of these working together to generate a useful amount of power. But given how cheap and quickly these printable TENGs can be produced, that doesn’t seem like it would be too much of a challenge.

Continue reading “3D Printing Your Own Triboelectric Generators”

Advanced 3D Printing Tips

One of the best things about hanging around with other hackers is you hear about the little tricks they use for things like 3D printing. But with the Internet, you can overhear tips from people you’ll probably never meet, like [3D Printer Academy]. His recent video has a little bit of a click-bait title (“10 Secret 3D Printing Tricks…“) but when we watched it, we did see several cool ideas. Of course, you probably know at least some of the ten tips, but it is still interesting to see what he’s been up to, which you can do in the video below.

At one point he mentions 11 tips, but the title has 10 and we had to stretch to get to that number since some of them have some overlap. For example, several involve making printed threads. However, he also shows some C-clips, a trick to add walls for strength, and printing spur gears. Of course, some of these, like the gears, require specific tools, but many of them are agnostic.

Some of the tips are about selecting a particular infill pattern, which you’d think would be pretty obvious, but then again, your idea of what’s novel and what’s old hat might be different than ours. The explanation of how a print-in-place hinge works is pretty clear (even if it isn’t really a live hinge) and also applies to making chains to transfer power. We also thought the threaded containers were clever.

So if you can overlook the title and you don’t mind seeing a few tips you probably already know, you can probably take something away from the video. What’s your favorite “expert” trick? Let us know in the comments.

A lot of what we print tends to be enclosures and there are some good tips for those floating around. Of course, the value of tips vary based on your experience level. But if you are just starting out, you should check out [Bald Engineer]’s video of things he wished someone had told him when he started 3D printing.

Continue reading “Advanced 3D Printing Tips”

One-Piece Tank Chassis Pushes Print-in-Place To New Heights

What’s better than 3D printing a tank chassis with working tracks? How about 3D printing the entire thing, moving parts and all, as a single piece? That’s [3D Honza]’s PiPBOT-1, and it’s the culmination of a whole lot of design work.

The design prints flat, then folds up into its final form.

[3D Honza] has been sharing progress pictures and videos on his Twitter account, and just recently released the first version of his design. Version 1.0 is just the mechanics, but he’s already at work on version 2.0 which includes the ability to attach servos to drive the treads. At this writing, the design is currently downloadable directly from his site and includes CAD files, which is great to see.

One part of the design we’d like to draw your attention to is the chunky hinge that doubles as a kind of axial structure making up the body. This allows the tank to print in an unfolded state with the treads and wheels flat on the print bed. After printing, the tank gets folded up a bit like a taco to attain its final form. It’s a clever layout that allows the unit to be printed according to a filament-based 3D printer’s strengths, printing as a single piece that transforms into a small tank chassis, complete with working treads, in a few seconds.

When it comes to vehicles and bots, whether to choose wheels or tracks is a serious question our own Lewin Day has explained thoroughly. And for those of you who choose tracks, this design is great for small devices but don’t forget it’s always possible to go bigger when it comes to 3D-printed tanks.

Continue reading “One-Piece Tank Chassis Pushes Print-in-Place To New Heights”

Hand reaching for a 3d-printed hinge

One-piece Geared Hinge Can Take The Weight

3D printers have come a long way from cranking out things like bottle openers and coat pegs, and [E. Soderberg]’s Print in Place Geared Hinge is a pretty nifty demonstration of that. This hinge is designed as a print-in-place part, meaning it is 3D printed as a single piece, requiring no assembly. Not only that, but the herringbone gears constrain the sturdy device in a way that helps it support heavy loads.

Of course, hinges — even strong ones — are not particularly hard to find items. They’re available in a mind-boggling array of shapes and sizes. But what’s interesting about this design is that it shows what’s easily within the reach of just about any hobbyist nowadays. Not that long ago, designing and creating an object like this would not have been accessible to most home enthusiasts. Making it without a modern 3D printer would certainly have been a challenge in its own right.

It doesn’t always matter that a comparable (or superior) off-the-shelf part is available; an adequate part that can be created in one’s own workshop has a value all its own. Plus, it’s fun to design and make things, sometimes for their own sake. After all, things like 3D-printed custom switch assemblies would not exist if everyone were satisfied with the ability to just order some Cherry MX switches and call it a day.

Never Lose A Piece With 3D Printed Sliding Puzzles

Have you ever been about to finish a puzzle, when suddenly you realize there are more holes left than you have pieces? With [Nikolaos’s] 3D printed sliding puzzles, this will be a problem of the past!

An image showing the sliding dovetails of the puzzle
The dovetails, integrated into each piece, keep the puzzle together but still allows pieces to move.

The secret of the puzzle is in the tongue and groove system that captures the pieces while allowing them to slide past each other and along the puzzle’s bezel. The tongues are along the top and right sides of the pieces shown here, with the grooves along the left and bottom. There is only one empty spot on the board, so the player must be methodical in how they move pieces to their final destinations. See this in action in the video after the break.

[Nikolaos] designed the puzzle in Fusion 360, and used this as an opportunity to practice with parameters. He designed the model in such a way that any size puzzle could be generated by changing just 2 variables. Once the puzzle is the proper size, the image is added by importing and extruding an SVG.

Another cool aspect of these puzzles is that they are print-in-place, meaning that when the part is removed from the 3D printer, it is ready to use and fully assembled. No need to remove support material or bolt and glue together multiple components. Print-in-place is useful for more than just puzzles, you could also use this technique to 3D print wire connectors!

Continue reading “Never Lose A Piece With 3D Printed Sliding Puzzles”