3D printers may be old news to most of us, but that’s not stopping creative individuals from finding new ways to improve on the technology. Your average consumer budget 3D printer uses an extrusion technology, whereby plastic is melted and extruded onto a platform. The printer draws a single two-dimensional image of the print and then moves up layer by layer. It’s an effective and inexpensive method for turning a computer design into a physical object. Unfortunately, it’s also very slow.
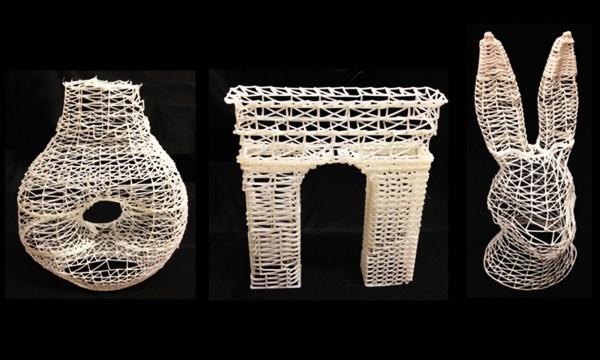
That’s why Hasso Plattner Institute and Cornell University teamed up to develop WirePrint. WirePrint can slice your three-dimensional model into a wire frame version that is capable of being printed on an extrusion printer. You won’t end up with a strong final product, but WirePrint will help you get a feel for the overall size and shape of your print. The best part is it will do it in a fraction of the time it would take to print the actual object.
This is a similar idea to reducing the amount of fill that your print has, only WirePrint takes it a step further. The software tells your printer to extrude plastic in vertical lines, then pauses for just enough time for it to cool and harden in that vertical position. The result is much cleaner than if this same wire frame model were printed layer by layer. It also requires less overall movement of the print head and is therefore faster.
The best part about this project is that it’s a software hack. This means that it can likely be used on any 3D printers that use extrusion technology. Check out a video of the process below to see how it works. Continue reading “WirePrint Is A Physical ‘Print Preview’ For 3D Printers”