[Hugh] has been going back through episodes of the Hackaday podcast, and Elliot mentioned in episode 67 that it can often be inspiring to go back through the archives of Hackaday to find ideas for new projects. Well, he did just that and came across a single-pixel camera made using an infrared photodiode. He decided to try and hack together his own single-pixel camera, but this time on the cheap and using an ever simpler component – a photoresistor!
His description of the project tickled me – “I’ve used an ESP32, MicroPython, two servos, a peanut butter jar lid, a toilet paper roll, a paper towel roll, magnets and scrap wood for this version.” That’s certainly a much simpler bill of materials than the original (which was written up by Hackaday way back in 2015), which used a nice metal frame to hold everything together. However, there’s absolutely nothing wrong with improvising with things you happen to have to hand.
Microcontroller dev boards are wonderfully useful items, in testament to which most of us maintain an ample collection of the things. But dragging one out to do a simple job can be a pain, what with making sure you have the whole toolchain set up to support the device, not to mention the inevitable need to solder or desolder header pins. Wouldn’t it be nice if there was a simple plug-and-play way to add a few bits of GPIO to your desktop or laptop machine?
[Nick Bild] thinks so, and came up with the USBgpio. The hardware in the dongle is pretty much what you’d expect — an Arduino Nano 33 IoT. Yes, you could just bust out a Nano and do this yourself, but [Nick] has done all the heavy lifting already. Eleven of the Nano’s IO pins plus 3.3V and ground are broken out to header pins that stick out of the 3D-printed enclosure, and the dongle is powered over the USB cable. [Nick] also built a Python library for the USBgpio, making it easy to whip up a quick program. You just import the library, define the serial port and baud rate, and the library takes care of the rest. The video below shows a quick blinkenlight test app.
Earth-shattering stuff? Perhaps not; [Nick] admits as much by noting the performance doesn’t really dazzle. But that’s hardly the point of the project, and if you need a couple of pins of IO on the desktop for a quick tactical project or some early-stage prototyping, USBgpio could be your friend. Continue reading “USB Dongle Brings Python-Controlled GPIO To The Desktop”→
MicroPython is a wonderful Python interpreter that runs on many higher-end microcontrollers, from ESP8266 to STM32 to the RP2040. MicroPython lets you build devices quickly, and its latest release, 1.23, brings a number of improvements you should be aware of.
The first one is custom USB device support, and it’s a big one. Do you want to build HID devices, or play with MIDI, or do multiple serial streams with help of PIO? Now MicroPython lets you easily create USB devices on a variety of levels, from friendly wrappers for creating HID or MIDI devices, to low-level hooks to let you define your own USB descriptors, with user-friendly libraries to help all the way through. Currently, SAMD and RP2040 ports are supported in this part of code, but you can expect more in the future.
Hooray to 10 years of MicroPython!
There’s more – support for OpenAMP, an inter-core communication protocol, has received a ton of improvements for systems where MicroPython reigns supreme on some of the CPU cores but also communicates with different systems on other cores. A number of improvements have made their way through the codebase, highlighting things we didn’t know MicroPython could do – for instance, did you know that there’s a WebAssembly port in the interpreter, letting you run MicroPython in your browser?
Well, it’s got a significant overhaul in this release, so there’s no better time to check it out than now! Library structure has been refactored to improve CPython compatibility, the RP2040 port receives a 10% performance boost thanks to core improvements, and touches upon areas like PIO and SPI interfaces.
We applaud all contributors involved on this release. MicroPython is now a decade old as of May 3rd, and it keeps trucking on, having firmly earned its place in the hacker ecosystem. If you’ve been playing with MicroPython, remember that there are multipleIDEs, graphicslibraries, and you can bring your C code with you!
There’s the old joke about 10 kinds of programmers, but the truth is when it comes to programming, there are often people who make tools and people who use tools. The Arduino system is a good example of this. Most people use it like a C compiler. However, it really uses C++, and if you want to provide “things” to the tool users, you need to create objects. For example, when you put Serial in a program, you use an object someone else wrote. Python — and things like Micropython — have the same kind of division. Python started as a scripting language, but it has added object features, allowing a rich set of tools for scripters to use. [Damilola Oladele] shows the ins and outs of object-oriented Python in a recent post.
Like other languages, Python allows you to organize functions and data into classes and then create instances that belong to that class. Class hierarchies are handy for reusing code, customizing behavior, and — through polymorphism — building device driver-like architectures.
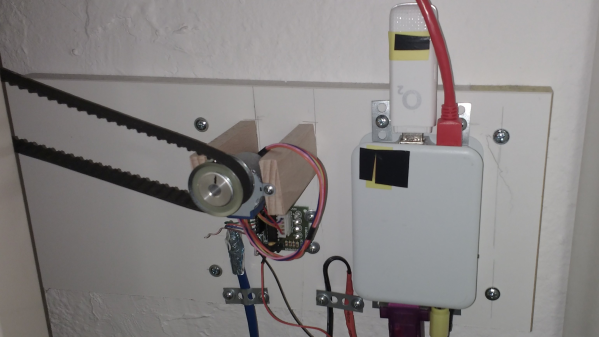
Hackaday.io user [mabe42] works during the week away from their home city and rents a small apartment locally to make this life practical. However, the heating system, a night-storage system, is not so practical. They needed a way to remotely control the unit so that the place was habitable after a long winter commute; lacking internet connectivity, they devised a sensible solution to create an SMS-controlled remote heating controller.
The controller runs atop an old Raspberry Pi B inside a 3D-printed case. Seeing such an old board given a real job to do is nice. Connectivity is via a USB UMTS stick which handles the SMS over the cellular network. The controller knob for the heater thermostat (not shown) is attached via a toothed belt to a pully and a 28BYJ-48 5V geared stepper motor. Temperature measurement is via the ubiquitous DS1820 module, which hooks straight up to the GPIO on the Pi and works out of the box with many one-wire drivers.
The software is built on top of Gammu, which handles the interface to the UMTS device. Daily and historical temperature ranges are sent via SMS so [mabe42] can decide how to configure the heating before their arrival. The rest of the software stack is in Python, as per this (German-language) GitHub project.
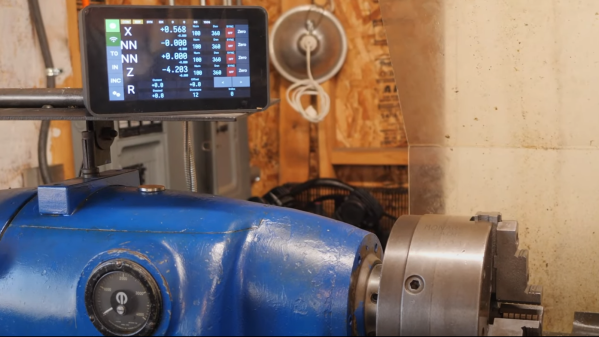
When using a manual machine tool such as a lathe or milling machine, there can be a lot of pressure to read the position and feed the axes at the correct rate. That’s why modern machines typically have some form of digital read-out (DRO). [Stefano Bertelli] has created a simple Raspberry Pi based DRO with an additional twist, that of a linked motor drive output.
Realtime encoder position reading and motor control are best done with a dedicated microcontroller, ideally with a proper RTOS.
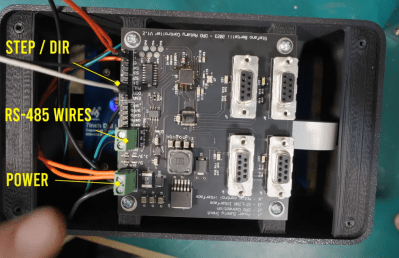
The axes that need to be monitored should be mechanically attached to a position sensor like a linear encoder or a rotary type. Using a linear sensor with a linear axis instead of a rotary encoder on the downstream dial is better. For the readout unit, [Stefano] used a WaveShare 7-inch touchscreen module with a Raspberry Pi 3 for the UI of the readout unit. The Pi has a custom-designed HAT, that performs power conditioning and provides a robust RS485 interface. Connected via that RS485 link is another custom PCB based on an STM32F411 with a few supporting power supplies and interfacing components. The job of this board is to interface to the position encoders, reading positioning pulses using interrupts. There is an additional stepper motor drive courtesy of a ULN2003 Darlington driver to allow the control of a single motorised axis. An additional motor driver module is required, which should be no surprise since driving a milling machine axis will require a fairly beefy motor. This GitHub repo contains the FreeRTOS-based firmware for this board. This motor drive has the ability to be connected to a measuring axis in a programmable way, enabling one axis to be adjusted to follow or jump in controlled steps with another. This feature can significantly simplify certain types of machining operations, as [Stefano] elaborates in the video.
Lastly, the Raspberry Pi runs a simple Python application with Kivy for the GUI. As [Stefano] explains in the video below, this makes debugging and modification quite simple.
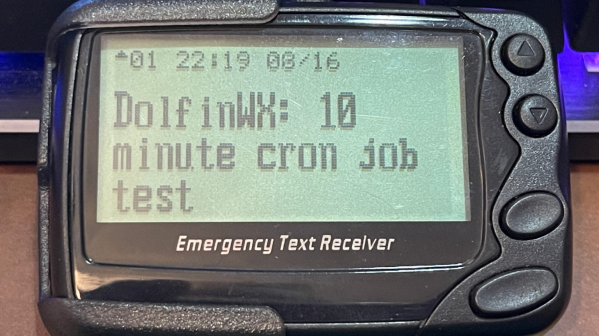
Pagers were a big deal for a while there, even if they never quite made it into the pantheon of excellent sitcom plot devices like answering machines did. Anyway, [Finnley Dolfin] had some pagers and gave them a refresh for the modern era, using them to receive message alerts from Mastodon.
The project is laced together with a bunch of Python code. It uses the Mastodon library for interacting with the social media website. When it detects an incoming direct message, it hooks into DAPNET – the Decentralized Amateur Paging Network. Via this network, a message is sent out over the airwaves to [Finnley’s] pager, serving as a notification that someone’s reached out to chat on Mastodon.
It’s neat that the amateur radio world is keeping pagers alive, using distributed base stations to share messages. Unfortunately, given the existence of smartphones, we don’t quite see pagers catching on again any time soon. And yet, [Finnley’s] setup has a certain level of old-school cool that no modern phone could match.