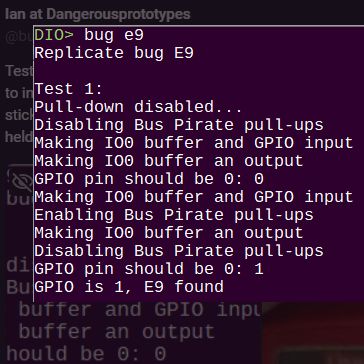
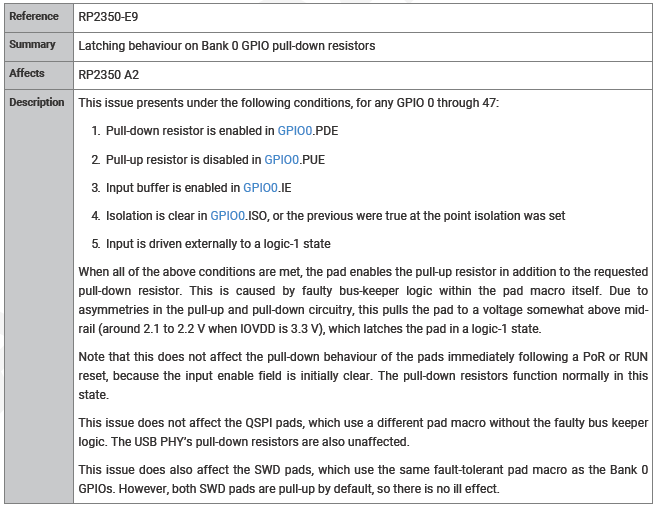
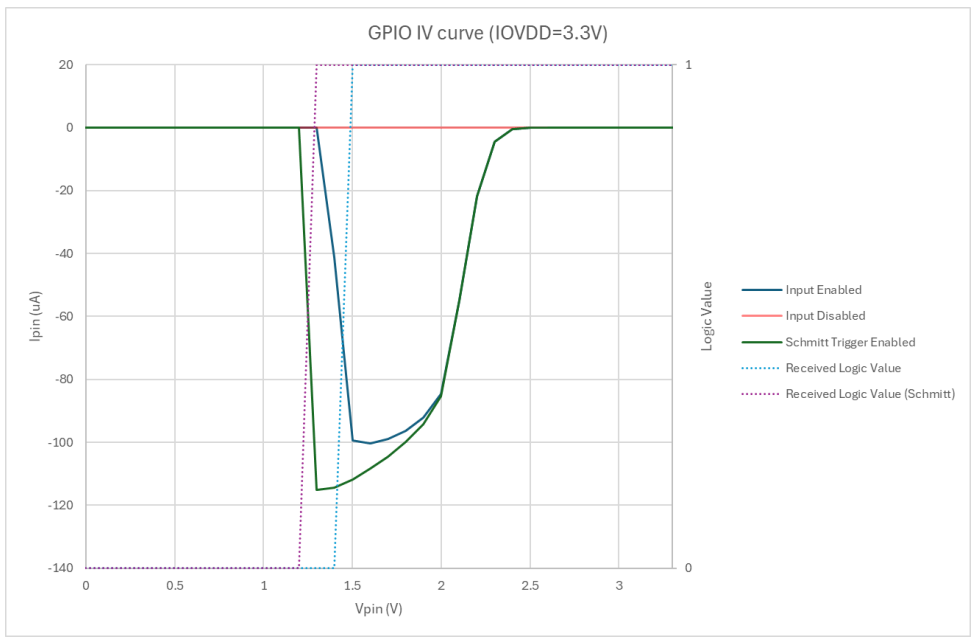
Parachute Drops Are Still A Viable Solution For Data Recovery From High Altitude Missions

Once upon a time, when the earliest spy satellites were developed, there wasn’t an easy way to send high-quality image data over the air. The satellites would capture images on film and dump out cartridges back to earth with parachutes that would be recovered by military planes.

It all sounds so archaic, so Rube Goldberg, so 1957. And yet, it’s still a viable method for recovering big globs of data from high altitude missions today. Really, you ask? Oh, yes indeed—why, NASA’s gotten back into the habit just recently!

Continue reading “Parachute Drops Are Still A Viable Solution For Data Recovery From High Altitude Missions”

When Is A Typewriter A Printer? When It Has A Parallel Port

If you want to talk to a typewriter using something other than your fingers on the keys, you could do a lot worse than to pick up a specimen featuring a Centronics parallel port. That’s what happened to [mlupo], who came across an old Swintec 1146 CMP and decided to hack it into an art installation.

At the push of a giant, clicky button, the typewriter now spits out family stories. This is all thanks to an Adafruit KB2040 keyboard driver being used in a new, exciting way — as a printer driver.

More specifically, the CircuitPython program running on the KB2040 takes in a text file and then sends the data one character at a time until a newline is reached. At that point, the typewriter sends a busy signal and the characters are typed.

As soon as the typewriter is no longer occupied, the data stream picks back up until the next newline or until the file is completely typed out.

Once [mlupo] figured out enough of the parallel port protocol, they were able to build a custom breakout board with the KB2040, a female parallel port, and a row of LEDs for debugging that [mlupo] kept because they look cool.

The KB2040 sets the values high on a series of the parallel port’s data pins, along with the port’s STROBE pin, which pulls low when data is ready. During each STROBE cycle, the high and low pins are read by the Swintec as a binary character.

Of course, you can always use the power of Pi to build your own modern typewriter.

Thanks to [foamyguy] for the tip!

DIY Tachistoscope Feeds Your Hunger For Popcorn And Propaganda

You’ve probably heard of subliminal advertising — the idea is that behaviors can be elicited by flashing extremely brief messages on a movie or TV screen. “BUY POPCORN NOW” is the canonical example, with movies containing such subconscious messaging supposedly experiencing dramatic increases in popcorn sales.

Did it work? Maybe, maybe not, but the idea is intriguing enough to at least explore using this subliminal tachistoscope. [Roni Bandini] seems to have taken this project on as a sort of cautionary tale about brainwashing techniques, not only in motion pictures and TV but in printed media too; he goes pretty hard on the Peronistas’ use of not-so-subliminal messages to mold young Argentinian minds back in the 1940s and 50s.

The tachistoscope [Roni] presents is a little more sophisticated than those ham-fisted propaganda attempts. The Raspberry Pi-powered device downloads a video from YouTube and automatically replaces random frames with a propaganda message inspired by those used by the Peronistas, with the modified video piped to a composite video output for display on a TV.

A digital counter on the tachistoscope keeps track of the total time viewers have been propagandized. For extra fun, the machine has a switch to enable ChatGPT-created political messages to be inserted into the stream; we shudder to think what those might look like. Watch the video below for a sample of the brainwashing, but don’t blame us if you fall in love with [Evita].

We understand that this is more of a statement on the power of propaganda than an actual tool for mind control, but if [Roni] is serious about his brainwashing, some small mods might make it more effective. Thanks to the full frame of text on a black background, the subliminal messages aren’t very subliminal; they might be more subtle if the text was overlaid on the target frame rather than replaced completely. Seems like that should be possible with ffmpeg or something similar.

Continue reading “DIY Tachistoscope Feeds Your Hunger For Popcorn And Propaganda”

Raspberry Pi Changes HATs

Following on the heels of their Raspberry Pi 5 launch and some specifications for their RP1 all-in-one peripheral chip, the Raspberry Pi folks have now released an update to the HAT peripheral hardware specification reflecting the new model. Called the HAT+, it represents a major step forward with some significant changes.

Most visible will be changes to the mechanical specification, for while the original HAT specification was very rigid this new version is much looser. A HAT+ must only mate with the 40-pin connector, including the ID pins, and line up with only a single mounting hole compared to the four on the original. Electrically, a HAT+ must recognise the standby power state in which the 3.3-volt line is powered down while the 5-volt line remains active, while software-wise, there are changes to the content of the ID EEPROM including the ability to inform about stackable smaller HATs.

Continue reading “Raspberry Pi Changes HATs”

New Part Day: Flush-mount Touchscreen For Retro PC Build

I recently had the opportunity to purchase an early version of a new display, and it happened to be just the thing I needed to make a project work. That display is the Elecrow 11.6″ CrowVision touchscreen slated for release in 2024. Preorders are being accepted on Crowd Supply.

I had an idea for a retro-inspired PC build that was just waiting for a screen like this. I’ll talk about the display and what’s good about it, then showcase the build for which it was the missing piece. If you’ve got a project waiting for something similar, maybe this part will provide what you need or at least turn on some new ideas.

What Is It?

The CrowVision 11.6″ 1366 x 768 touchscreen has an HDMI input, USB output for touch data, and accepts 12 V DC. It’s made to interface easily with a Raspberry Pi or other SBC (single-board computer).

Personally I consider a display like this to be the minimum comfortable size for using desktop type applications in a windowed environment. Most displays in this space are smaller. But aside from that, what helps make it useful for embedding into a custom enclosure is the physical layout and design.

Since I was looking for the largest display that could be flush-mounted in an enclosure without a lot of extra space around the display’s sides, it was just what I needed. The integrated touchscreen is a nice bonus.

Continue reading “New Part Day: Flush-mount Touchscreen For Retro PC Build”

Pico Makes A So-So Keyboard Neat-O

When someone gives you a crappy little toy keyboard, what can you do? Sadly plunk on the thing one note at a time? Well yes, but that’s not going to get you on Hackaday. Do what [Turi] did and give that thing a complete overhaul.

[Turi] threw away the original controller board, keeping only the keys, buttons, case, speaker, and a little bit of the original powder yellow enclosure. The Picophonica’s new brain is, you guessed it, a Raspberry Pi Pico. This enables [Turi] to use [Ryo Ishigaki]’s pico_synth_ex synthesizer and introduce MIDI out via USB-C.

The new engine does things that little keyboard could never have dreamed of originally, especially considering it wasn’t even polyphonic. Those fourteen white buttons now control things like sustain, cutoff, LFO rate, decay, and so on. Now it sounds great!

Be sure to check out the brief build video after the break. Excluding drums, the soundtrack was made entirely on the Picophonica.

Of course, Picos aren’t just good for musical keyboards. Use one to convert an old proprietary keyboard to PS/2, or create your own.

Continue reading “Pico Makes A So-So Keyboard Neat-O”

The Raspberry Pi 5 Can Use External Graphics Cards Now

The Raspberry Pi line is full of capable compact computers, but they’ve never been the strongest in the bunch when it comes to graphical output. Nor have they been particularly expandable in that regard. However, that’s all beginning to change, with [Jeff Geerling] reporting success getting external GPUs to work on the Raspberry Pi 5.

Unlike previous Raspberry Pis, the Raspberry Pi 5 has a less quirky implementation for its PCI Express bus. Previous editions have thrown up issues when trying to work with GPUs, but [Jeff] has found much more success this time around. He’s gotten an AMD RX 460 to work with the setup, and has got it running quite a bit of the glmark2 test regime. He’s working on a variety of other AMD cards too, but suspects NVidia parts could be harder due to some initialization issues that are proving difficult to quash.

It still takes some funky adapters and a lot of work, but finally GPUs are starting to work with the platform. Keep up with his list of card trials on the PiPCI website. We’ve seen [Jeff]’s work with earlier iterations of the Raspberry Pi before, too. Video after the break.

Continue reading “The Raspberry Pi 5 Can Use External Graphics Cards Now”