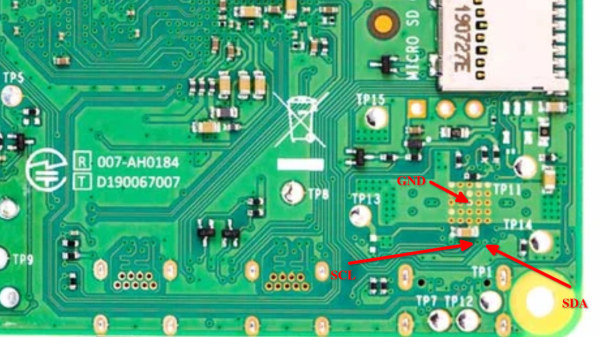
Since the Raspberry Pi 3B+ release, the Pi boards we all know and love gained one more weakpoint – the PMIC chip, responsible for generating all the power rails a Pi needs. Specifically, the new PMIC was way more vulnerable to shorting 5V and 3.3V power rails together – something that’s trivial to do on a Raspberry Pi, and would leave you with a bricked board. Just replacing the PMIC chip, the MxL7704, wouldn’t help since the Raspberry Pi version of this chip is customized – but now, on Raspberry Pi forums, [Nefarious19] has reportedly managed to replace it and revive their Pi.
First off, you get a replacement PMIC and reflow it – and that’s where, to our knowledge, people have stopped so far. The next step proposed by [Nefarious19] is writing proper values into the I2C registers of the PMIC. For that, you’d want a currently-alive Pi – useful as both I2C controller for writing the values in, and as a source of known-good values. That said, if you go with the values that have been posted online, just having something like a Pi Pico for the I2C part ought to be enough.
[Nefarious19] reports a revived Pi, and this is way more hopeful than the “PMIC failures are unfixable” conclusion we’ve reached before. The instructions are not quite clear – someone else in the thread reports an unsuccessful attempt doing the same, and it might be that there’s a crucial step missing in making the values persist. However, such an advancement is notable, and we trust our readers to take the lead.
A week ago, [Mangy_Dog] on Hackaday Discord brought up fixing Raspberry Pi boards – given that the Raspberry Pi shortages are still an issue, digging up your broken Pi and repairing it starts making sense budget-wise. It’s no longer the ages where you could buy broken Pi boards by the hundred, and we imagine our readers have been getting creative. What are your experiences with fixing Raspberry Pi boards?


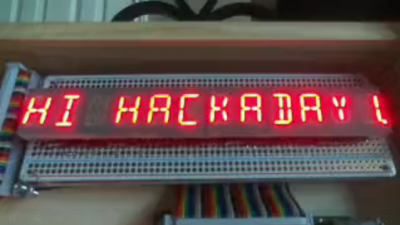 As [Steve] tells the story, this is one of those “boredom-buster” projects that start with a look through the junk bin to see what presents itself. In his case, some fourteen-segment common-cathode LEDs presented themselves, and the result was a simple but fun build. [Steve] used some clever methods to get the display stuffed onto two protoboards, including mounting the current-limiting resistors cordwood-style between the boards. A Raspberry Pi drives the display through a very neatly routed ribbon cable, and the whole thing lives in a tidy wooden box.