In the past few years we’ve seen the rise of low-power mesh networking devices for everything from IoT devices, weather stations, and even off-grid communications networks. These radio modules are largely exempt from licensing requirements due to their low power and typically only operate within a very small area. But by borrowing some ideas from the licensed side of amateur radio, [Peter Fairlie] built this Meshtastic repeater which can greatly extend the range of his low-power system.
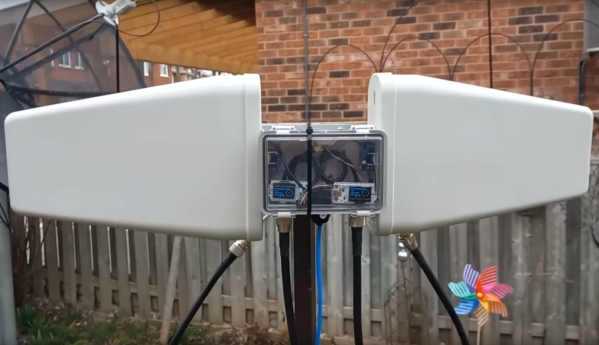
[Peter] is calling this a “long lines relay” after old AT&T microwave technology, but it is essentially two Heltec modules set up to operate as Meshtastic nodes, where one can operate as a receiver while the other re-transmits the received signal. Each is connected to a log-periodic antenna to greatly increase the range of the repeater along the direction of the antenna. These antennas are highly directional, but they allow [Peter] to connect to Meshtastic networks in the semi-distant city of Toronto which he otherwise wouldn’t be able to hear.
With the two modules connected to the antennas and enclosed in a weatherproof box, the system was mounted on a radio tower allowing a greatly increased range for these low-power devices. If you’re familiar with LoRa but not Meshtastic, it’s become somewhat popular lately for being a straightforward tool for setting up low-power networks for various tasks. [Jonathan Bennett] explored it in much more detail as an emergency communications mode after a tornado hit his home town.