Epoxy lenses

The Ins And Outs Of Casting Lenses From Epoxy

If you need a lens for a project, chances are pretty good that you pick up a catalog or look up an optics vendor online and just order something. Practical, no doubt, but pretty unsporting, especially when it’s possible to cast custom lenses at home using silicone molds and epoxy resins.

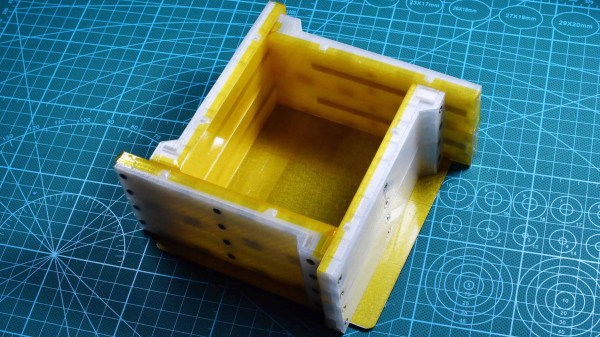
Possible, but not exactly easy, as [Zachary Tong] relates. His journey into custom DIY optics began while looking for ways to make copies of existing mirrors using carbon fiber and resin, using the technique of replication molding. While playing with that, he realized that an inexpensive glass or plastic lens could stand in for the precision-machined metal mandrel which is usually used in this technique. Pretty soon he was using silicone rubber to make two-piece, high-quality molds of lenses, good enough to try a few casting shots with epoxy resin. [Zach] ran into a few problems along the way, like proper resin selection, temperature control, mold release agent compatibility, and even dealing with shrinkage in both the mold material and the resin. But he’s had some pretty good results, which he shares in the video below.

[Zach] is clear that this isn’t really a tutorial, but rather a summary of the highs and lows he experienced while he was working on these casting methods. It’s not his first time casting lenses, of course, and we doubt it’ll be his last — something tells us he won’t be able to resist trying this all-liquid lens casting method in his lab.

Continue reading “The Ins And Outs Of Casting Lenses From Epoxy”

3D Printed Marble Music Machine Looking Good Already

Inspired by the enormous marble music machines from the staggeringly talented [Wintergatan] and the marble run builds by [Daniel de Bruin], [Ivan Miranda] has been busy again building a largely 3D printed contraption to test his ideas around building his own marble music machine from scratch. (Video, embedded below.)

Leveraging his recent experiences with resin printing and his own giant 3D printer, he had no difficulty in producing everything he needed from his workshop, even if the design work apparently took ages.

The build shows how early in development this project is, as there are clearly quite a few issues to be dealt with, but progress looks encouraging so far. To be clear, plans are to ‘go big’ and this little eight-channel testbed is just to explore this issues around ball guiding, transport and ball release onto the first audio test device, a Korg Nano Pad 2.

Some significant teething problems were identified, such as when [Ivan] designed the ball lifter, he intended the balls to load from the rear, but then needed to switch it to load from the front. No big deal, simply reverse the motor direction to load balls on the opposite side of the mechanism. Sadly, that also meant the directly coupled note drum was now also rotating the wrong way to release the balls. Oops. A quick hack later and [Ivan] was back in business. Various parts needed shimming up with plates, but with 3D printers on the bench, knocking those out took little time or effort. This just shows how darn useful 3D printers can be, allowing you to iterate in a short time and feed your hacks back into the final version.

[Ivan] is clearly going to have a lot of ‘fun’ with this one, as [Wintergatan] will surely testify, these big musical marble machine builds are quite some undertaking. We shall definitely be tuning in later on to see where this one goes!

While we’re on the subject of the [Wintergatan] marble machines, here’s a mini homage to the latest Marble Machine X, and if you’re in the need for a 3D printed marble clock, then try this one for starters.

Continue reading “3D Printed Marble Music Machine Looking Good Already”

Faster IPA Recycling For Your Resin Print Workflow

If you’ve printed with photopolymer resins, you know that you need alcohol. Lots of alcohol. It makes sense that people would like to reuse the alcohol both to be environmentally responsible and to save a little money. The problem is that the alcohol eventually becomes so dirty that you have to do something. Given time, the polymer residue will settle to the bottom and you can easily pour off most of the clean liquid. You can also use filters with some success. But [Makers Mashup] had a different idea. Borrowing inspiration from water treatment plants, he found a chemical that will hasten the settling process. You can see a video of his process below.

The experimentation started with fish tank clarifier, which is — apparently — mostly alum. Alum’s been used to treat wastewater for a long time. Even the ancient Romans used it for that purpose in the first century. Alum causes coagulation and flocculation so that particles in the water wind up sinking to the bottom.

Continue reading “Faster IPA Recycling For Your Resin Print Workflow”

PCB fluorescent 7-segment display

Unique Seven-Segment Display Relies On FR-4 Fluorescence

It’s interesting what you see when you train a black light on everyday objects. We strongly suggest not doing this in a hotel room, but if you shine UV light on, say, a printed circuit board, you might see what [Sam Ettinger] did, which led him to build these cool low-profile seven-segment fluorescent PCB displays.

UV light causing FR4 to fluoresceAs it turns out, at least some FR-4 PCBs fluoresce under UV light, giving off a ghostly blue-green glow. Seeing the possibilities, [Sam] designed a PCB with cutouts in the copper and solder mask in the shape of a traditional seven-segment display. The backside of the PCB has pads for UV LEDs and current-limiting resistors, which shine through the board and induce the segments to glow. Through-slots between the segments keep light from one segment from bleeding over into the next; while [Sam] left the slots unfilled, they could easily be filled with solder. The fluorescent property of FR-4, and therefore the brightness and tint of the segments, seems to vary by board thickness and PCB manufacturer, but it looks like most PCBs will show pretty good results.

We’d say the obvious first improvement might be to cover the back of the display with black epoxy, to keep stray light down, and to improve contrast. But they look pretty great just as they are. We can also see how displays with other shapes, like icons and simple symbols. Or maybe even alphanumeric characters — say, haven’t we seen something like that before?

Resin printing

Resin Printing Hack Chat

Join us on Wednesday, October 13 at noon Pacific for the Resin Printing Hack Chat with Andrew Sink!

At its heart, 3D printing is such a simple idea that it’s a wonder nobody thought of it sooner. Granted, fused deposition modeling does go back to the 80s, and the relatively recent explosion in cheap, mass-market FDM printers has more to do with cheap components than anything else. But really, at the end of the day, commodity 3D printers are really not much more than glorified hot-glue guns, and while they’re still a foundational technology of the maker movement, they’ve gotten a bit dull.

So it’s natural that we in this community would look for other ways to push the 3D printing envelope, and stereolithography has become the new hotness. And with good reason — messy though it may be, the ability to gradually pull a model from a tank of goo by selective photopolymerization looks magical, and the fine level of detail resin printers are capable of is just as enchanting. So too are the prices of resin printers, which are quickly becoming competitive with commodity FDM printers.

If there’s a resin printer in your future, then you’ll want to swing by the Hack Chat when Andrew Sink visits us. Andrew has been doing a lot of 3D printing stuff in general, and resin printing in particular, over on his YouTube channel lately. We’ve featured a couple of his tricks and hacks for getting the most from a resin printer, and he’ll be sharing some of what he has learned lately. Join us as we discuss the ins and outs of resin printing, what’s involved in taking the dive, and the pros and cons of SLA versus FDM.

join-hack-chatOur Hack Chats are live community events in the Hackaday.io Hack Chat group messaging. This week we’ll be sitting down on Wednesday, October 13 at 12:00 PM Pacific time. If time zones have you tied up, we have a handy time zone converter.

Lots of parts printed at once with a resin printer

Making The Most Of Your Resin Printer Investment

To the extent that we think of 3D printers as production machines, we tend to imagine huge banks of FDM machines slowly but surely cranking out parts. These printer farms are a sensible way to turn a slow process into a high-volume operation, but it turns out there’s a way to do the same thing with only one printer — as long as you think small.

This one comes to us by way of [Andrew Sink], who recently showed us a neat trick for adding a dash of color to resin printed parts. As with that tip, this one centers around his Elegoo resin printer, which is capable of intricately detailed prints but like any additive process, takes quite a bit of time to finish a print. Luckily, though, the printer uses the MSLA, or masked stereolithography, process, which exposes the entire resin tank to ultraviolet light in one exposure. That means that, unlike FDM printers, it takes no more time to print a dozen models than it does to print one. The upshot of this is that however many models can fit on the MSLA print platform can be printed in the same amount of time it takes to print the part with the most layers. In [Andrew]’s case, 22 identical figurine models were printed in the same three hours it took to print just one copy.

It seems obvious, but sometimes the simplest tips are the best. And the next step is obvious, especially as MSLA printer prices fall: a resin printer farm, with each printer working on dozens of small parts at a time. Such a setup might rival injection molding in terms of throughput, and would likely be far cheaper as far as tooling goes. Continue reading “Making The Most Of Your Resin Printer Investment”

Modular Box Design Eases Silicone Mold-Making

Resin casting is a fantastic way to produce highly detailed parts in a wide variety of colors and properties, and while the process isn’t complicated, it does require a certain amount of care and setup. Most molds are made by putting a part into a custom-made disposable box and pouring silicone over it, but [Foaly] was finding the process of making and re-making those boxes a bit less optimized than it could be. That led to this design for a re-usable, modular, adjustable mold box that makes the workflow for small parts considerably more efficient.

The walls of the adjustable box are four identical 3D-printed parts with captive magnets, and the base of the box is a piece of laser-cut steel sheet upon which the magnetic walls attach. The positioning and polarity of the magnets are such that the box can be assembled in a variety of sizes, and multiple walls can be stacked to make a taller mold. To aid cleanup and help prevent contamination that might interfere with curing, the inner surfaces of each piece are coated in Kapton tape.

The result is a modular box that can be used and re-used, and doesn’t slow down the process of creating and iterating on mold designs. The system as designed is intended for small parts, but [Foaly] feels there is (probably) no reason it can’t be scaled up to some degree. Interested? The design files are available from the project’s GitHub repository, and if you need to brush up a bit on how resin casting works, you can read all about it here.