Sunshine In A Bag

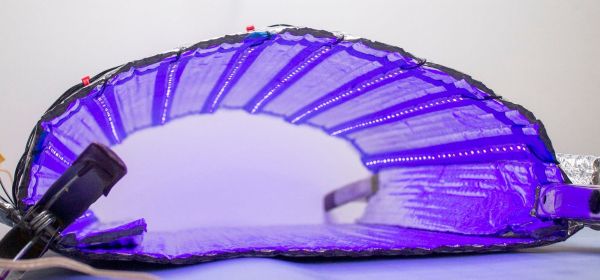
Ultraviolet (UV) curing lamps are crucial if you have a resin 3D printer or work with UV adhesives. Some folks line an old Amazon shipping box with foil and drop a spotlight somewhere inside. Other folks toss their work under the all-natural light source, Sol. Both options have portability and reliability problems, but [AudreyObscura] has it covered with a reflective mat lined with UV strip lights. This HackadayPrize2020 finalist exemplifies the ideal that good ideas are often simple, and this has a remarkably short bill of materials.

Foil bubble insulation is the medium because it provides structure and reflectivity, but it doesn’t cooperate with the LED strip’s adhesive. [AudreyObscura] demonstrates that masking tape as an interfacing layer makes everyone play nicely. A fine example of an experienced maker, their design covers bundling wires and insulating connections to keep everything tidy and isolated. With different arrangements, this can form a tunnel lit from above, a chimney lit from the walls, or you can drape it over some scaffolding.

If you need something a little less portable for your own shop you might consider a mirror-filled chamber. One nice touch to add is a turntable to help make sure the entire part is cured without any missing areas.

Continue reading “Sunshine In A Bag”

Friendly Fiberglassing: Can Hide Glue Replace Epoxy?

Hide glue has been around for thousands of years, and some of it is holding wood pieces three thousand years after application. It is made from animal protein, so vegetarians may want to stick to the petroleum-based adhesives. [Surjan Singh] wanted to see if its longevity made it a contender with modern epoxy by casting a couple of fiberglass car parts with the competing glues. In short, it doesn’t hold up in this situation, but it is not without merit.

Musical instrument makers and antique restorers still buy and use hide glue, but you would never expose it to heat or moisture. To its credit, hide glue doesn’t require a ventilator. All you need is boiling water and a popsicle stick, and you are in business. [Surjan] writes his findings like a narrative rather than steps, so his adventures are a delight to read. He found that a car part made with fiberglass and epoxy will withstand the weather better than the alternative because heat and humidity will soften hide glue. His Saab 96 isn’t the right application, but since it is nearly as strong as epoxy once set, you could make other fabric shapes, like a flannel nightstand or a lace coffee table, and you could shape them in the living room without toxifying yourself

No matter how you want to work with glues and substrates, Bil Herd has you covered, and here is an excellent tip for a cheap degassing setup.

Printing, Plating, And Baking Makes DIY Microlattices Possible

To be honest, we originally considered throwing [Zachary Tong]’s experiments with ultralight metallic microlattices into the “Fail of the Week” bucket. But after watching the video below for a second time, it’s just not fair to call this a fail, so maybe we’ll come up with a new category — “Qualified Success of the Week”, perhaps?

[Zachary]’s foray into the strange world of microlattices began when he happened upon a 2011 paper on the subject in Science. By using a special photocurable resin, the researchers were able to use light shining through a mask with fine holes to create a plastic lattice, which was then plated with nickel using the electroless process, similar to the first half of the electroless nickel immersion gold (ENIG) process used for PCBs. After removing the resin with a concentrated base solution, the resulting microlattice is strong, stiff, and incredibly light.

Lacking access to the advanced materials and methods originally used, [Zachary] did the best he could with what he had. An SLA printer with off-the-shelf resin was used to print the skeleton using the same algorithms used in the original paper. Those actually turned out pretty decent, but rather than electroless plating, he had to go with standard electroplating after a coat of graphite paint. The plated skeletons looked great — until he tried to dissolve the resin. When chemical approaches failed, into the oven went the plated prints. Sadly, it turns out that the polymers in the resin expand when heated, which blew the plating apart. A skeleton in PLA printed on an FDM printer fared little better; when heated to drive out the plastic, it became clear that the tortuous interior of the lattice didn’t plate very well.

From aerogels to graphene, we love these DIY explorations of new and exotic materials, so hats off to [Zachary] for giving it a try in the first place.

Continue reading “Printing, Plating, And Baking Makes DIY Microlattices Possible”

Denim Sunglasses Frames Use A Wicked Set Of Jigs

An obligatory “Future’s so bright I gotta wear… denim” joke is the only way to kick off this article. Sorry!

Now that that’s out of the way, how would you turn your own blue jeans into sunglasses? Well you wouldn’t, unless you’ve built an intricate jig for assembling sunglasses frames like [Mosevic] has done. Boiled down, this is like making parts out of carbon fiber, except you swap in denim for the carbon fiber. Several layers of blue jean material are layered in a mold and impregnated with resin. Once hardened, parts can be milled or laser cut from this stock and then assembled into the frames all of the hipsters are after.

For us its the assembly jig that’s so interesting to see. [Mosevic] shared it in an unlisted video of an update to the Kickstarter campaign which ran at the end of 2019. The jig is used to align machined parts into stack ups that include brass reinforcement and pins to align layers, as well as the joining for the three parts of the frame via the metal hinges. Most of the jig is made from machined plywood. The plates that hold the three parts of the frame, the “frame front” and the two “temples” in eyeglass parlance, are interchangeable so that the same jig can be used to assemble several variants of the frame design. The most notable non-plywood part of the jig are two metal clamps that hold the hinge into the frame front as the glue dries, holding a couple of tiny chunks of denim/resin block in place.

Here you can see the jig with all clamps fully closed. There is not an insignificant amount of time just getting the parts into this jig. But parts still need quite a bit of cleanup after this process to sand, shape, and polish all edges and surfaces of the frames. And of course you have to figure in the time it took to make the parts that went into the jig in the first place. The finished frames are gorgeous, but we have a lot more respect having seen what it takes to pull it off.

Now if you like your glasses like George Washington liked his false teeth, here’s how you can pull a set of shades out of your woodshop.

Continue reading “Denim Sunglasses Frames Use A Wicked Set Of Jigs”

Art of 3D printer in the middle of printing a Hackaday Jolly Wrencher logo

3D Printering: Sticky Resin Prints And How To Fix Them

After going through all the trouble of printing a part in resin, discovering it feels sticky or tacky to the touch is pretty unwelcome. Giving the model some extra ultraviolet (UV) curing seems like it should fix the problem, but it probably does not. So, what can be done?

The best thing to do with a sticky print is to immediately re-wash it in clean isopropyl alcohol (IPA) before the UV present in ambient light cures stray resin. If the part remains sticky after it is dry, more aggressive steps can be taken.

We’ll get into those more extreme procedures shortly, but first let’s understand a bit more about how resin works, then look at how that applies to preventing and removing tacky surfaces on finished prints. Continue reading “3D Printering: Sticky Resin Prints And How To Fix Them”

Printable, Castable Feeders Simplify Pick-and-Place Component Management

It goes without saying that we love to see all the clever ways people have come up with to populate their printed circuit boards, especially the automated solutions. The idea of manually picking and placing nearly-microscopic components is reason enough to add a pick and place to the shop, but that usually leaves the problem of feeding components to the imagination of the user. And this mass-production-ready passive component feeder is a great example of that kind of imagination.

Almost every design we’ve seen for homebrew PnP component feeders have one of two things in common: they’re 3D-printed, or they’re somewhat complex. Not that those are bad things, but they do raise issues. Printing enough feeders for even a moderately large project would take forever, and the more motors and sensors a feeder has, the greater the chance of a breakdown. [dining-philosopher] solved both these problems with a simple design using only two parts, which can be resin cast. A lever arm is depressed by a plunger that’s attached to the LitePlacer tool, offset just enough so that the suction cup is lined up with the component location on the tape. A pawl in the lower arm moves forward when the tool leaves after picking up the part, engaging with the tape sprocket holes and advancing to the next component.

[dining-philosopher] didn’t attack the cover film peeling problem in his version, choosing to peel it off manually and use a weight to keep it taut and expose the next component. But in a nice example of collaboration, [Jed Smith] added an automatic film peeler to the original design. It complicates things a bit, but the peeler is powered by the advancing tape, so it’s probably worth it.

Continue reading “Printable, Castable Feeders Simplify Pick-and-Place Component Management”

Art of 3D printer in the middle of printing a Hackaday Jolly Wrencher logo

3D Printering: Will A Resin Printer Retire Your Filament-based One?

Adding a resin printer to one’s workbench has never looked so attractive, nor been so affordable. Complex shapes with effortlessly great detail and surface finish? Yes, please! Well, photos make the results look effortless, anyway. Since filament-based printers using fused deposition modeling (FDM) get solid “could be better” ratings when it comes to surface finish and small detail resolution, will a trusty FDM printer end up retired if one buys a resin printer?

The short answer is this: for users who already use FDM, a resin-based stereolithography (SLA) printer is not likely to take over. What is more likely to happen is that the filament printer continues to do the same jobs it is good at, while the resin printer opens some wonderful new doors. This is partly because those great SLA prints will come at a cost that may not always justify the extra work.

Let’s go through what makes SLA good, what it needs in return, and how it does and doesn’t fit in with FDM.

Continue reading “3D Printering: Will A Resin Printer Retire Your Filament-based One?”