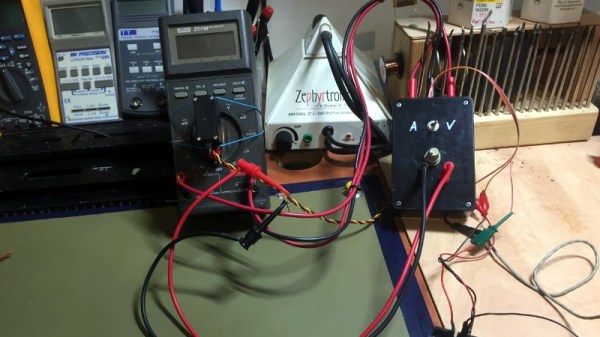
Be Still, My Animatronic Heart

Fair warning for the squeamish: some versions of [Will Cogley]’s animatronic heart are realistic enough that you might not want to watch the video below. That’d be a shame though, because he really put a lot of effort into the build, and the results have a lot to teach about mimicking the movements of living things.

As for why one would need an animatronic heart, we’re not sure. [Will] mentions no specific use case for it, although we can think of a few. With the Day of Compulsory Romance fast approaching, the fabric-wrapped version would make a great gift for the one who stole your heart, while the silicone-enrobed one could be used as a movie prop or an awesome prank. Whatever the reason, [Will]’s build is a case study in incremental development. He started with a design using a single continuous-rotation servo, which powered four 3D-printed paddles from a common crank. The four paddles somewhat mimicked the movements of the four chambers of the heart, but the effect wasn’t quite convincing. The next design used two servos and complex parallelogram linkages to expand each side of the heart in turn. It was closer, but still not quite right.

After carefully watching footage of a beating heart, [Will] decided that his mechanism needed to imitate the rapid systolic contraction and slow diastolic expansion characteristic of a real heart. To achieve this, his final design has three servos plus an Arduino for motion control. Slipped into a detailed silicone jacket, the look is very realistic. Check out the video below if you dare.

We’ve seen plenty of animatronic body parts before, from eyes to hands to entire faces. This might be the first time we’ve seen an animatronic version of an internal organ, though.

Continue reading “Be Still, My Animatronic Heart”

Active Suspension R/C Car Really Rocks

When you’re a kid, remote control cars are totally awesome. Even if you can’t go anywhere by yourself, it’s much easier to imagine a nice getaway from the daily grind of elementary school if you have some wheels. And yeah, R/C cars are still awesome once you’re an adult, but actual car-driving experience will probably make you yearn for more realism.

What could be more realistic and fun than an active suspension? Plenty of adults will never get the chance to hit the switches in real car, but after a year of hard work, [snoopybg] is ready to go front and back, side to side, and even drift in this super scale ’63 Oldsmobile Dynamic 88 wagon. We think you’ll agree that [snoopybg] didn’t miss a detail — this thing makes engine noises, and there are LEDs in the dual exhaust pipes to simulate flames.

An Arduino reads data from a triple-axis accelerometer in real time, and adjusts a servo on each wheel accordingly, also in real time, to mimic a real car throwing its weight around on a real suspension system. If that weren’t cool enough, most of the car is printed, including the tires. [snoopybg] started with a drift car chassis, but even that has been hacked and drilled out as needed.

There are a ton of nice pictures on [snoopybg]’s site if you want to see what’s under the hood. We don’t see the code anywhere, but [snoopybg] seems quite open to publishing more details if there is interest out there. Strap yourself in and hold on tight, because we’re gonna take this baby for a spin after the break.

If this is all seems a bit much for you, but you’ve got that R/C itch again, there’s a lot to be said for upgrading the electronics in a stock R/C car.

Continue reading “Active Suspension R/C Car Really Rocks”

Space-Saving Servo Tester Console Looks Space-Worthy

You know how it goes — sometimes you just have to stop in the middle of a project and build yourself a tool that vastly improves your workflow as soon as it’s completed. [Ikkalebob] aka [Will Cogley] on YouTube is working on some super secret project that requires a whole bunch of servos. And since all of them have to be tested and set, he built this adorable servo tester as a time-saving gift to himself.

This tester revolves around an Adafruit 16-channel servo driver and an Arduino Uno. The servos show up on the screen in groups of four, and can be tested four at a time with the pots. The buttons let [Ikkalebob] move up and down between the groups. The SainSmart LCD proved to be more difficult to set up than others, but [Ikkalebob] did you a solid and tweaked the library. It’s available along with his code and STLs.

Speaking of STLs, we really dig the mini NASA console look and the folding enclosure. Leveraging the print process to build hinges and other things is awesome, and so is getting away with using fewer fasteners. You can see a bit of how [Ikkalebob] designed it in the video after the break.

Depending on what you’re doing with servos, you might want a different kind of testing suite. Here’s one that’s geared toward RC pilots.

Continue reading “Space-Saving Servo Tester Console Looks Space-Worthy”

2D-Platform Seeks Balance With A Touch Screen

It’s the [Bruce Land]-iest season of all, when the Cornell professor submits the projects his microcontroller class students have been working on all semester. Imagination does not seem to be in short supply with these students, and we always look forward to these tips this time of year.

[Greg] and [Sam]’s touch-screen two-dimensional ball balancer is a good example of what [Land]’s students turn out. The resistive touch screen is supported by a 3D-printed gimballed platform and tilted in two axes by hobby servos. [Greg] and [Sam] chose to read the voltage outputs from the touch screen directly using the ADC on a PIC32, toggling between the two axes at 2 kHz. Two PID control loops were implemented to keep the ball as centered as possible on the platform, and the video below shows that there’s still some loop tuning to do. But given the positional inaccuracies of hobby servos and the compliance in the gimbal, we’re impressed that they were able to keep the system under control at all.

Of course we’ve seen ball-balancers before, but most of them have closed the loop using either cameras or microphones. Seeing direct sensing on the platform like this is a nice change of pace. Continue reading “2D-Platform Seeks Balance With A Touch Screen”

Cat Diner Now Under New Management

Most of these stories start with a cat standing on someone’s chest, begging for food at some obscene hour of the morning. But not this one. Chaz the cat is diabetic, and he needs to get his insulin with breakfast. The problem is that Chaz likes to eat overnight, which ruins his breakfast appetite and his chances at properly metabolizing the insulin. [Becky] tried putting the bowl away before bed, but let’s face it — it’s more fun to solve a problem once than to solve the same problem every night.

[Becky]’s solution was to design and print a bowl holder with a lid, and to cover the bowl when the cat diner is closed using a small servo and a NodeMCU. It looks good, and it gets the job done with few components. Chaz gets his insulin, [Becky] gets peace of mind, and everybody’s happy. This isn’t going to work for all cats, because security is pretty lax. But Chaz is a senior kitty and therefore disinterested in pawing at the lid to see what happens. Claw your way past the break to see [Becky]’s build/demo video featuring plenty of cat tax coverage.

We’ve seen a lot of cat feeding apparatus around here, but few that solve a specific problem like this one. If it’s overengineering and cat metrics you want, come and get it.

Continue reading “Cat Diner Now Under New Management”

Rescue An Expensive Servo With Some Reverse Engineering

[Andrew] had a servo damaged by someone connecting the power supply to the wrong pins (whoops) which fried the microcontroller and a logic level shifter. With a bit of reverse engineering, he successfully restored basic servo functionality by writing some new code. The new code implements only basic features, but that’s enough to save the device from the junk bin.

FAULHABER 2232DBHHO ring any bells? Google came up empty.

Why bother reverse engineering a servo? Well, if dollars are reasons then there are many for saving a HerkuleX DRS-0602 from the junk heap; they cost around 320 USD before shipping. Another reason to try is that the microcontroller turned out to be an AVR XMega, which gave [Andrew] confidence in writing some new code.

If you want to understand more about how these servos work, [Andrew] provides good photos of the insides and identifies the major components and their connections and functions. There are some mysteries (such as details of the motor and embedded encoder, which are FAULHABER 2232DBHHO) but [Andrew] figured out enough to write some basic code to allow the servo to work as a standard servo with a UART interface.

Sometimes curiosity drives reverse engineering and repair efforts, sometimes it’s cost, and sometimes it’s both. A $320 servo is certainly worth trying to save, and so are huge observatory telescopes with obsolete servo amps.

Steel Tubes And Ground Plates Form The Skeleton Of This DIY Vertical CNC Mill

If you’re going to do it yourself, you might as well outdo yourself. That seems to be the thinking behind this scratch-built CNC mill, and it’s only just getting started.

According to [Kris Temmerman], the build will cost about $10,000 by the time he’s done. So it’s not cheap, and a personal CNC from Tormach can be had for less, but that’s missing the point entirely. [Kris] built most of the structural elements for the vertical mill from cheap, readily available steel tubing, of the kind used for support columns in commercial buildings. Mounted to those are thick, precision-ground steel plates, which eat up a fair fraction of the budget. Those in turn hold 35 mm linear bearings and ball screws for the three axes, each powered by a beefy servo. The spindle is a BT30 with a power drawbar, belt-driven by an external motor that [Kris] doesn’t share the specs on, but judging from the way it flings chips during the test cut in the video below, we’d say it’s pretty powerful.

There’s still plenty to do, not least of which is stiffening the column; perhaps filling it with epoxy granite would do the trick? But it sure looks like [Kris] is building a winner here, and if he keeps the level of craftsmanship up going forward, he’ll have a top-quality machine on his hands.

Continue reading “Steel Tubes And Ground Plates Form The Skeleton Of This DIY Vertical CNC Mill”