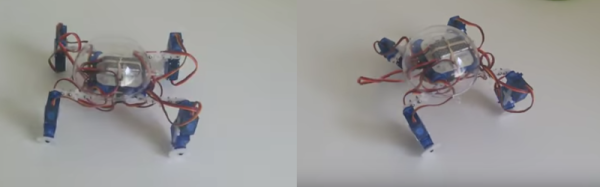
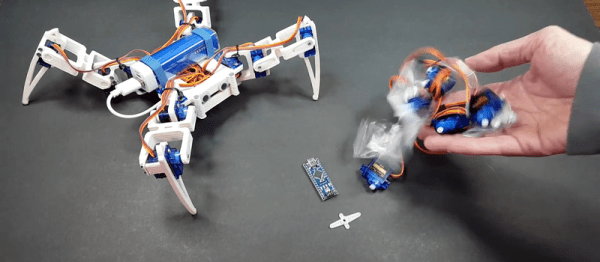
Hackaday Prize Entry: Experiments With Wheeled Legs

If you’ve been keeping tabs on recent developments in robotics, you surely remember Handle — the awesome walking, wheeled robot from Boston Dynamics. There’s a good reason why such a combination is a good choice of locomotion for robots. Rolling on wheels is a good way to cover smooth terrain with high efficiency. But when you hit rocky patches or obstacles, using legs to negotiate these obstacles makes sense. But Handle isn’t the only one, nor is it the first.

[Radomir Dopieralski] has been building small robots for a while now, and is especially interested in how they move. He is sharing his experience while Experimenting with Wheeled Legs, with the eventual aim of “building an experimental walking+rolling robot, to more efficiently kill all humans and thus solve all the problems”. His pithy comments aside, investigating and experimenting with different forms of locomotion to understand which method is most efficient will pay rich dividends in the design of future robots.

During an earlier version of the Hackaday Prize, [Radomir] snagged a coupon for laser cutting services. He used it to build a new robot based on a fresh look at some of his earlier designs. This resulted in the Logicoma-kun — a functional model of a Logikoma (a logistics robot designed to be a fast all-terrain vehicle for transporting weapons and ammunition) from “Ghost in the Shell: Arise”. Along the way, he figured out how to save some servo channels. For gripping function, he needed to drive two servos in sync with each other, but in opposing directions. This would usually require two GPIO’s and a few extra lines of code. Instead, he dismantled a servo and reversed the motor AND the servo potentiometer connections.

But this is still early days for [Radomir]. He is fleshing out ideas, looking for feedback and discussions on robotic locomotion. This fits in perfectly with the “Design Your Concept” phase of the Hackaday Prize 2017. He has already made some progress on Logicoma-kum by having it move in either the wheeled or walking modes — check out the videos after the break.

Continue reading “Hackaday Prize Entry: Experiments With Wheeled Legs”

Robot Arm From Recyclables

A robot assistant would make the lives of many much easier. Luckily, it’s possible to make one of your own with few fancy materials. The [circuito.io] team demonstrates this by building a robot arm out of recyclables!

With the exception of the electronics — an Arduino, a trio of servo motors, and a joystick — the arm is made almost completely out of salvaged recyclables: scrap wood, a plastic bottle, bits of plastic string and a spring. Oh, and — demonstrating yet another use for those multi-talented tubers — a potato acts as a counterweight.

Instead of using screws or glue, these hackers used string made from a plastic bottle as a form of heat shrink wrap to bind the parts of the arm together. The gripper has only one pivoting claw for greater strength, and the spring snaps it open once released. Behold: your tea-bag dunking assistant.

Continue reading “Robot Arm From Recyclables”

Zero-Intrusion Wireless Light Switch

What do you do if your light switch is too far from your desk, and you’re in a rental property so you can’t put in extra wiring to install an electronic control for it? Get up and turn it on or off by hand? Of course not!

If you are [Guyfromhe], you solve this problem with a servo attached to a screw-on light switch faceplate, and you control it with a pair of Arduino/nRF24L01 combos. It’s a pretty simple arrangement, the wireless link simply takes the place of a serial cable that instructs the Arduino on the light switch to operate the servo that in turn moves the switch. The whole thing is triggered through his home automation system, which in turn responds to an Amazon Dash button on his desk. Yes, it’s complex. But turning on the light has been automated without intrusion into his landlord’s domain, and that’s all that matters.

On a more serious note, he’s put some Arduino code up on his write-up, as well as a YouTube video we’ve put below the break.

Continue reading “Zero-Intrusion Wireless Light Switch”

Arduino + Geometry + Bicycle = Speedometer

It is pretty easy to go to a big box store and get a digital speedometer for your bike. Not only is that no fun, but the little digital display isn’t going to win you any hacker cred. [AlexGyver] has the answer. Using an Arduino and a servo he built a classic needle speedometer for his bike. It also has a digital display and uses a hall effect sensor to pick up the wheel speed. You can see a video of the project below.

[Alex] talks about the geometry involved, in case your high school math is well into your rear view mirror. The circumference of the wheel is the distance you’ll travel in one revolution. If you know the distance and you know the time, you know the speed and the rest is just conversions to get a numerical speed into an angle on the servo motor. The code is out on GitHub.

Continue reading “Arduino + Geometry + Bicycle = Speedometer”

Newton’s Cradle For Those Too Lazy To Procrastinate

Desk toys are perfect for when you don’t want to work. There’s a particularly old desk toy called the Newton’s cradle. If you don’t know the name, you’d still recognize the toy. It is some ball bearings suspended in midair on strings. If you pull back, say, two balls and let them swing to impact the other balls, the same number of balls on the other side will fly out. When they return, the same number will move on the other side and this repeats until friction wears it all down.

We think [JimRD] might be carried away on procrastination. You see, he not only has a Newton’s cradle, he has automated it with an Arduino. According to [Jim], this is his third attempt at doing so. You can see the current incarnation in the video, below.

Continue reading “Newton’s Cradle For Those Too Lazy To Procrastinate”

Modified Servo Adds Focus Control To Telescope

Scanning the heavens with a telescope is a great way to spend long, clear winter nights, but using a manual telescope can get to be a drag. A motorized mount with altitude and azimuth control is basic equipment for the serious observer, but adding a servo to control the focus of your telescope is one step beyond your average off-the-shelf instrument.

Having already motorized the two axes of the equatorial mount of his modest telescope as a senior project, [Eric Seifert] decided to motorize the focus rack as well. His first inclination was to use a stepper motor like he did on the other two axes, but with a spare high-torque servo at hand, he hacked a quick proof-of-concept. The servo was modified for continuous rotation in the usual way, but with the added twist of replacing the internal potentiometer with an external linear pot. Attached to the focus tube, the linear pot allows [Eric] to control the position and speed of the modified servo. Sounds like controlling the focus will be important to [Eric]’s planned web interface for his scope; we’ll be looking for details on that project soon.

We like the simplicity of this solution, and it’s a trick worth keeping in mind for other projects.  But if fancy steppers and servos aren’t your thing, fear not — astrophotography is as easy as slapping a couple of boards together with a hinge.

Continue reading “Modified Servo Adds Focus Control To Telescope”

Raspberry Pi And Alexa Make Teddy Ruxpin Smarter Than The Average Bear

Behold the unholy union of Amazon’s Alexa and that feature-limited animatronic bear from the 80s, Teddy Ruxpin. Alexa Ruxpin?

As if stuffing Alexa inside a talking fish weren’t bad enough, now Amazon’s virtual assistant can talk to you through the creepy retro plush thanks to [Tinkernut]’s trip down memory lane. Having located a Teddy Ruxpin on eBay for far less than the original $70 that priced it out from under his childhood Christmas tree, [Tinkernut] quickly learned that major surgery would be necessary to revive the Ruxpin. The first video below shows the original servos being gutted and modern micro servos grafted in, allowing control of the mouth, eyes, and nose via an Arduino.

With the bear once again in control of its faculties, [Tinkernut] embarked on giving it something to talk about. A Raspberry Pi running AlexaPi joined the bear’s recently vacated thorax with the audio output split between the bear’s speaker and the analog input on the Arduino. The result is a reasonable animation, although we’d say a little tweaking of the Arduino script might help the syncing. And those eyes and that nose really need to get into the game as well. But not a bad start at all.

This isn’t the first time that Teddy Ruxpin has gone under the knife in the name of hacks, and it likely won’t be the last. And the way toy manufacturers are going, they might just beat us hackers to the punch.

Continue reading “Raspberry Pi And Alexa Make Teddy Ruxpin Smarter Than The Average Bear”