Teensy Spectrum Analyzer Has 170 Channels

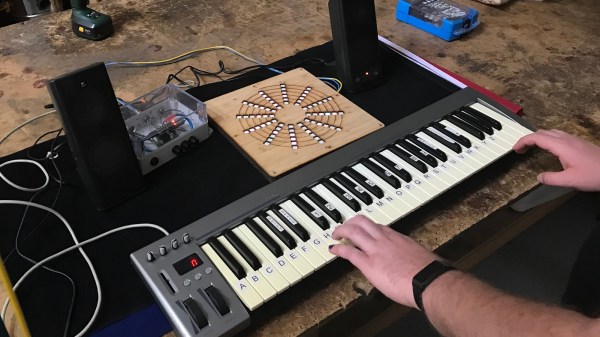
While high-fidelity audio has come a long way in the past several decades, a lot of modern stereo equipment is still missing out on some of the old analog meters that were common on amplifiers and receivers of the 60s through the 80s. Things like VU meters don’t tend to be common anymore, but it is possible to build them back in to your sound system with the help of some microcontrollers. [Mark] shows us exactly how to reclaim some of the old-school functionality with this twin audio visualizer display.

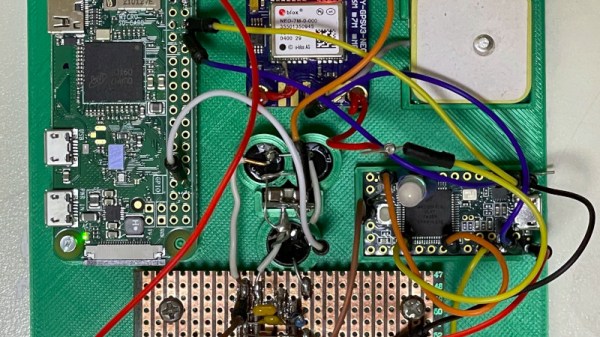
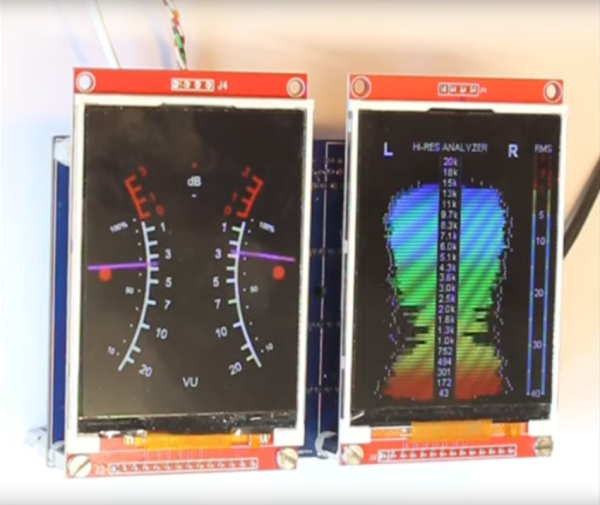
Not only does this build include two displays, but the microcontroller is keeping up with 170 channels in real-time in order to drive the display. What’s more impressive is that it’s being done all on a Teensy 4.1. To help manage all of the data and keep the speed as fast as possible it uses external RAM soldered to the board, and a second Teensy audio board is used to do the real time FFT analysis. Most of the channels are sent to the display hosting the spectrum analyzer but two are reserved for left and right stereo VU meters on the second display.

The project from [Mark] is originally based on this software from [DIYLAB] so everything is open-source. While it was originally built for a specific piece of hardware, [Mark] has it set up with a line in and line out plus a microphone input so it can be used for virtually any audio hardware now. For another take on the classic VU meter, take a look at this design based on an Arudino instead.

Continue reading “Teensy Spectrum Analyzer Has 170 Channels”

A Gameport Joystick To USB-MIDI Converter

These days, live music performance often involves electronic synthesizers and computers rather than traditional instruments played by hand. To aid in his own performances, [alekappa] built a special interface to take signals from a joystick and convert them to MIDI messages carried over USB.

The build is simple and straightforward, using a Teensy LC to interface with a simple gameport joystick. With a smattering of simple components, it’s easy to read the outputs of the joystick with only a little debounce code needed to ensure the joystick’s buttons are read accurately. Similarly, analog axes are read using the analog-to-digital converters onboard the microcontroller.

This data is then converted into control changes, note triggers and velocity levels and sent out over the Teensy LC’s USB interface. A mode switch enables changes to the system’s behaviour to be quickly made. The device is wrapped up in a convenient housing nabbed from an old Gameport-to-USB converter from many years ago.

It’s a neat project and we’re sure the joystick allows [alekappa] to add a new dimension to his performances on stage. We’ve seen other great MIDI controllers, too, from the knitted keyboard to the impressive Harmonicade. If you’ve got your own mad musical build under construction, don’t hesitate to drop us a line!

Accurately Track Your Mains Frequency

Depending upon where in the world you live, AC mains frequency is either 50Hz or 60Hz, and that frequency is maintained accurately enough over time that it can be used as a time reference for a clock. Oddly it’s rarely exactly that figure though, instead it varies slightly with load on the network and the operators will adjust it to keep a constant frequency over a longer period. These small variations in frequency can easily be measured, and [jp3141] has created a circuit that does exactly that.

It’s a surprisingly straightforward device, in which a Teensy takes its power supply from a very conventional if now a little old-school mains transformer, rectifier, and regulator. A sample of the AC from the transformer passes through a low-pass filer and a clamp, and thence to the Teensy where it is fed into one of the on-board comparators from which its period is measured using one of the timers. Even then the on-board crystal isn’t considered accurate enough, so it is in turn disciplined by a 1 pulse per second (PPS) signal from a GPS receiver.

The Teensy then reports its readings over a serial line every five seconds to a Raspberry Pi, which collates and graphs the data. In case you are wondering what the effect of mains frequency variations might be, we once covered the story of how an entire continent lost six minutes.

Illustrated Kristina with an IBM Model M keyboard floating between her hands.

Keebin’ With Kristina: The One With The Ballpoint Typewriters

So you want to minimize finger movement when you type, but don’t have three grand to drop on an old DataHand, or enough time to build the open-source lalboard? Check out these two concept keebs from [SouthPawEngineer], which only look like chord boards.

Every key on the home row is a five-way switch — like a D-pad with straight down input. [SouthPawEngineer] has them set up so that each one covers a QWERTY column. So like, for the left pinky switch, up is Q, right is A, down is Z, and left is 1. Technically, the split has 58 keys, and the uni has 56.

Both of these keebs use KB2040 boards, which are Adafruit’s answer to the keyboard-building craze of these roaring 2020s. These little boards are of course easy to program with CircuitPython, which supports KMK, an offshoot of the popular QMK. Thanks for the tip, [foamyguy]!

Continue reading “Keebin’ With Kristina: The One With The Ballpoint Typewriters”

Modern Features In Classic Radio

As consumer electronics companies chase profits on tighter and tighter margins, it seems like quality is continually harder to find for most average consumer-grade products. Luckily, we don’t have to hunt through product reviews to find well-built merchandise since we have the benefit of survivorship bias to help us identify quality products from the past that have already withstood the test of time. [Tom] has forever been fond of this particular Sony TV/radio combo from the ’70s so he finally found one and set about modernizing it in a few key ways.

Among the modifications to this 1978 Sony FX-300 include the addition of a modern color display, Bluetooth, an upgraded FM radio, and a microphone. At the center of all of this new hardware is a Teensy 4 which [Tom] has found to be quite powerful and has enough capabilities to process the audio that’s being played in order to make visual representations of the sound on the screen. He also implemented a bitcrusher filter and integrated it into the controls on the original hardware. He’s using an optimized version of this library to cram all of that processing ability into such a small chip, and the integration of all this new hardware is so polished that it looks like it could be an original Sony stereo from the modern era.

While some may complain about restomod-type builds like this, we don’t really see any need to be arbitrarily or absolutely faithful to bygone eras even if the original hardware was working properly in the first place. What works is taking the proven technology of the past and augmenting it with modern features to enjoy the best of both worlds. Much like this hi-fi stereo which blends the styles and technology of the 90s with that of the 60s in an equally impressive way.

Illustrated Kristina with an IBM Model M keyboard floating between her hands.

Keebin’ With Kristina: The One With The Cat Keyboard

Special thanks to [Maarten], who stumbled upon this old gem of a geekhack thread by [suka]. It’s essentially a show and tell of their DIY keyboard journey, complete with pictures. [suka]’s interest started with a yen for ergonomic keyboard layout alternatives. They soon found the geekhack forum and started lurking around, practicing layouts like Neo and AdNW, which [suka] still uses today.

A pair of num pads wired up to a Teensy becomes a keyboard.When it was time to stop lurking and start building something, [suka] got plenty of support from the community. They knew they wanted a split ortho with a trackpoint and plenty of thumb keys. [suka] started by building them from old Cherry keyboards, which are easier to come by in Germany.

The first build was a pair of num pads turned landscape and wired up to a Teensy, but [suka] wanted those sweet, clacky Cherry MX switches instead of MLs. So the second version used a pair of sawed-off num pads from old MX boards.

When the Truly Ergonomic came out, it got [suka] interested in one-piece splits. Plus, they were tired of carrying around a two-piece keyboard. So their next build was a sexy monoblock split with a laser-sintered case and keycaps. But that was ultimately too uncomfortable, so [suka] went back to split-splits.

Everyone takes a different path into and through this hobby, and they’re all likely to be interesting. Is yours documented somewhere? Let us know.

What Could Have Been: The Dygma Raise

I do some streaming here and there, mostly for the sense of focus I get out of being live on camera. I like to find out what my people in chat are clacking on, and one of them told me they have a staggered split called the Dygma Raise. I hadn’t heard of it before that day, but this keyboard has been around for a few years now.

This same person told me that Dygma might make an ortholinear version sometime soon, but apparently Dygma wanted it that way from the beginning. According to the timely video below sent to the tips line by [deʃhipu], Dygma’s original plan was a split ortho with few keys and presumably a layer system.

Continue reading “Keebin’ With Kristina: The One With The Cat Keyboard”

LEDs display different pitches in a sunburst pattern

Spiral Music Visualization

Displaying notes live as they are being played can be a really powerful learning tool, but it’s usually used to learn how to play a specific instrument. This take on the topic is actually a neat way to learn more about music theory — how pitches work together to build the sounds that we hear. The visual tack chosen arranges each of 12 notes into a spiral. As you continue to go up the scale through more octaves, pitches that share the same name line up into a line like a ray projecting out from the sun. So there are 12 rays for the notes in the scale: C, C#/D♭, D, D#/E♭,F, etc.

[mechatronicsguy] built it a few years back but just now got around to documenting it, and we’re sure glad he did. The layout of notes at first looks just like a colorful visualization. But as he mentions in his description, this assigns a shape to each different type of cord. A major cord will have the same shape whether it is played with C, G#, B♭, or any other note as the root. The shape simply rotates around the axis based on that root note. Higher octaves will be shown further out on the radius, but the chord shape will still be the same. Minor, augmented, even modal chords and those with added pitches all have their own unique shape on the display.

You get the best understanding of the visualization by looking at the Python-rendered version in the video below. It’s a nice touch that notes turn grey and fade away after being released so you kind of see where the current chord came from. This isn’t strictly a perk of pre-recordings. While you can feed it MIDI files, you can also play a MIDI instrument and display the visuals live on the hardware version that uses a Teensy with an audio shield.

If you’re looking for examples on how music visualizers are used to teach the instrument, look no further than this Wurlitzer note visualizer replica. Also for those who don’t know, the song being played in the hardware demo (second video below) is Beethoven’s 7th Symphony. Well worth a full listen, it’ll change your life.

Continue reading “Spiral Music Visualization”