Sometimes, less is more. Sometimes, more is more. There is a type of person who believes that if enough photos of the same subject are taken, one of them will shine above the rest as a gleaming example of what is possible with a phone camera and a steady hand. Other people know how to frame a picture before hitting the shutter button. In some cases, the best method may be snapping a handful of photos to get one good one, not by chance, but by design.
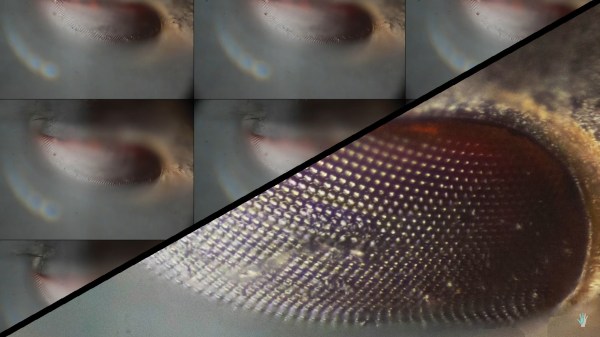
[The Thought Emporium]’s video, also below the break, is about getting crisp pictures from a DSLR camera and a microscope using focus stacking, sometimes called image stacking. The premise is to take a series of photos that each have a different part of the subject in focus. In a microscope, this range will be microscopic but in a park, that could be several meters. When the images are combined, he uses Adobe products, the areas in focus are saved while the out-of-focus areas are discarded and the result is a single photo with an impossible depth of focus. We can’t help but remember those light-field cameras which didn’t rely on moving lenses to focus but took many photos, each at a different focal range.
[The Thought Emporium] has shown us his photography passion before, as well as his affinity for taking the cells out of plants and unusual cuts from the butcher and even taking a noble stab at beating lactose intolerance.
Continue reading “Impossibly Huge Depth Of Focus In Microscope Photographs”