The Creality Ender 3 is part of the new wave of budget 3D printers, available for less than $250 from many online retailers. For the money, it’s hard to complain about the machine, and it’s more than suitable for anyone looking to get make their first steps into the world of FDM printing. But there’s certainly room for improvement, and as [Simon] shows in a recent blog post, a little effort can go a long way towards pushing this entry-level printer to the next level.
The first step was to replace the printer’s stepper drivers with something a bit more modern. Normally the Ender 3 uses common A4988 drivers, but [Simon] wanted to replace them with newer Trinamic drivers that offer quieter operation. Luckily, Trinamic makes a drop-in replacement for the A4988 that makes installation relatively easy. You’ll need to change out a few caps and remove some resistors from the board to make everyone play nice, but that shouldn’t pose a challenge to anyone who knows their way around a soldering iron.
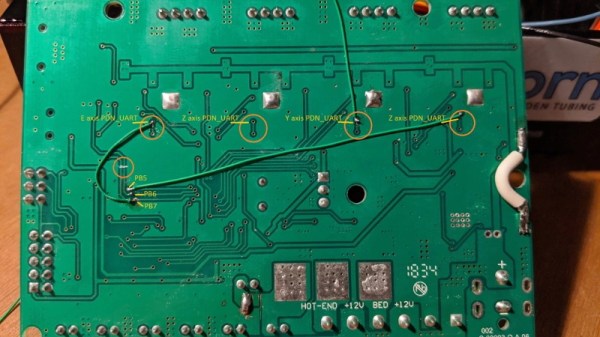
Beyond quieter running steppers, the Trinamic TMC2208 drivers also offer direct UART control mode. Of course the Ender’s board was never designed for this, so the MCU doesn’t have enough free pins to establish serial communications with the three drivers (for the X, Y, and Z axes). But [Simon] realized if he sacrificed the SD card slot on the board, the six pins that would free on the controller could be cut and rewired to the driver’s UART pins.
Combined with the Klipper firmware, these relatively minor modifications allows him to experiment with printing at speeds far greater than what was possible before. Considering the kind of headaches that a ~$200 printer would have given you only a few years ago, it’s impressive what these new machines are capable of; even if it takes a few tweaks.
 The
The