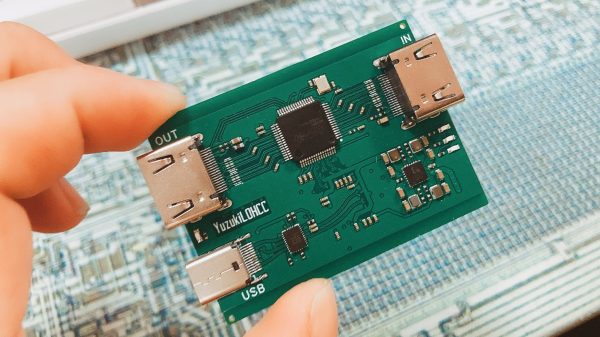
A Gameport Joystick To USB-MIDI Converter

These days, live music performance often involves electronic synthesizers and computers rather than traditional instruments played by hand. To aid in his own performances, [alekappa] built a special interface to take signals from a joystick and convert them to MIDI messages carried over USB.

The build is simple and straightforward, using a Teensy LC to interface with a simple gameport joystick. With a smattering of simple components, it’s easy to read the outputs of the joystick with only a little debounce code needed to ensure the joystick’s buttons are read accurately. Similarly, analog axes are read using the analog-to-digital converters onboard the microcontroller.

This data is then converted into control changes, note triggers and velocity levels and sent out over the Teensy LC’s USB interface. A mode switch enables changes to the system’s behaviour to be quickly made. The device is wrapped up in a convenient housing nabbed from an old Gameport-to-USB converter from many years ago.

It’s a neat project and we’re sure the joystick allows [alekappa] to add a new dimension to his performances on stage. We’ve seen other great MIDI controllers, too, from the knitted keyboard to the impressive Harmonicade. If you’ve got your own mad musical build under construction, don’t hesitate to drop us a line!

On the left, four through-hole USB-C connectors laid out on a purple cutting mat. On the right, a teardown picture shows that there's neither resistors nor CC connections inside such a connector, resulting in consequences described in the article.

The USB-C Connectors You Never Knew You Wanted To Avoid

On Tech Twitter, some people are known for Their Thing – for example, [A13 (@sad_electronics)], (when they’re not busy designing electronics), searches the net to find outstanding parts to marvel at. A good portion of the parts that they find are outstanding for all the wrong reasons. Today, that’s a through-hole two-pin USB Type-C socket. Observing the cheap tech we get from China (or the UK!), you might conclude that two 5.1K pulldown resistors are very hard to add to a product – this socket makes it literally impossible.

We’ve seen two-pin THT MicroUSB sockets before, sometimes used for hobbyist kits. This one, however, goes against the main requirement of Type-C connectors – sink (Type-C-powered) devices having pulldowns on CC pins, and source devices (PSUs and host ports) having pull up resistors to VBUS. As disassembly shows, this connector has neither of these nor the capability for you to add anything, as the CC pins are physically not present. If you use this port to make a USB-C-powered device, a Type-C-compliant PSU will not give it power. If you try to make a Type-C PSU with it, a compliant device shall (rightfully!) refuse to charge from it. The only thing this port is good for is when a device using it is bundled with a USB-A to USB-C cable – actively setting back whatever progress Type-C connectors managed to make.

As much as USB Type-C basics are straightforward, manufacturers get it wrong on the regular – back in 2016, a wrong cable could kill your $1.5k MacBook. Nowadays, we might only need to mod a device with a pair of 5.1K resistors every now and then. We can only hope that the new EU laws will force devices to get it right and stop ruining the convenience for everyone, so we can finally enjoy what was promised to us. Hackers have been making more and more devices with USB-C ports, and even retrofitting iPhones here and there. If you wanted to get into mischief territory and abuse the extended capabilities of new tech, you could even make a device that enumerates in different ways if you flip the cable, or make a “BGA on an FPC” dongle that is fully hidden inside a Type-C cable end!

Open Source LXI Tools Free Us From Vendor Bloat

LXI, or LAN eXtensions for Instrumentation is a modern control standard for connecting electronics instrumentation which supports ethernet. It replaces the older GPIB standard, giving much better performance and lower cost of implementation. This is a good thing.  [Martin Lund] has created the open source lxi-tools project which enables us to detach ourselves from the often bloated vendor tools usually required for talking LXI to your bench equipment. This is a partial rewrite of an earlier version of the tool, and now sports some rather nice features such as mDNS for instrument discovery, support for screen grabbing, and a LUA-based scripting backend. (API Link)

SCPI or Standard Commands for Programmable Instruments is the text-based language spoken by many instruments, allowing control and querying of an instrument. Just to be clear, SCPI is not at all a new thing, and older instruments that have GPIB or RS232 connectors, still could talk SCPI. lxi-tools is not for those. Some instruments can also be very picky about the formatting of commands, especially if they’re buggy, so the ability to interactively debug commands is very desirable. It is quite possible to make poor use of SCPI commands in your test script and end up with tests that just take far longer to execute that they need to. lxi-tools has a benchmarking tool too, which helps you to dig in and find out where all the time is going and make suitable adjustments.

We’ve not seen much about LXI on Hackaday, but we did cover using PyVISA for dealing with SCPI-over-GPIB in python.  If you have an older instrument  with GPIB and you don’t want to sell a internal organ to pay for a USB adaptor, here’s one you can make yourself.

Rainbow DIP Switch Is The Coolest Way To Configure Your Project

Oftentimes, when programming, we’ll put configuration switches into a config file in order to control the behaviour of our code. However, having to regularly open a text editor to make changes can be a pain. This colorful little DIP switch dongle from [Glen Aikins] makes for a fun alternative solution.

Do want.

The build is simple, relying on a rainbow-colored 8-pin DIP switch as the core of the project. A PIC16F1459 then reads the position of the switches, with the 8-bit microcontroller doing the job of speaking USB to the host machine. The device enumerates as a USB HID device, and reports to the host machine when queried as to the state of its 8 switches. [Glen] used a basic C# app to show a digital representation of the switches on screen changing as per the real physical DIP switch plugged into the machine.

It’s a great tool for controlling up to 8 different parameters in a program you might be working on, without having to dive into your editor to change the relevant parts. Also, it bears noting that the rainbow design is simply very fetching and a cool thing to have plugged into your computer. It’s a more serious device than [Glen’s] hilarious 4-byte “solid state drive” that we saw recently, but we love them both all the same!

Retro Gaming With Retro Joysticks

One of the biggest reasons for playing older video games on original hardware is that emulators and modern controllers can’t replicate the exact feel of how those games would have been originally experienced. This is true of old PC games as well, so if you want to use your original Sidewinder steering wheel or antique Logitech joystick, you’ll need something like [Necroware]’s GamePort adapter to get them to communicate with modern hardware.

In a time before USB was the standard, the way to connect controllers to PCs was through the GamePort, typically found on the sound card. This has long since disappeared from modern controllers, so the USB interface [Necroware] built relies on an Arduino to do the translating. Specifically, the adapter is designed as a generic adapter for several different analog joysticks, and a series of DIP switches on the adapter select the appropriate mode. Check it out in the video after the break. The adapter is also capable of automatically calibrating the joysticks, which is necessary as the passive components in the controllers often don’t behave the same way now as they did when they were new.

Plenty of us have joysticks and steering wheels from this era stored away somewhere, so if you want to experience Flight Simulator 5.0 like it would have been experienced in 1993, all it takes is an Arduino. And, if you want to run these programs on bare metal rather than in an emulator, it is actually possible to build a new Intel 486 gaming PC, which operates almost exactly like a PC from the 90s would have.

Continue reading “Retro Gaming With Retro Joysticks”

Turn On Sarcasm With The Flip Of A Switch

Sarcasm is notoriously difficult to distinguish in online communities. So much, in fact, that a famous internet rule called Poe’s Law is named after the phenomenon. To adapt, users have adopted several methods for indicating implied sarcasm such as the /s tag, but more recently a more obvious sarcasm indicator has appeared that involves random capitalization througout the sarcastic phrase. While this looks much more satisfying than other methods, it is a little cumbersome to type unless you have this sarcasm converter for your keyboard.

The device, built by [Ben S], is based around two Raspberry Pi Pico development boards and sits between a computer and any standard USB keyboard. The first Pi accepts the USB connection from the keyboard and reads all of the inputs before sending what it reads to the second Pi over UART. If the “SaRcAsM” button is pressed, the input text stream is converted to sarcasm by toggling the caps lock key after every keystroke.

For communicating in today’s online world with rapidly changing memes, a device like this is almost necessary for making sure you aren’t misunderstood on whichever popular forum you like to frequent. We don’t know how long this trend will continue, either, but until something else replaces it to more concisely communicate sarcasm we expect it to remain relevant. The build is also a reminder of the various interesting ways that microcontrollers can be programmed to act as keyboards.

Thanks to [ted yapo] for the tip!

Setup Menu Uses Text Editor Hack

Many embedded devices that require a setup menu will use a USB serial port which you connect to your favorite terminal emulator. But we recently encountered a generic USB knob that did setup using a text editor, like Notepad or even Vim (although that was a bit ugly). A company called iWit makes several kinds of USB knobs which end up in many such products.

These generic USB knobs are normally just plug-and-play, and are used to control your PC’s volume and muting. Some models, like the iWit, the user can configure the mapping within the device. For example, knob rotation can be set to generate up and down arrow keys, and knob press could be ENTER. One could do this kind of mapping on the PC, but many of these USB knobs can do it for you. The crux of the setup is this menu (which you can see in action in the first 30 seconds of the video below).

Continue reading “Setup Menu Uses Text Editor Hack”