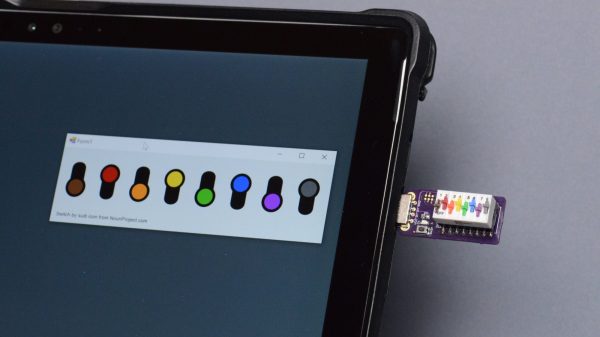
Oftentimes, when programming, we’ll put configuration switches into a config file in order to control the behaviour of our code. However, having to regularly open a text editor to make changes can be a pain. This colorful little DIP switch dongle from [Glen Aikins] makes for a fun alternative solution.
Do want.
The build is simple, relying on a rainbow-colored 8-pin DIP switch as the core of the project. A PIC16F1459 then reads the position of the switches, with the 8-bit microcontroller doing the job of speaking USB to the host machine. The device enumerates as a USB HID device, and reports to the host machine when queried as to the state of its 8 switches. [Glen] used a basic C# app to show a digital representation of the switches on screen changing as per the real physical DIP switch plugged into the machine.
It’s a great tool for controlling up to 8 different parameters in a program you might be working on, without having to dive into your editor to change the relevant parts. Also, it bears noting that the rainbow design is simply very fetching and a cool thing to have plugged into your computer. It’s a more serious device than [Glen’s] hilarious 4-byte “solid state drive” that we saw recently, but we love them both all the same!
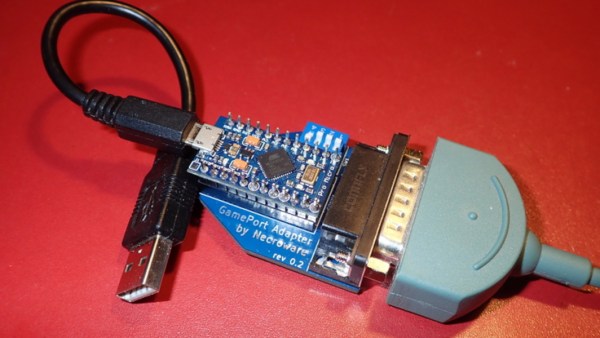
One of the biggest reasons for playing older video games on original hardware is that emulators and modern controllers can’t replicate the exact feel of how those games would have been originally experienced. This is true of old PC games as well, so if you want to use your original Sidewinder steering wheel or antique Logitech joystick, you’ll need something like [Necroware]’s GamePort adapter to get them to communicate with modern hardware.
In a time before USB was the standard, the way to connect controllers to PCs was through the GamePort, typically found on the sound card. This has long since disappeared from modern controllers, so the USB interface [Necroware] built relies on an Arduino to do the translating. Specifically, the adapter is designed as a generic adapter for several different analog joysticks, and a series of DIP switches on the adapter select the appropriate mode. Check it out in the video after the break. The adapter is also capable of automatically calibrating the joysticks, which is necessary as the passive components in the controllers often don’t behave the same way now as they did when they were new.
Plenty of us have joysticks and steering wheels from this era stored away somewhere, so if you want to experience Flight Simulator 5.0 like it would have been experienced in 1993, all it takes is an Arduino. And, if you want to run these programs on bare metal rather than in an emulator, it is actually possible to build a new Intel 486 gaming PC, which operates almost exactly like a PC from the 90s would have.
Sarcasm is notoriously difficult to distinguish in online communities. So much, in fact, that a famous internet rule called Poe’s Law is named after the phenomenon. To adapt, users have adopted several methods for indicating implied sarcasm such as the /s tag, but more recently a more obvious sarcasm indicator has appeared that involves random capitalization througout the sarcastic phrase. While this looks much more satisfying than other methods, it is a little cumbersome to type unless you have this sarcasm converter for your keyboard.
The device, built by [Ben S], is based around two Raspberry Pi Pico development boards and sits between a computer and any standard USB keyboard. The first Pi accepts the USB connection from the keyboard and reads all of the inputs before sending what it reads to the second Pi over UART. If the “SaRcAsM” button is pressed, the input text stream is converted to sarcasm by toggling the caps lock key after every keystroke.
For communicating in today’s online world with rapidly changing memes, a device like this is almost necessary for making sure you aren’t misunderstood on whichever popular forum you like to frequent. We don’t know how long this trend will continue, either, but until something else replaces it to more concisely communicate sarcasm we expect it to remain relevant. The build is also a reminder of the various interesting ways that microcontrollers can be programmed to act as keyboards.
Many embedded devices that require a setup menu will use a USB serial port which you connect to your favorite terminal emulator. But we recently encountered a generic USB knob that did setup using a text editor, like Notepad or even Vim (although that was a bit ugly). A company called iWit makes several kinds of USB knobs which end up in many such products.
These generic USB knobs are normally just plug-and-play, and are used to control your PC’s volume and muting. Some models, like the iWit, the user can configure the mapping within the device. For example, knob rotation can be set to generate up and down arrow keys, and knob press could be ENTER. One could do this kind of mapping on the PC, but many of these USB knobs can do it for you. The crux of the setup is this menu (which you can see in action in the first 30 seconds of the video below).
USB cables inevitably fail and sometimes one end is reincarnated to power our solderless breadboards. Of course, if the cable broke once, it is waiting to crap out again. Too many have flimsy conductors that cannot withstand any torque and buckle when you push them into a socket. [PROSCH] has a superior answer that only takes a couple of minutes to print and up-cycles a pair of wires with DuPont connectors. The metal tips become the leads and the plastic sheathing aligns with the rim.
The model prints with a clear plus sign on the positive terminal, so you don’t have to worry about sending the wrong polarity, and it shouldn’t be difficult to add your own features, like a hoop for pulling it out, or an indicator LED and resistor. We’d like to see one with a tiny fuse holder.
At the time of this writing, the James Webb Space Telescope was perched upon its ride to space, ready for its much-delayed launch from the ESA spaceport in French Guiana. The $10 billion space observatory suffered one final delay (knocks on wood) when predictions of high winds aloft pushed it back from a Christmas Eve launch to a Christmas Day departure, at 12:20 UTC. Given the exigencies of the day, we doubt we’ll be able to watch the launch live — then again, past experience indicates we’ll still be wrapping presents at 4:20 PST. Either way, here’s hoping that everything comes off without a hitch, and that astronomers get the present they’ve been waiting many, many Christmases for.
In other space news, things are getting really interesting on Mars. The ESA announced that their ExoMars Trace Gas Orbiter has detected signs of water in the Valles Marineris. The satellite found a large area of increased hydrogen concentration in the top meter of Martian soil; the assumption is that the hydrogen comes from water, meaning that as much as 40% of the material in the region scanned may be water. If so, that’s a huge find, as we thought most of Mars’ water was locked in the polar regions. The Mariner Valley stretches more than 4,000 km just below the equator, and so may prove to be an important resource for future explorers.
Meanwhile, in Jezero crater, Perseverance has decided to upstage its rotorcraft sidekick for a change by finding signs of organic molecules on Mars. It’s not the first time organic compounds have been found — Perseverance’s cousin Curiosity found some too, ESA’s Mars Express mission spotted methane from on high, and then there were the equivocal but intriguing results from the Viking missions in the 1970s. But the latest evidence is really great news for the scientists who picked Jezero crater as a likely place to search for signs of past life on Mars. The organics found are not proof of life by any means, as there are many ways to make organic molecules abiotically. But then again, if you’re going to find evidence of life on Mars, you’ve got to start with detecting organics.
Back on Earth, getting your laptop stolen would be bad enough. But what if it got yoinked while it was unlocked? Depending on who you are and what you do with that machine, it could be a death sentence. That’s where BusKill could come in handy. It’s a hardware-software approach to securing a laptop when it — or you — suddenly goes missing. A dongle with a breakaway magnetic lanyard gets plugged into a USB port, and the other end of the lanyard gets attached to your person. If you get separated from your machine, the dongle sends customizable commands to either lock the screen or, for the sufficiently paranoid, nuke the hard drive. The designs are all up on GitHub, so check it out and think about what else this could be useful for.
If you like the look of low-poly models but hate the work involved in making them, our friend and Hack Chat alumnus Andrew Sink came up with a solution: an online 3D low-poly generator. The tool is pretty neat; it uses three.js and runs completely in-browser. All you have to do is upload an STL file and set sliders to get rid of as many triangles as you want. Great stuff, and fun to play with even if you don’t need to decimate your polygons.
And finally, what have you done with your oscilloscope for the last three years? Most of us can’t answer that except in the vaguest of terms, but then there’s DrTune, who took three years’ worth of screencaps from this Rigol DS1054z and strung them together into a 60-second movie. He swears he didn’t purposely sync the video to the soundtrack, which is “Flight of the Bumblebee” by Rimsky-Korsakov, but in some places it’s just perfect. See if you can guess what DrTune has been working on by watching the waveforms fly by. And watch for Easter eggs.
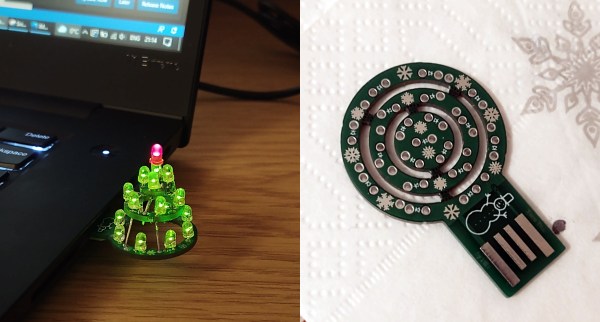
[Piotr SB] knows there is no way out of the holidays; the only path is through. You’ve got to find cheer wherever and however you can, so why not cater to your own interests and build the cutest little LED Christmas tree you ever did see? And did we mention it’s USB and absolutely free (as in carols, not eggnog)?
This O-Christmas tree is made up of concentric rings that are built into a tier as you solder the LEDs. And of course you’re supposed use the LED legs as supports! One leg from each LED — 18 green and a red one for the top. Because the PCB is not quite thick enough, you’ll need to add a plastic spacer to get it to stay in the USB port. Not only is this a nice design, the snowflakes and snowman on the silkscreen totally seal the cuteness deal.


![USB to Dupont adapter by [PROSCH]](https://hackaday.com/wp-content/uploads/2022/01/2022-01-01-USB-to-DuPont-adapter-feat.jpg?w=600&h=450)