Extracting Sounds With Acid And UV

Toaplan was a Japanese video game developer in the 80s and early 90s, most famous for Zero Wing, the source of the ancient ‘All Your Base’ meme. Memeology has come a long way since the Something Awful forums and a pre-Google Internet, but MAME hasn’t. Despite the completionist nature of MAME aficionados, there are still four Toaplan games with no sound in the current version of MAME.

The sound files for these games is something of a holy grail for connoisseurs of old arcade games, and efforts to extract these sounds have been fruitless for three decades. Now, finally, these sounds have been released with the help of sulfuric acid and microscopes.
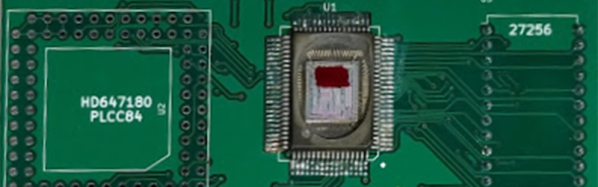
The sounds for Fire SharkVimanaTeki Paki, and Ghox were stored on their respective arcade boards inside the ROM for a microcontroller, separate from the actual game ROM. Since the fuse bits of this microcontroller were set, the only way to extract the data was decapsulation. This messy and precise work was done by CAPS0ff, who melted away the epoxy coating of the chip, revealing the microcontroller core.

Even without a microscope, the quarry of this hunt was plainly visible, but there was still no way to read out the data. The built-in read prevention bit was set, and the only way to clear that was to un-set a fuse. This was done by masking everything on the chip except the suspected fuse, putting it under UV, and checking if the fuse switched itself to an unburnt state.

The data extraction worked, and now the MAME project has the sound data for games that would have otherwise been forgotten to time. A great success, even if the games are generic top-down shooters.

Robots With 3D Printed Shock Absorbing Skin

MIT’s Computer Science and Artificial Intelligence Laboratory, CSAIL, put out a paper recently about an interesting advance in 3D printing. Naturally, being the computer science and AI lab the paper had a robotic bend to it. In summary, they can 3D print a robot with a rubber skin of arbitrarily varying stiffness. The end goal? Shock absorbing skin!

They modified an Objet printer to print simultaneously using three materials. One is a UV curing solid. One is a UV curing rubber, and the other is an unreactive liquid. By carefully depositing these in a pattern they can print a material with any property they like. In doing so they have been able to print mono body robots that, simply put, crash into the ground better.  There are other uses of course, from joints to sensor housings. There’s more in the paper.

We’re not sure how this compares to the Objet’s existing ability to mix flexible resins together to produce different Shore ratings. Likely this offers more seamless transitions and a wider range of material properties. From the paper it also appears to dampen better than the alternatives. Either way, it’s an interesting advance and approach. We wonder if it’s possible to reproduce on a larger scale with FDM.

Seeing The Truly Invisible With DIY Shortwave UV Imaging

We’ve all seen how to peel IR filters off digital cameras so they can see a little better in the dark, but there’s so much more to this next project than that. How about being able to see things normally completely outside the visual spectrum, like hydrogen combustion or electrical discharges?

UV Electrical Discharge

[David Prutchi] has just shared his incredible work on making his own shortwave ultraviolet viewers for imaging entirely outside of the normal visible spectrum – in other words, seeing the truly invisible. The project has not only fascinating application examples, but provides detailed information about how to build two different imagers – complete with exact part numbers and sources.

UV-Viewer-Small
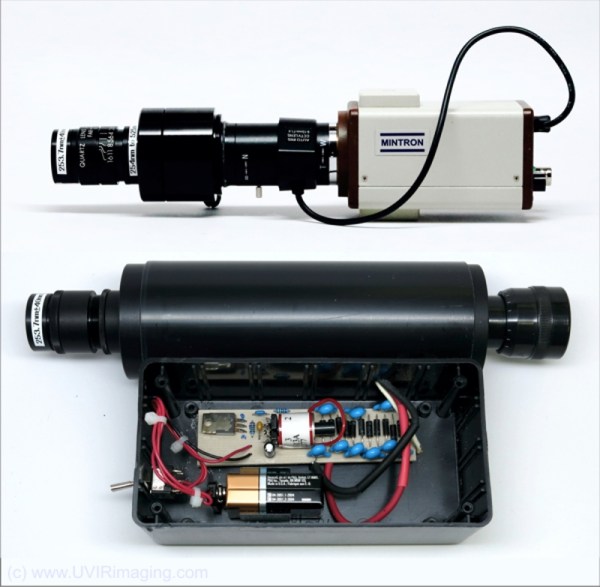
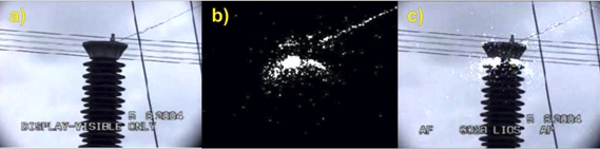
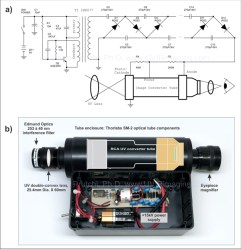
If you’re thinking UV is a broad brush, you’re right. [David Prutchi] says he is most interested in Solar Blind UV (SBUV):
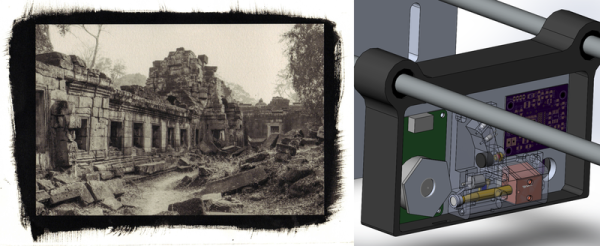
Solar radiation in the 240 nm to 280 nm range is completely absorbed by the ozone in the atmosphere and cannot reach Earth’s surface…

Without interference from background light, even very weak levels of UV are detectable. This allows ultraviolet-emitting phenomena (e.g. electrical discharges, hydrogen combustion, etc.) to be detectable in full daylight.

There is more to the process than simply slapping a UV filter onto a camera, but happily he addresses all the details and the information is also available as a PDF whitepaper. [David Prutchi] has been working with imaging for a long time, and with his sharing of detailed build plans and exact part numbers maybe others will get in on the fun. He’s also previously shared full build plans for a Raspberry Pi based multispectral imager, [David’s] DOLPHi Polarization Camera was a finalist in the 2015 Hackaday Prize, and he spoke at the Hackaday SuperConference about the usefulness of advanced imaging techniques for things like tissue analysis in medical procedures, and landmine detection for the purposes of cleaning up hazardous areas.

UV Photographic Printer Lets You Use Strange Chemistries

There is a family of old photographic chemistries based on iron compounds which, like the blueprint, are exposed using UV light. Ironically, the digital camera revolution which has made everything else in our photographic lives much easier, has made it harder to experiment around with these alternative methods. [David Brown] is making a UV photographic printer to change that.

[David]’s application has a lot in common with PCB printers that use a UV-sensitive resist, only [David] needs greyscale, and it might also be nice if it could work with wet paper. This makes it a more challenging project than you might think, but we like the cut of [David]’s jib.

Like some of the other UV exposer projects, [David]’s uses a rotating mirror to scan across the to-be photograph’s surface. Unlike the other ones that we’ve seen, the exposer hangs from two linear rails. Other printers move the paper underneath a stationary scanning head, which seems a mechanically simpler arrangement. We’re excited to see how this goes.

There’s a lot of interest in UV PCB printers right now. We’ve seen one made from junked CD-ROM drives on one end of the spectrum to one made by retrofitting a delta robot on the other. And don’t disregard the work done by folks interested in UV-curing 3D printers, either.

EPROM Timer

[glitch] had a cheap EPROM eraser with very few features. Actually, that might be giving it too much credit: it’s barely more than a UV light that turns on when it’s plugged in and turns off when it’s plugged out unplugged. Of course it would be nice to implement some safety features, so he decided he’d hook it up to a software-controlled power outlet.

Of course, controlling a relay that’s wired to mains is old hat around here, and in fact, we’ve covered [glitch]’s optoisolated mains switch already. He’s gone a little beyond the normal mains relay project with this one, though. Rather than use a microcontroller to run the relay, [glitch] wrote a simple Ruby script on his computer to turn the EPROM eraser on for the precise amount of time that is required to erase the memory.The Ruby script drives the relay control directly over a USB to serial adapter’s RTS handshake pin.

[glitch]’s hack reminds us that if you just need a quick couple bits of slow output, a USB-serial converter might be just the ticket. You could imagine driving everything from standard lamps to your 3D printer’s bed heater (provided you use similar hardware), but it’s especially helpful for [glitch] who claims to forget to turn off the eraser when it’s done its job, which leaves a potentially dangerous UV source just lying about. It’s always a good idea to add safety features to a dangerous piece of equipment!

The Ultimate Tool For Homebrew PCB Manufacturing

While OSHPark, Seeed Studio, and DirtyPCB have taken most of the fun and urgency out of making your own circuit boards at home, there are still a few niche cases and weird people who like to go it alone. For them, [Jarzębski] has created the ultimate homebrew PCB manufacturing solution (.pl, here’s the Google translatrix).

[Jarzębski] is using UV-sensitive photomasks for his PCBs, but he’s not doing something simple like a blacklight to develop his boards. He’s using a 30 Watt UV LED for exposing his boards. This, of course, generates a lot of heat and to mitigate that he’s added a Peltier cooler, temperature sensor, and a fan to cool off this retina-burning LED. 30 Watts will get the job done, considering [Jarzębski] was using a quartet of 4.5W LEDs before this build.

Developing a PCB is only one part of the equation; you need to etch it, too. For this, [Jarzębski] is using a small 1.6 Liter aquarium and four aquarium heaters for dunking 120mm x 120mm PCBs in the tank. There’s no mention of what chemistry [Jarzębski] is using – ferric chloride, cupric chloride, or otherwise – but the heaters and aerator should make etching go very smoothly.

There’s a video (English) going over the rest of the project below.

Continue reading “The Ultimate Tool For Homebrew PCB Manufacturing”

The Hackaday Prize Semifinalist Update

There are only a few more days until The Hackaday Prize semifinalists need to get everything ready for the great culling of really awesome projects by our fabulous team of judges. Here are a few projects that were updated recently, but for all the updates you can check out all the entries hustling to get everything done in time.


Replacing really, really small parts

accThe NoteOn smartpen is a computer that fits inside a pen. Obviously, there are size limitations [Nick Ames] is dealing with, and when a component goes bad, that means board rework in some very cramped spaces. The latest problem was a defective accelerometer.

In a normal project, a little hot air and a pair of tweezers would be enough to remove the defective part and replace it. This is not the case with this smart pen. It’s a crowded layout, and 0402 resistors can easily disappear in a large solder glob.

[Nick] wrapped the closest parts to the defective accelerometer in Kapton tape. That seemed to be enough to shield it from his Aoyue 850 hot air gun. The new part was pre-tinned and placed back on the board with low air flow.

How to build a spectrometer

spec

The RamanPi Spectrometer is seeing a lot of development. The 3D printed optics mount (think about that for a second) took somewhere between 12 and 18 hours to print. Once that was done and the parts were cleaned up, the mirrors, diffraction grating, and linear CCD were mounted in the enclosure. Judging from the output of the linear CCD, [fl@C@] is getting some good data with just this simple setup.

Curing resin and building PCBs

uv
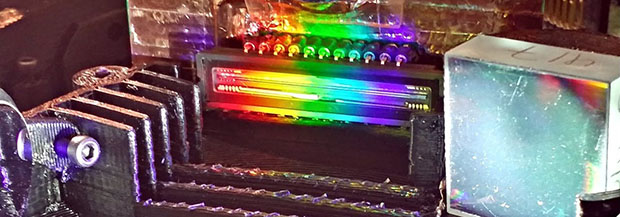
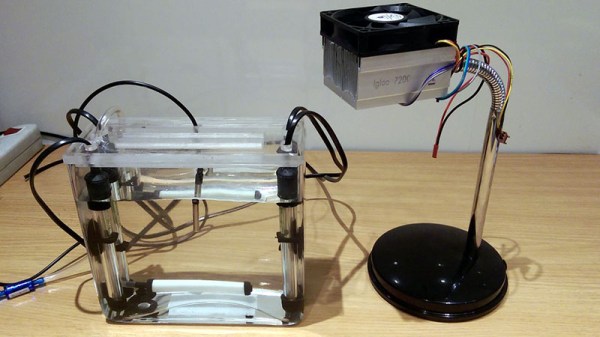
[Mario], the guy behind OpenExposer, the combination SLA printer, PCB exposer, and laser harp is chugging right along. He finished his first test print with a tilted bed and he has a few ideas on how to expose PCBs on his machine.

You don’t need props to test a quadcopter

bladesGoliath, the gas-powered quadcopter, had a few problems earlier this month. During its first hover test a blade caught a belt and bad things happened. [Peter] is testing out a belt guard and tensioner only this time he’s using plywood cutouts instead of custom fiberglass blades. Those blades are a work of art all by themselves and take a long time to make; far too much effort went into them to break in a simple motor test.