Imperial Rocker For Stopping Tiny Rebel Scum

Some of the luckiest kids in the world have to be the ones with hackers and makers as parents. While normal kids are stuck playing with cookie cutter mass produced toys, these kids get one-off gadgets and creations that will be the envy of the playground. Frankly, some of the stuff ends up being so cool that it’ll get the adults wishing they could go back in time and play with it.

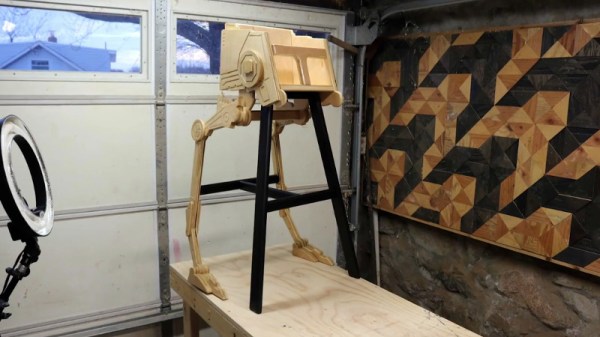
One such parent, and one such project, is the Imperial Rocker by [Matthew Regonini]. Hoping to instill an obsession with a galaxy far, far, away on his offspring, [Matthew] designed this AT-AT rocking horse piece by piece in Illustrator, and then cut it all out of birch using his XCarve CNC router. Each piece was then meticulously glued together to produce a final 3D effect from the individual cutouts.

With a liberal application of spring clamps to hold it all together while it dried, all that was left to do was painstakingly sand all the parts so the edges of the laminated construction would be smooth. Dowels were then added for the handlebars and foot pegs, and a few coats of polyurethane seal up the plywood while bringing out a natural look.

[Matthew] notes some issues here and there, notably quite a bit of blowout in some of the detail cuts and a couple miscalculated dimensions. But he reasons that the rocker is going to live a pretty hard life anyway, so best not to sweat the small stuff.

While the Imperial Rocker has that quaint old-school charm, we wonder how long it will be before [Matthew’s] little Stormtrooper starts yearning for the blinking lights and buttons that youngsters just can’t get enough of.

Continue reading “Imperial Rocker For Stopping Tiny Rebel Scum”

Smooth And Steady Cuts With An Improvised Power Feeder

Some woodworking operations require stock to be fed at a smooth, steady rate, for which purpose a power feeder is usually employed. They’re expensive bits of gear, though, and their cost can usually be borne only by high-output production shops. But when you need one, you need one, and hacking a power feeder from a drill and a skate wheel is a viable option.

It should come as no surprise that this woodshop hack comes to us from [Matthias Wandel], who never seems to let a woodworking challenge pass him by. His first two versions of expedient power feeders were tasked with making a lot of baseboard moldings in his new house. Version three, presented in the video below, allows him to feed stock diagonally across his table saw, resulting in custom cove moldings. The completed power feeder may look simple — it’s just a brushless drill in a wooden jig driving a skate wheel — but the iterative design process [Matthias] walks us through is pretty fascinating. We also appreciate the hacks within hacks that always find their way into his videos. No lathe? No problem! Improvise with a drill and a bandsaw.

Surprised that [Matthias] didn’t use some of his famous wooden gears in this build? We’re not. A brushless motor is perfect for this application, with constant torque at low speeds. Want to learn more about BLDC motors? Get the basics with a giant demo brushless motor.

Continue reading “Smooth And Steady Cuts With An Improvised Power Feeder”

Wood Finish From Old Records

Next time you’re working on a project that needs a durable wood finish, don’t grab the polyurethane. Follow [Victor Ola’s] advice and raid your grandparent’s record cabinet for some old 78 records. Modern records are made from vinyl. The stiff, brittle old 78’s from the 1960’s and earlier were made from shellac. Shellac is a natural material secreted by the female lac bug. It can be thought of as a natural form of plastic and was used as such for years until man-made plastics became commodity items.

Older 78 RPM phonograph albums are usually made entirely from shellac. [Victor] started by taking a few old cracked records and pulverizing them with a hammer. The shellac crumbs were then poured into a mason jar along with some isopropyl alcohol. The alcohol dissolves the shellac, creating a thick goo. More alcohol will thin the slurry down to a paintable consistency. The mixture is then ready to be painted on any wood surface. Wiping off the excess will reveal the wood grain.

Shellac is normally amber in color. Records are black because carbon is added to the mix. This makes the shellac stain dark and makes it a flat finish. While it would be fine to leave it this way, [Victor] added a coat of lacquer over his shellac stain to achieve a glossy finish on his upcycled gramophone.

If you’re getting into woodworking, don’t worry – anyone can do it. Just make sure you have sharp tools.

Continue reading “Wood Finish From Old Records”

Huge Functionality, Small Package: A Custom Tablet, Raspberry Style

As the adage goes, “if you want something done right, do it yourself.” Desirous of a tablet but preferring to eschew consumer models, [Stefan Vorkoetter] constructed his own compact and lightweight Raspberry Pi tablet, covering several extra miles in the process.

The tablet makes use of a Raspberry Pi 3 and the official touchscreen, with the final product marginally larger than the screen itself. Designed with a ‘slimmer the better’ profile in mind, [Vorkoetter] had to modify several components to fit this precept; most obvious of these are the removal of the Pi’s GPIO headers, USB, and Ethernet ports, and removing the USB power out port from the touchscreen controller board so the two could be mounted side-by-side.

An Adafruit PowerBoost 1000C handles charging the 6200 mAh battery — meaning up to six hours(!) of YouTube videos — via a micro USB, but only after [Vorkoetter] attached a pair of home-made heatsinks due to negligible air flow within the case. A modified USB audio adapter boosts the Pi’s audio capabilities, enabling the use of headphones, a mic, and a built-in speaker which is attached to the tablet’s back cover.

Continue reading “Huge Functionality, Small Package: A Custom Tablet, Raspberry Style”

Wooden Laptop Enclosure: New Life For Old Thinkpad

Technology is designed to serve us and make our lives better. When a device gets outdated, it is either disposed of or is buried in a pile of junk never to be seen again. However, some individuals tend to develop a certain respect for their mechanical servants and make an effort to preserve them long after they have become redundant.

My relationship with my first laptop is a shining example of how to hold onto beloved hardware way too long. I converted that laptop into a desktop with a number of serious modifications which helped me learn about woodworking along the way. Maybe it’s more pragmatic to just buy new equipment. But you spend so much time each day using your devices. It is incredibly satisfying to have a personal connection that comes from pouring your own craftsmanship into them.

Why the Effort?

IBM Thinkpad R60 via Notebook Review

The laptop in question is an IBM R60 which I lugged around during the first three years after I graduated. It was my companion during some tough times and naturally, I developed a certain attachment to it. With time its peripherals failed including the keyboard which housed the power switch and it was decided that the cost of repair would outweigh its usefulness.

Then came the faithful day when I was inspired to make something with the scrap wood that had accumulated in my workshop. This would be my second woodworking project ever and I did not have the professional heavy machinery advertised in most YouTube videos. Yet I had two targets in mind with this project.

  1. Make the R60 useful again.
  2. Learn about woodworking for creating enclosures for future projects.

Armed with mostly hand tools, a drill and a grinder that was fitted with a saw blade, I started with the IBM R60 to all-in-one PC mod. Following is a log of things I did and those I regret not doing a.k.a. lessons learned. Read on.

Continue reading “Wooden Laptop Enclosure: New Life For Old Thinkpad”

Summer Is Approaching. Are You Prepared To Relax?

[Blake Schreurs] found himself in dire straights — there was a critical lack of available hammocks in his immediate vicinity, and he wanted one. Fast. So he built a hammock stand in half an afternoon.

Initially dismayed by the cost of store-bought models, [Schreurs]’ hammock stand is perfect for woodworking-newbies and yard-loungers on a budget alike, as the build requires only a few straight cuts and some basic tools to whip up.

After cutting and laying out the lumber to make sure that it will all fit together as intended, [Schreurs] aligned and drilled holes through the pieces — don’t worry, he’s included the measurements in his post. Playing a game of connect-the-boards-with-carriage-bolts-nuts-and-washers — with a minor pause in the action to attach the feet to the base — all but finished this quick build. All that’s missing now is a hammock in which to recline!

One final note: be sure to use galvanized hardware for this — or any — project that’s expected to spend time out in the elements. Rust is not usually your friend!

Lounging in your backyard beginning to feel a little cramped? Take you relaxation on the road.

Plywood Steals The Show From Upcycled Broken Glass Art Lamps

You can tell from looking around his workshop that [Paul Jackman] likes plywood even more than we do. And for the bases of these lamps, he sandwiches enough of the stuff together that it becomes a distinct part of the piece’s visuals. Some work with a router and some finishing, and they look great! You can watch the work, and the results, in his video embedded below.

The plywood bases also hide the electronics: a transformer and some LEDs. To make space for them in the otherwise solid blocks of wood, he tosses them in the CNC router and hollows them out. A little epoxy for the caps of the jars and the bases were finished. Fill the jars with colored glass, and a transparent tube to allow light all the way to the top, and they’re done.

Continue reading “Plywood Steals The Show From Upcycled Broken Glass Art Lamps”