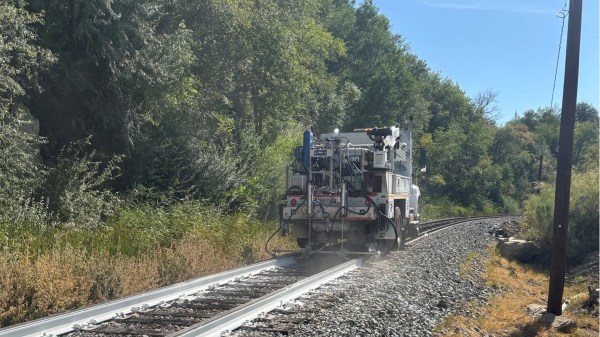
Building An Organic Flow Battery Based On Green Tea

As simple of a concept flow batteries are, the used chemicals can still be somewhat problematic in the context of a school experiment. To this end [Markus Bindhammer] decided to implement a flow battery version that uses compounds from green tea for its electrolyte, based on a German research paper from 2016.

The flow battery construction from the paper by Rosenberg et al., 2016.

These organic flow batteries can use gallic acid, pyrogallol as well as the polyphenols in green tea, making them rather safe even in the hands of more careless students. The demonstrated flow battery uses a carbon electrode with activated carbon around it to increase surface area, a platinum wire electrode, and a graphite foil as as third electrode.

In the paper a silver electrode is also used, along with the additional electrodes, and a terracotta flower pot as the barrier between the carbon and graphite electrodes, with [Markus] further explaining that there are fortunately cheaper options than what he is using, especially with the flower pot instead of a special ceramic vessel.

The electrolyte solution has epigallocatechin gallate (EGCG) dissolved in it, which here comes in the form of finely ground green tea powder (commonly known as matcha), which so happens to be pretty rich in this substance. In the below graphic by [Markus] you can see the complete set of solutions and other relevant details.

Of course, the performance of this type of flow cell isn’t amazing, with a cell voltage of less than a volt and a few mA of current, but it’s enough to spin a small fan, and to light up a few LEDs. This would be more than enough to demonstrate the reaction and flow cells in general, as long as you don’t mind donating some tasty matcha to science.

Continue reading “Building An Organic Flow Battery Based On Green Tea”

Security Camera Gets Several Defensive Upgrades

Ever since the early web, people have been streaming video with inexpensive webcams, and since the advent of the Raspberry Pi and its dedicated camera slot we’ve really seen how easy it can be to build security cameras or any other webcam and get it online quickly. But these cameras notably lack defensive capabilities if anyone tries to break into an area they shouldn’t be, and [John] added some features to this webcam to help defend his garage.

The webcam itself is a custom build, mounted on a custom-built tilt-and-pan mount that lets it freely rotate to view any location in the garage. Some custom software running on a Raspberry Pi lets it operate in autonomous mode or be controlled manually from an Android tablet. But for the defensive capabilities, it also carries a Nerf machine gun with a laser sight and spotlights which can all be controlled autonomously by the Raspberry Pi, including a computer vision system that lets it track various objects. While this is mostly a fun novelty for his security camera, the noise it makes might be enough to startle any would-be burglar.

[John] added a few other features to this build as well, including a speaker, which allows the system to be voice-controlled and to communicate back to the user. This lets him activate and deactivate the system using a verbal password. These types of Nerf guns are fairly popular for turrets as well, and some have practical uses as well like keeping cats from walking on the kitchen counters.

Continue reading “Security Camera Gets Several Defensive Upgrades”

The Problem Of Making A Good Metal-To-Glass Seal

If you’ve ever taken a close look at a vacuum tube, you’ll have seen the seals around the pins that keep everything air-tight while providing the the device’s electrical contacts. As [maurycyz] finds out, it’s not an easy process to get right.

The problem is one of both chemistry and thermal expansion, as while a good seal can be made between glass and red copper oxide, it remains very difficult indeed to stop the glass cracking on cooldown due to differing thermal expansion properties. We’re led through a variety of experiments including surface treatments and flattening the metal to a sheet, with varying pros and cons. The most successful seal on the page comes from very thin tungsten wire, though hardly the most practical conductor for a vacuum tube.

It’s a fascinating investigation for the casual reader, taking them into the properties of metal-glass bonds and the difficulties involved in making them. We have even more respect for the people who make their own tubes after reading it.

Smart Bulb WiFi Server Hosts “Banned” Literature

Let’s stop for a moment and pause to consider the smart bulb. Imagine going back 20 years and telling yourself that people will be putting computers capable of acting as web servers into light bulbs just so they can control them from their telephone instead of hitting the switch. The whole thing seems crazy — but its great, because it enables hacks like this one where [RickOOOOOO] takes a commercially-available ESP32 smart bulb, and hacks it into a local file server and digital library for banned books.

The word “banned” gets bandied about a lot — but assured, there’s nothing getting served up by [RickOOOOOO]’s bulb that’s going to help somebody will ill-intent build an improvised explosive device.  No, at least as conceived here, it appears to be full of easily-available e-books that were pulled from school libraries in the USA, which may-or-may not meet your personal definition of ‘banned’. Whatever you want to call them, we appreciate the idea that a student could hypothetically replace one of the bulbs at school with a hacked version serving up that sort of content. a bulb in such a school with a bulb hacked to host that sort of content–in minecraft, naturally.

In any case, the hardest part of the hack was carving the ESP32C3 in the bulb out of the IoToreo bulb enough to access it. Unfortunately having done so, [Rick] wasn’t able to get an SDcard interface soldered on, so he’s stuck with just 4MB for books and webserver. That means only a few epubs can fit on the bulb, but it’s better than those books being unavailable.

Like the solarpunk message board we featured recently, which also ran on an ESP32, the bulb broadcasts a public network that uses a captive portal to take you to the web interface of the library. From there, users can browse books– including learning from where they were banned and why–and admins can access a password-protected control panel. One neat work-in-progress feature on the control panel is that the bulb can still be used as a smart bulb, so you can try and match the light to its surroundings. In Minecraft, because of course we would never encourage kids to change light bulbs. Perish the thought!

Speaking of Minecraft, you can run a server on a lightbulb, too. Or DOOM, because of course even the light bulbs run DOOM now. What a time to be alive!

An image of a miniature diorama of Snow White and the Seven Dwarves. On the left is a more detailed 1/6 scale model with a tall, dark haired Snow White and dwarves with red caps and tan tunics. The image on the right is of a much smaller and less detailed set of miniatures. The figures's proportions are a little more uncanny and feel like a low budget Disney rip-off.

How Did They Make View-Master Slides?

The basics of producing a stereophotograph of real life places were well-established by the time the View-Master arrived, but producing images of imaginary scenes was a bit more involved. [View Master Travels and Peter Dibble] took a look at how the fairy tale and media tie-in reels may have been made.

Staring with simple dioramas, View-Master eventually developed an entire team to work on fairy tales. One of the most influential members was sculptor [Florence Thomas]. She was instrumental in updating many of the original fairy tale reels from small scale miniatures to 1/6 scale dioramas for the scenes. Unfortunately, the department was eventually cut and all the original miniatures thrown away.

Before VCRs, View-Master was the primary way people could interact with their favorite TV shows and movies when they weren’t being broadcast. TV shows could be photographed while in production in Hollywood with a stereo camera giving great visual detail. Some cartoon and movie reels were less engaging, having been made from promotional images, giving more of a paper cutout appearance rather than “real” 3D. In either case, many of these visual techniques have been lost with little documentation on how they were achieved.

We previously covered [View Master Travels and Peter Dibble]’s History of the View-Master and how you can digitize the disks for posterity.

Continue reading “How Did They Make View-Master Slides?”

Image of an elf projected by the laser scanner

2026 Frikkin Lasers Contest: Glow Engine Is Like An Open Air Slow Scan CRT

Slow-scan CRTs were never exactly common compared to their faster cousins, but given the popularity of Slow Scan TV (SSTV) amongst hams and NASA broadcasts, many of you are probably familiar with them. The slow scan rate of SSTV meant it required much less bandwidth, but in the early days you needed a CRT with a long-persistence phosphor to hold onto the image. [AJRussell]’s Glow Engine works much the same, with one key difference — instead of cathode rays, he’s using a frikkin laser beam.

In this case, the phosphor is Strontium Aluminate, the same stuff that gives most glow-in-the-dark toys and filament its kick. Energized by a 405 nm laser of questionable wattage, the phosphor will glow for several seconds, allowing the creation of an image. So while this is a laser projector, it works more like a CRT than most galvo projectors, which rely on Persistence of Vision to create an image. Here it’s persistence of fluorescence.

Continue reading “2026 Frikkin Lasers Contest: Glow Engine Is Like An Open Air Slow Scan CRT”

8087's 4-bit adder block. (Credit: Ken Shirriff)

The Adder At The Heart Of Intel’s 8087 FPU

As simple as the concept of adding two numbers appears at first glance, doing it in the 1970s in Intel’s 8087 FPU with its 69-bit adder was still a tall order. This is namely the core feature that many features like tangents, cosines and exponentiation rely on, so it had to be basically perfect. In a recent die-level analysis of the 8087 [Ken Shirrif] dives into the structure, layout and functioning of this ‘beating heart’ of this piece of semiconductor history.

The Intel 8087 adder and associated registers. (Credit: Intel)

Although anyone can build a simple binary adder out of off-the-shelf parts including 74-series logic ICs, the problem is to make it fast so that the 69th bit doesn’t have to wait for e.g. a carry to trickle all the way through the preceding bits. The main way that this is solved is by breaking addition into 4-bit blocks, reducing the problem by a factor of four, along with an optimized Manchester carry-chain carry-lookahead implementation.

The main advantage of this variation of a carry-lookahead is that it reduces the number of required transistors, without sacrificing too much performance. Later on Intel would switch to the faster, but more transistor-intensive Kogge-Stone adder.

Implementing this entire adder with NMOS technology and wiring it all up to the rest of the die required a lot of ingenuity on the side of the Intel engineers, as as previously noted this adder is effectively always used in any operation at some stage. This necessitates many surrounding registers and in turn circuitry to manage these, with part of the complexity handled in microcode and part in silicon.