Minimizing Stress On A Coin Cell Battery

When it comes to powering tiny devices for a long time, coin cell batteries are the battery of choice for things like keyfobs, watches, and even some IoT devices. They’re inexpensive and compact and a great choice for very small electricity needs. Their major downside is that they have a relatively high internal resistance, meaning they can’t supply a lot of current for very long without decreasing the lifespan of the battery. This new integrated circuit uses a special DC-DC converter to get over that hurdle and extend the life of a coin cell significantly.

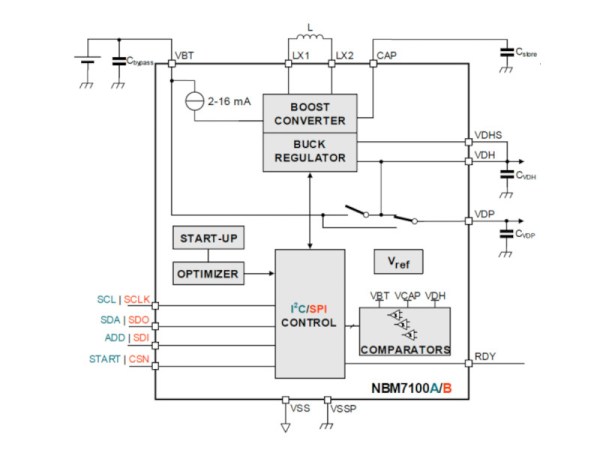
A typical DC-DC converter uses a rapidly switching transistor to regulate the energy flow through an inductor and capacitor, effectively stepping up or stepping down the voltage. Rather than relying on a single converter, this circuit uses a two-stage system. The first is a boost converter to step the voltage from the coin cell up to as much as 11 volts to charge a storage capacitor. The second is a buck converter which steps that voltage down when there is a high current demand. This causes less overall voltage drop on the battery meaning less stress for it and a longer operating life in the device.

There are a few other features of this circuit as well, including an optimizer which watches the behavior of the circuit and learns about the power demands being placed on it. That way, the storage capacitor is only charged up to its maximum capacity if the optimizer determines that much charge is needed. With all of these features a coin cell could last around seven times as long as one using more traditional circuitry. If you really need to get every last bit of energy from a battery, though, you can always use a joule thief.

Careful Cuts Lets Logger Last A Year On A Coin Cell

Coin cells are great for backup power for things like real-time clocks, or even for powering incredibly small mechanical devices like watches. But for something like a data logger, running on a standard microcontroller, most people would reach for a lithium cell of some sort. Not so with this build, though, which squeezes every joule of energy from a coin cell in order to run a data logger for a full year.

Won’t be needing that anymore.

Most of the design and engineering required to improve the efficiency of the data logger involve standard practices for low-power devices such as shutting off unnecessary components and putting the device to sleep when not actively running, but this build goes far beyond that. The Vcc pin on the RTC was clipped which disables some of its internal logic but still keeps its basic functionality intact.

All of the voltage regulators were removed or disabled in favor of custom circuitry that doesn’t waste as much energy. The status and power LEDs were removed where possible, and the entire data logger is equipped with custom energy-efficient code as well.

If you’re starting a low-power project, even one that isn’t a datalogger, it’s worth checking out this build to see just how far you can go if you’re willing to hack at a PCB with cutting tools and a soldering iron. As to why this data logger needed such a low power requirement, it turns out it’s part of a kit being used in classrooms and using a coin cell brought the price of the entire unit down tremendously. Even if you have lithium cells on hand, though, it’s still worthwhile to check out the low power modes of your microcontroller.

Thanks to [Adrian] for the tip!

Coin Cell Eliminator Does More Than Save Batteries

Coin cells are useful things that allow us to run small electronic devices off a tiny power source. However, they don’t have a lot of capacity, and they can run out pretty quickly if you’re hitting them hard when developing a project. Thankfully, [bobricius] has just the tool to help.

The device is simple – it’s a PCB sized just so to fit into a slot for a CR2016 or CR2032 coin cell. The standard board fits a CR2016 slot thanks to the thickness of the PCB, and a shim PCB can be used to allow the device to be used in a CR2032-sized slot instead.

It’s powered via a Micro USB connector, and has a small regulator on board to step down the 5 V supply to the requisite 3 V expected from a typical coin cell. [bobricius] also gave the device a neat additional feature – a pair of pads for easy attachment of multimeter current probes. Simply open the jumper on the board, hook up a pair of leads, and it’s easy to measure the current being drawn from the ersatz coin cell.

If you’re regularly developing low-power devices that use coin cells, this tool is one that could save a lot of mucking about in the lab. [bobricius] has them available on Tindie for those eager to get their hands on one. We’ve seen similar designs before too, albeit pursued in a different way!

3D Printer Bed Probing Using A Tact Switch And Coin Cell

Inspired by his CNC’s leveling system, [Chuck] built a small PCB to help level his 3D printer and he shares the details in the video you can see below. The idea is simple, the nozzle pushes down on the PCB which has a tact switch underneath. When the switch closes, an LED lights.

In practice, you measure the height of the board and use that for your Z offset, and you are done. Our only concern would be how repeatable the switch is. Granted, most people use a piece of paper and that’s probably not totally repeatable or accurate either. Proper feeler gauges are the “right” way to do it, but we know only a few people who do that.

If you ever look into the repeatability of various Z probes like the proximity sensors or the little pins that drop out of a 3D Touch probe, they aren’t that repeatable. Some people use microswitches, too, which is pretty similar to this approach and is apparently good enough.

The board is available, but it is simple enough that you could create it — or an equivalent — with just about any method you use for your PCBs. [Chuck’s] prototype board was milled. We are always surprised more people don’t use the nozzle itself to sense the bed. Some people go to a lot more trouble than just electrical contact even for CNC.

Continue reading “3D Printer Bed Probing Using A Tact Switch And Coin Cell”

A Coin Cell Powers This Tiny ESP32 Dev Board

Just for the challenge, just for fun, just for bragging rights, and just to do a little showing off – all perfectly valid reasons to take on a project. It seems like one or more of those are behind this tiny ESP32 board that’s barely larger than the coin cell that powers it.

From the video below, [Mike Rankin] has been working down the scale in terms of powering and sizing his ESP32 builds. He recently completed a project with an ESP32 Pico D4 and an OLED display that fits exactly on an AA battery holder, which he populated with a rechargeable 14550. Not satisfied with that form factor, he designed another board, this time barely larger than the LIR2450 rechargeable coin cell in its battery holder. In addition to the Pico D4, the board sports a USB charging and programming socket, a low drop-out (LDO) voltage regulator, an accelerometer, a tiny RGB LED, and a 96×16 OLED display. Rather than claim real estate for switches, [Mike] chose to add a pair of pads to the back of the board and use them as capacitive touch sensors. We found that bit very clever.

Sadly, the board doesn’t do much – yet – but that doesn’t mean we’re not impressed. And [Mike]’s no stranger to miniaturization projects, of course; last year’s Open Hardware Summit badge was his brainchild.

Continue reading “A Coin Cell Powers This Tiny ESP32 Dev Board”

A Better Charger For Your Coin Cell Batteries

Rechargeable coin cell batteries are great for all your small projects. They look exactly like regular coin-cell batteries, but in a shocking turn of events you can recharge these little guys. They can put out a reasonable amount of current, and they’re small. Just what you need for your Arduino smart watch, or whatever else the kids are doing these days.

But if these batteries are rechargeable, you need a charger. That’s where [Jon]’s entry for the Hackaday Prize comes in handy. It’s a small, cheap charger for LIR2032 and other rechargeable batteries comes in. It’s barely larger than the battery itself, and it plugs right into a USB port. How this isn’t a product already, we’ll never know.

The circuit on this coin cell charger is built from an MCP73831, a nice single cell, lithium ion and lithium polymer charge management controller. In the standard, ‘I only need to read the first page of the datasheet’ configuration, this chip can put 500 mA into a battery. Standard rechargeable coin cells only have a capacity of 40 mAh, so you’ve got plenty of headroom at 1C.

The total cost for this project was under $8 for three boards, and a BOM cost of $2 for one. That’s fourteen bucks for three of them, if you know how to solder, compared to a standard, off-the-shelf charger for about $20. Building this is cheaper than buying the equivalent product. It’s unbelievable, but true.

Coin Cell Hacks That Won The Coin Cell Challenge

It’s amazing what creative projects show up if you give one simple constraint. In this case, we asked what cool things can be done if powered by one coin cell battery and we had about one hundred answers come back. Today we’re happy to announce the winners of the Coin Cell Challenge.

Continue reading “Coin Cell Hacks That Won The Coin Cell Challenge”