DIY Programmable Guitar Pedal Rocks The Studio & Stage

Ever wondered how to approach making your own digital guitar effects pedal? [Steven Hazel] and a friend have done exactly that, using an Adafruit Feather M4 Express board and a Teensy Audio Adapter board together to create a DIY programmable digital unit that looks ready to drop into an enclosure and get put right to work in the studio or on the stage.

The bulk of the work is done with two parts, and can be prototyped easily on a breadboard.

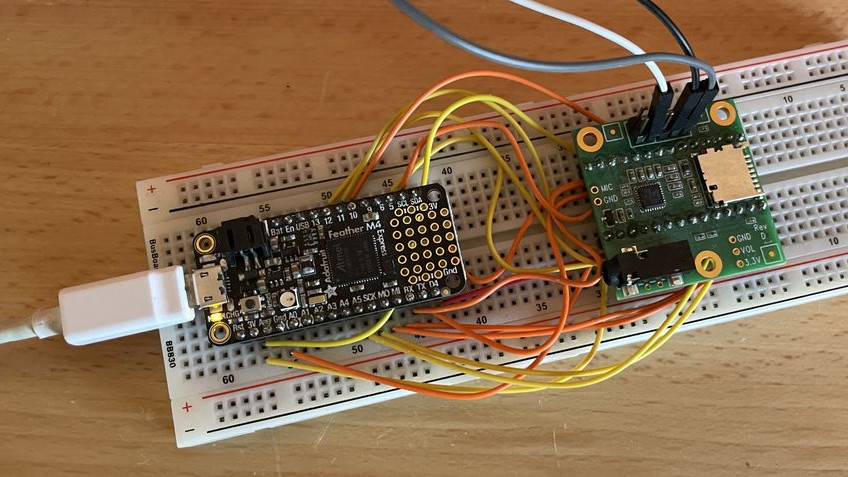
[Steven] also made a custom PCB to mount everything, including all the right connectors, but the device can be up and running with not much more than the two main parts and a breadboard.

On the inside, the Adafruit Feather M4 Express board works with the audio board over I2S, a standard for sending serial digital audio between chips. Working with the audio itself is done with the Teensy Audio Library, providing a fantastic array of easy-to-use functions for processing and manipulating digital audio streams.

Together, all the right pieces are in place and [Steven] provides the code for a simple tremolo effect as a glimpse of what’s possible with the unit. Interested in going a bit further? [Steven] shares additional details about what’s involved in writing a custom effect from scratch using the Teensy Audio Library.

As mentioned, I2S is where it’s at when it comes to working with digital audio at the chip level, and our own Jenny List can tell you everything you need to know about I2S, a useful protocol that has actually been around since 1982!

Neural Networks Emulate Any Guitar Pedal For $120

It’s a well-established fact that a guitarist’s acumen can be accurately gauged by the size of their pedal board- the more stompboxes, the better the player. Why have one box that can do everything when you can have many that do just a few things?

Jokes aside, the idea of replacing an entire pedal collection with a single box is nothing new. Your standard, old-school stompbox is an analog affair, using a combination of filters and amplifiers to achieve a certain sound. Some modern multi-effects processors use software models of older pedals to replicate their sound. These digital pedals have been around since the 90s, but none have been quite like the NeuralPi project. Just released by [GuitarML], the NeuralPi takes about $120 of hardware (including — you guessed it — a Raspberry Pi) and transforms it into the perfect pedal.

The key here, of course, is neural networks. The LSTM at the core of NeuralPi can be trained on any pedal you’ve got laying around to accurately reproduce its sound, and it can even do so with incredibly low latency thanks to Elk Audio OS (which even powers Matt Bellamy’s synth guitar, as used in Muse‘s Simulation Theory World Tour). The result of a trained model is a VST3 plugin, a popular format for describing audio effects.

This isn’t the first time we’ve seen some seriously cool stuff from [GuitarML], and it also hearkens back a bit to some sweet pedal simulation in LTSpice we saw last year. We can’t wait to see this project continue to develop — over time, it would be awesome to see a slick UI, or maybe somebody will design a cool enclosure with some knobs and an honest-to-god pedal for user input!

Thanks to [Mish] for the tip!

Continue reading “Neural Networks Emulate Any Guitar Pedal For $120”

Rockin’ Out In LTSpice: Simulating Classic Guitar Pedals

Musicians have a fantastic language to describe signals. A sound can be fat, dark, crunchy, punchy — the list goes on. These aren’t very technical terms, but they get the job done. After all, it’s much easier to ask to guitarist for a crisper sound than to ask them to sharpen the edges of the waveform, while amplifying the high-frequency 
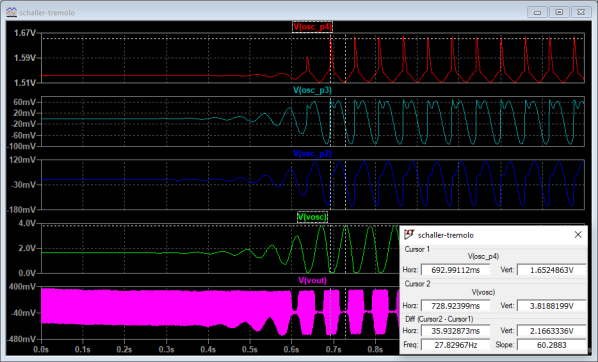
components and attenuating the low-frequency components. Of course, it’s fun to look at signals this way as well, especially when you can correlate shifts in sound quality to changes in the waveform and, ideally, the circuit that produces it.

To undergo such an investigation, [Nash Reilly] has been simulating guitar effects pedals in LTSpice. Able to find most of the schematics he needs online, [Nash] breaks down the function of each part of the circuit and builds a simulation of the entire system. His write-up clearly explains, and often demonstrates, what’s going on inside the box. On the surface, it’s an interesting tour of the inner workings of your favorite effects pedals. Beyond that, it’s an excellent survey of analog design that is well-worth the read for anybody interested in audio, electronics, or audio electronics.

For those interested in taking the physical route rather than the simulated one, we’ve taken a look at pedal design before. Anybody who wants to try their hand at creating simulations can grab a copy of LTSpice, or check out a package called LiveSpice, which lets you simulate circuits in realtime and use them to process live audio — pretty useful for prototyping guitar effects.

A Candle Powered Guitar Pedal

When it comes to guitar effects pedals, the industry looks both back and forward in time. Back to the 50’s and 60’s when vacuum tubes and germanium transistors started to define the sound of the modern guitar, and forward as the expense and rarity of parts from decades ago becomes too expensive, to digital reproductions and effects. Rarely does an effects company look back to the turn of the 19th century for its technological innovations, but Zvex Effects’ “Mad Scientist,” [Zachary Vex], did just that when he created the Candela Vibrophase.

At the heart of the Candela is the lowly tea light. Available for next to nothing in bags of a hundred at your local Scandinavian furniture store, the tea light powers the Zvex pedal in three ways: First, the light from the candle powers the circuit by way of solar cells, second, the heat from the candle powers a Stirling engine, a heat engine which powers a rotating disk. This disc has a pattern on it which, when rotated, modifies the amount of light that reaches the third part of the engine – photoelectric cells. These modulate the input signal to create the effects that give the pedal its name, vibrato and phase.

Controls on the engine adjust the amount of the each effect. At one end, the effect is full phasor, at the other, full vibrato. In between a blend of the two. A ball magnet on a pivot is used to control the speed of the rotating disk by slowing the Stirling engine’s flywheel as it is moved closer.

While more of a work of art than a practical guitar effect, if you happen to be part of a steam punk inspired band, this might be right up your alley. For more information on Stirling engines, take a look at this post. Also take a look at this horizontal Stirling engine.

Continue reading “A Candle Powered Guitar Pedal”

Power Your Guitar Pedals With Drill Batteries

Guitar pedals are a great way to experiment with the sound of your instrument. However, they require electricity, and when you’re using more than a couple, it can get messy. Some will run on batteries, while others are thirstier for more current and will only work with a plugback. There are a great many solutions out there, but most people with more than a few pedals to power will end up going to some kind of mains powered solution. [Don] is here to show us that it’s not the only way.

Mains power is great for some things, but where pedals are concerned, it’s not always perfect. There are issues with noise, both from cheap power supplies and poorly designed pedals, and it means you’re always hunting for a power socket, which is limiting for buskers.

[Don] realised that the common drill battery is a compact source of clean, DC power, and decided to use that to power his rig. By slapping together a drill battery with a pre-assembled buck converter and a 3D printed adapter, he was able to build a portable power supply for his pedals. Thanks to the fact that the vast majority of pedals use 9V DC with the same input jack design, it’s a cinch to wire up. With an appropriately sized buck converter, a drill battery could supply even a hefty pedalboard for a significant period of time.

Overall, it’s a great hack that solves a problem faced by many performing musicians. We’ve seen our fair share of guitar pedals around Hackaday – perhaps you’d like to see how one makes it from concept to production?

Continue reading “Power Your Guitar Pedals With Drill Batteries”

Taking A Guitar Pedal From Concept Into Production

Starting a new project is fun, and often involves great times spent playing with breadboards and protoboards, and doing whatever it takes to get things working. It can often seem like a huge time investment just getting a project to that functional point. But what if you want to take it to the next level, and take your project from a prototype to a production-ready form? This is the story of how I achieved just that with the Grav-A distortion pedal.

Why build a pedal, anyway?

The author, shown here with bandmates.

A long time ago, I found myself faced with a choice. With graduation looming on the horizon, I needed to decide what I was going to do with my life once my engineering degree was squared away. At the time, the idea of walking straight into a 9-5 wasn’t particularly attractive, and I felt like getting back into a band and playing shows again. However, I worried about the impact an extended break would have on my potential career. It was then that I came up with a solution. I would start my own electronics company, making products for musicians. Continue reading “Taking A Guitar Pedal From Concept Into Production”

Pedal-Pi, Simple Programmable Guitar Pedal

For several years, [Ray] and [Anna], the team behind ElectroSmash, have been smashing audio electronics and churning out some sweet DIY audio gear. This time around, they’ve built Pedal-Pi — a simple programmable guitar pedal based around the Raspberry-Pi Zero. It is aimed at hackers, programmers and musicians who want to experiment with sounds and learn about digital audio. A lot of effort has gone in to documenting the whole project. Circuit analysis, a detailed BoM, programming, assembly and background information on related topics are all covered on their Forum.

The hardware is split in to three parts. On the input, a MCP6002 rail-to-rail op-amp amplifies and filters the analog waveform and then a MCP3202 ADC digitizes it to a 12-bit signal. The Pi-Zero then does all of the DSP, creating effects such as distortion, fuzz, delay, echo and tremolo among others. The Pi-Zero generates a dual PWM signal, which is combined and filtered before being presented at the output. The design is all through hole and the handy assembly guide can be useful for novices during assembly.  The code examples include a large number of pedal effects, and if you are familiar with C, then there’s enough information available to help you write your own effects.

Even if you don’t plan on building one, technical background such as the Basics of Audio DSP in C for Raspberry Pi Zero, Using MCP3202 ADC with Raspberry Pi Zero and PWM Audio on Raspberry Pi Zero ought to make for interesting reading. Check out the video after the break detailing the build.

If you’d like to check out some of their earlier work, check out 1WAMP, an Open Hardware Guitar Amplifier and pedalSHIELD, an opensource Arduino Guitar Pedal.

Continue reading “Pedal-Pi, Simple Programmable Guitar Pedal”