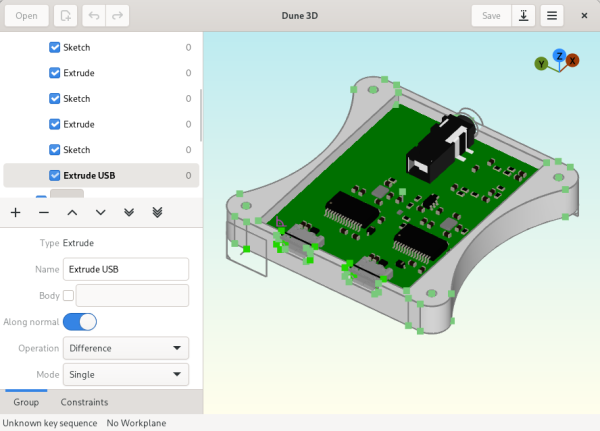
render of a sample board produced with help of this plugin. it's pretty, has nice lighting and all!

From KiCad To Blender For A Stunning Render

We love Blender. It brings you 3D modeling, but not in a CAD way — instead, people commonly use it to create animations, movies, games, and even things like VR models. In short, Blender is about all things art and visual expression. Now, what if you want a breathtaking render of your KiCad board? Look no further than the pcb2blender tool from [Bobbe 30350n].

This isn’t the first time we’ve seen KiCad meet Blender. However, compared to the KiCad to Blender paths that people used previously, pcb2blender makes the import process as straightforward and as quick as humanly possible. Install a plugin for both tools, and simply transfer a .pcb3d file out of the KiCad plugin into the Blender plugin. Want to make the surfaces of your design look like they’re meant to look in real life? Use the free2ki plugin to apply materials to your 3D models. In fact, you should check out [30350n]’s Blender plugin collection and overall portfolio, it’s impressive.

There’s no shortage of Blender hacks – just this year we’ve covered a hacker straight up simulating an entire camera inside Blender for the purpose of making renders, and someone else showing how to use Stable Diffusion to texture 3D scenes at lightning speed. We even recently published a comprehensive tutorial on how to animate your robot in Blender ourselves! Want to give it a shot? Check out this quick and simple Red Bull can model design tutorial.

Thanks to [Aki] for sharing this with us!

Radial Vector Reducer Rotates At Really Relaxed Velocity

When [Michael Rechtin] learned about Radial Vector Reducers, the underlying research math made his head spin, albeit very slowly. Realizing that it’s essentially a cycloidal drive meshed with a planetary gear set, he got to work in CAD and, in seemingly no time, had a design to test. You can see the full results of his experiment in the video below the break. Or head on out to Thingiverse to download the model directly.

[Michael] explains that while there are elements of a cycloidal drive, itself a wonderfully clever gear reduction mechanism, the radial vector reducer actually has more bearing surfaces, and should be more durable as a result. Two cycloidal disks are driven by a planetary gear reduction for an even greater reduction, but they don’t even spin, they just cycle in a way that drives the outer shell, setting them further apart from standard cycloidal drives.

How would this 3D printed contraption hold up? To test this, [Michael] built a test jig with a NEMA 23 stepper providing the torque, and an absurd monster truck/front loader wheel — also printed — to provide traction in the grass and leaves of his back yard. He let it drive around its tether for nearly two weeks before disassembling it to check for wear. How’d it look? You’ll have to check the video to find out.

If you aren’t familiar with cycloidal drives, check out this fantastic explanation we featured. As for planetary drives, what better way to demonstrate it than by an ornamental planetary gear clock!

Continue reading “Radial Vector Reducer Rotates At Really Relaxed Velocity”

DIY SpaceNavigator Brings The Freedom

[Pepijn de Vos] wanted a 6DOF HID. You know, a 6 Degrees Of Freedom Hardware Interface Device. Those are the fancy controllers for navigating in 3D space, for uses like Computer Aided Design, or Kerbal Space Program. And while we can’t speak to [Pepijn]’s KSP addiction, we do know that the commercially available controllers are prohibitively expensive. It takes some serious CAD work to justify the expenditure. [Pepijn] falls somewhere in-between, and while he couldn’t justify the expense, he does have the chops to design and 3D print his own.

Marvelously, he’s shared the design files for SpaceFox, linked above. It’s 6 spring-loaded potentiometers, supporting a floating printed Big Knob. The pots feed into an Arduino Pro Micro, which calculates the knob’s position on the fly and feeds in into the connected computer. On the computer side, the project uses the spacenavd driver to interface with various applications.

SpaceFox V1 is essentially a proof of concept, just asking for someone to come along and knock off the rough edges. [Pepijn] even includes a wishlist of improvements, but with the caveat that he’s satisfied with his working model. If this project really gets your 6DOF juices flowing, maybe try making an improved version, and share the improvements. And let us know about it!

Continue reading “DIY SpaceNavigator Brings The Freedom”

Blender screen with CAD drawing

CAD Sketcher, It’s Parametric CAD For Blender

It’s very early days for CAD Sketcher, a new parametric CAD add-on for Blender by [hlorus], but it looks very promising.

We do a lot of 3D work and like Blender as an environment. It’s always annoying that Blender doesn’t do parametric modeling, so we’re forced into a dedicated CAD package. Blending the two for that robot ocelot is always particularly annoying.

CAD Sketcher lets the user make a ‘sketch’, a 2D drawing. They then  constrain it, saying “this line is vertical, that line is parallel to this one”, until the sketch is fully defined. It’s a normal part of parametric modelling. This is powerful when your model needs refined over and over.

There’s an old adage, “Better a tool that does 90% of the job well than one that does 100% poorly”. For CAD systems, (and much other software), we’d suggest “Better a tool that does 90% of the job well and works with whatever does the other 10%”.

3D render of gaurd
Guard Drawn In CAD Sketcher And Blender

We tried a test part, and being in Blender’s universe showed its value. CAD Sketcher doesn’t do bevels and rounds yet, and probably won’t for a while. But Blender’s perfectly happy doing them.

It’s not going to put SolidWorks out of business any time soon, but it’s a very promising new development. We hope it gathers some community and encourage contributions.

We cover CAD frequently, like the recent advances with CadQuery  and the port of OpenSCAD to WASM.

[thanks paulvdh]

Continue reading “CAD Sketcher, It’s Parametric CAD For Blender”

REMOTICON 2021 // Jay Doscher Proves Tinkercad Isn’t Just For Kids

We invited [Jay Doscher] to give us a view into his process designing 3D printed parts for the impressive array of cyberdecks we’ve covered since 2019.

[Jay] got his start as a maker through woodworking in high school, getting satisfaction from bringing something from idea to reality. After a more recent class in blacksmithing and ax-making showed him what he could do when really focused, his hardware hacking really took off and his line of cyberdecks and other portable computers was born.

If you’ve heard of Tinkercad, you probably think it’s just for kids. While designed as an educational tool, [Jay] found that Autodesk’s younger sibling to the professionally powered (and priced) Fusion 360 had everything needed for making cyberdecks. If you’re willing to work around a few limitations, at the low-low price of free, Tinkercad might be right for you too.

What limitations? To start, Tinkercad is only available in a browser and online. There’s also no guarantee that it will remain free, but [Jay] notes that with its educational focus that is likely to remain the case. There is no library of common components to import while modeling. And, when your model is complete the options for exporting are limited to 2D SVGs and 3D STL, OBJ, and gaming-focused GBL formats. [Jay] has converted those to other formats for laser cutting and the STEP file a machine shop is expecting but admits that it’s something that adds complexity and is an annoyance.

back7-TinkerCad-Alignment

In the talk, [Jay] discusses moving from his initial “cringy” explorations with Tinkercad, to his first cyberdeck, a little history on that term, and the evolution of his craft. It’s mostly a hands-on demo of how to work with Tinkercad, full of tips and tricks for the software itself and implications for 3D printing yourself, assembly, and machining by others.

While quite limited, Tinkercad still allows for boolean operations to join two volumes or the subtraction of one from another. [Jay] does a wonderful job of unpeeling the layers of operations, showing how combinations of “solids” and “holes” generated a complex assembly with pockets, stepped holes for fasteners, and multiple aligned parts for his next cyberdeck. Even if you already have a favorite CAD tool, another approach could expand your mind just like writing software in Strange Programming Languages can.

Continue reading “REMOTICON 2021 // Jay Doscher Proves Tinkercad Isn’t Just For Kids”

Do You Need A Cycloidal Drive?

A cycloidal gear drive is one of the most mesmerizing reduction gears to watch when it is running, but it’s not all just eye-candy. Cycloidals give decent gearing, are relatively compact and back-drivable, and have low backlash and high efficiency. You probably want one in the shoulder of your robot arm, for instance.

But designing and building one isn’t exactly straightforward. Thanks, then, to [How To Mechatronics] for the lovely explanation of how it works in detail, and a nice walkthrough of designing and building a cycloidal gear reducer out of 3D printed parts and a ton of bearings. If you just want to watch it go, check out the video embedded below.

The video is partly an ad for SolidWorks, and spends a lot of time on the mechanics of designing the parts for 3D printing using that software. Still, if you’re using any other graphical CAD tool, you should be able to translate what you learned.

It’s amazing that 3D printing has made sophisticated gearbox designs like this possible to fabricate at home. This stuff used to be confined to the high-end machine shops of fancy robotics firms, and now you can make one yourself this weekend. Not exotic or unreliable enough for you? Well, then, buy yourself some flexible filament and step on up to the strain wave, aka “harmonic drive”, gearbox.

Thanks to serial tipster [Keith] for the tip!

Continue reading “Do You Need A Cycloidal Drive?”

Keycap Customizer Brings All Your Caps To The Board

With bright colors and often intricate designs, after the physical shape of a keyboard the most conspicuous elements are surely the keycaps. Historically dictated by the stem of the key switch it attaches to, keycaps come in a variety of sizes, colors, profiles, and designs. As they necessarily include small features with tight tolerances to fit the stem of their key switch, injection molding is the classic manufacturing technique for a keycap. But as hobbyist 3D printing matures and resin printers become more accessible, home keycap manufacturing is increasingly good option. Instead of designing each cap by hand, consider trying [rsheldiii]’s KeyV2 OpenSCAD script to create custom caps with ease.

To cover the basics, KeyV2 can generate full keycap sets with Cherry or Alps stems, in the SA, DSA, DCS profiles (and more!) for any typically sized keyboard. Generating a particular cap of arbitrary profile, position, and size is just a short chain of function calls away. But standard keycap sets aren’t the highlight of this toolset.

If you’re not an OpenSCAD aficionado yet, visit [Brian Benchoffs] great getting-started guide or our other coverage to get a feel for what the tool can do. Part of OpenSCAD’s attraction is that it is the the paragon of parametric modeling. It’s declarative part files ensure that no parameter goes undefined, which is a perfect fit for KeyV2.

The root file upon which all caps are based on has about 150 keycap parameters which can be tweaked, and that’s before more elaborate customization. Making simple “artisan” caps is a snap, as the magic of OpenSCAD means the user can perform any Boolean operations they need on top of the fully parameterized keycap. Combining an arbitrary model with a keycap is one union() away. See the README for examples.

For the prospective user of KeyV2 worried about complexity; don’t be, the documentation is a treat. Basic use to generate standard keycaps is simple, and there are plenty of commented source files and examples to make more complex usage easy. Thinking about a new keyboard? Check out our recent spike in clacky coverage.