Hinged Parts For The 8th Grade Set

I recently agreed to run a 3D printing camp for 8th graders. If you’ve never shared your knowledge with kids, you should. It is a great experience. However, it isn’t without its challenges. One thing I’ve learned: don’t show the kids things that you don’t want them to try to print.

I learned this, of course, the hard way. I have several “flexy”3D prints. You know the kind. Flexy dinosaurs, cats, hedgehogs, and the like. They all have several segments and a little hinge so the segments wobble. The problem is the kids wanted to print their own creations with flexy hinges.

I’ve built a few print-in-place hinges, but not using Tinkercad, the software of choice for the camp. While I was sure it was possible, it seemed daunting to get the class to learn how to do it. Luckily, there’s an easy way to add hinges like this to a Tinkercad design. There was only one problem.

Continue reading “Hinged Parts For The 8th Grade Set”

Retired Welding Robot Picks Up Side Hustle As CNC Router

Who says you can’t teach an old robot new tricks? Nobody, actually. That saying is about dogs. But it applies to robots too, at least judging by the way this late-90s industrial beast was put to use in a way it was never intended: as a giant CNC router.

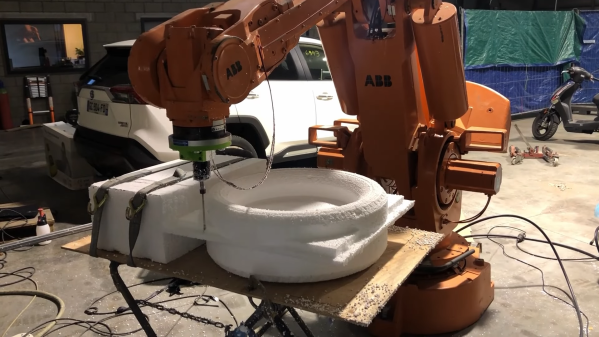
The machine in question is an ABB IRB6400, a six-axis, floor-mounted industrial machine that had a long career welding at a Eurorail factory in Austria before [Brian Brocken] made its acquaintance. He procured the non-working machine — no word on what he paid for it — and moved the 2-ton paperweight into his shop, itself a non-trivial endeavor. After a good scrubbing, [Brian] tried to get the machine started up. An error prevented the robot controller from booting; luckily, there’s a large community of ABB users, and [Brian] learned that one of the modules in the controller needed replacement.

After fixing that — and swapping out the controller’s long-dead backup batteries, plus replacing the original 1.44 MB floppy drive with a USB drive — he was able to bring the machine back to life. Unfortunately, the limited amount of internal memory made it difficult to use for anything complicated, so [Brian] came up with an application to stream coordinates to the controller over a serial port, allowing for unlimited operation. With that in place, plus a simple spindle mounted to the robot’s wrist with a 3D printed adapter, [Brian] was able to carve foam blocks into complex shapes. The video below shows everything from delivery to first chips — well, dust at least.

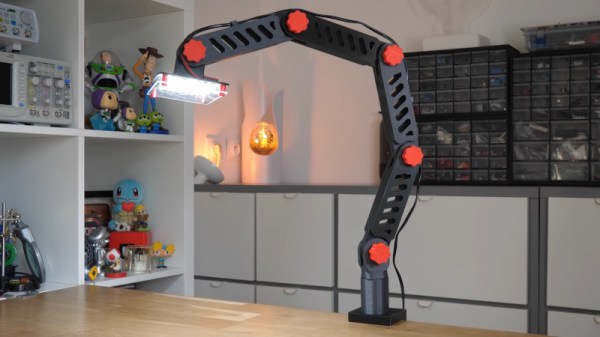
This build seems to be a significant escalation from [Brian]’s previous large-format CNC machine. He must have something interesting in mind, so stay tuned for details.

Continue reading “Retired Welding Robot Picks Up Side Hustle As CNC Router”

Scratch-Built Robot Arm Looks Like Something Off The Factory Floor

[Jeremy Fielding] is rightly impressed with the power and precision of industrial robot arms. The big arms that you see welding cars on assembly lines and the like are engineering feats in their own right, which is why his leap into scratch-building one in the home shop promises to be quite an adventure, and one we’re eager to follow.

From the look of the video below, [Jeremy]’s arm is already substantially complete, so it seems like he’ll be releasing videos that detail how he got to the point where this impressively large and powerful arm took over so much of his shop. He’s not fooling around here — this is a seven-axis articulated arm built from aluminum and powered by AC servos. [Jeremy] allows that some of the structural parts are still 3D-printed prototypes that he’s using to finalize the design before committing to cutting metal, a wise move as he notes that most of the metalworking skills he needs to complete the build are still fairly new to him. It still looks amazing, and we’re looking forward to the rest of the series to see how he got to this point.

We always appreciate [Jeremy]’s enthusiasm and presentation style, and we generally learn a lot from his videos. Whether it’s a CNC table saw, a homebrew dynamometer, or supersonically melting baseballs, his videos are always great to watch.

Continue reading “Scratch-Built Robot Arm Looks Like Something Off The Factory Floor”

3D Printed Workshop Lamp Uses A Few Neat Tricks

As far as light fittings go, store bought is fine, but it’s hard to beat something you’ve built yourself from the ground up. [Heliox] demonstrates this well, with a 3D-printed workshop lamp that looks the business and is functional, too.

The lamp has plenty of neat design touches that speak to [Heliox]’s experience in the 3D printed arts. The articulating arms are modular, and feature integrated cable guides. The lamp base features nuts inserted mid-print for easy assembly, and the swivel is actually a two-piece mechanism printed as a single assembly. The table clamp uses a large screw, and the benefit of 3D printing means its easy to customise to suit any individual table. Using black and orange filaments gives the lamp a proper industrial look, and the bright LED strips are perfect for illuminating a bench for fine detailed work.

It’s a great addition to [Heliox]’s workspace, and the tall articulated design means it can cast light without getting in the way of what you’re doing. We’ve featured her work before, too – like this glorious infinity cube. Video after the break.

Continue reading “3D Printed Workshop Lamp Uses A Few Neat Tricks”

Arduino Clock Jots Down The Time, In UV

We’re big fans of the impractical around here at Hackaday. Sure there’s a certain appeal to coming up with the most efficient method to accomplish your goal, the method that does exactly what it needs to do without any superfluous elements. But it’s just not as much fun. If at least one person doesn’t ask “But why?”, then you probably left something on the table, design wise.

So when we saw this delightfully complex clock designed by [Tucker Shannon], we instantly fell in love. Powered by an Arduino, the clock uses an articulated arm with a UV LED to write out the current time on a piece of glow-in-the-dark material. The time doesn’t stay up for long depending on the lighting in the room, but at least it only takes a second or two to write out once you press the button.

Things are pretty straightforward inside the 3D printed case. There’s an Arduino coupled with an RTC module to keep the time, which is connected to the two standard hobby servos mounted in the front panel. A UV LED and simple push button round out the rest of the Bill of Materials. The source code is provided, so you won’t have to figure out the kinematics involved in getting the two servos to play nicely together if you want to try this one at home.

We’ve seen many clocks powered by Arduinos over the years, occasionally they even have hands. But few can boast their own robotic arm.

Continue reading “Arduino Clock Jots Down The Time, In UV”

Super-small Robotic Joints Don’t Exist? They Do Now!

[Tim] needed very small, motorized joints for a robot. Unable to find anything to fit the bill, he designed his own tiny, robotic joints. Not only are these articulated and motorized, they are designed to be independent – each containing their own driver and microcontroller.

6mm geared motor next to LEGO [Source: Pololu]
None of the photos or video really give a good sense of just how small [Tim]’s design is. The motor (purple in the 3D render above, and pictured to the left) is a sub-micro planetary geared motor with a D shaped shaft. It is 6mm in diameter and 19mm long. One of these motors is almost entirely encapsulated within the screw it drives (green), forming a type of worm gear. As the motor turns the screw, a threaded ring moves up or down – which in turn moves the articulated shaft attached to the joint. A video is embedded below that shows the joint in action.

[Tim] originally tried 3D printing the pieces on his Lulzbot but it wasn’t up to the task. He’s currently using a Form 2 with white resin, which is able to make the tiny pieces just the way he needs them.

Continue reading “Super-small Robotic Joints Don’t Exist? They Do Now!”

Articulated Computer Lamp Lights Up Your Life

[Samimy] raided his parts bin to build this articulated lamp (YouTube link) for his computer workstation. Two pieces of aluminum angle form the main body of the lamp. Several brackets are used to form two hinges which allow the lamp to be positioned above [Samimy’s] monitor. The light in this case comes from a pair of 4 watt LED bulbs.

[Samimy] used double nuts on the moving parts to make sure nothing comes loose. The outer nuts are acorns, which ensure no one will get cut on an exposed bit of threaded rod. [Samimy] wired the two bulbs up in a proper parallel mains circuit. The switch is a simple toggle mounted in a piece of Plexiglass on the end of the lamp.

One thing we would like to see on this build is a ground wire. With all that exposed aluminum and steel, one loose connection or worn bit of insulation could make the entire lamp body live.

Continue reading “Articulated Computer Lamp Lights Up Your Life”