Dash With Arduino

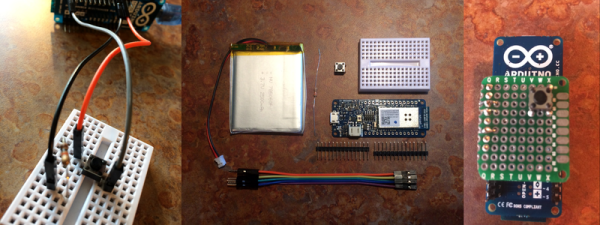
Amazon Dash is a handy service, and when Amazon released their AWS IoT platform, [Brian Carbonette] felt that it left out all the hardware hackers from the tinkering fun. Seeking justice, he put together a guide for an Arduino Dash button aimed at hardware hackers and those who are still easing into the world.

For his build, [Carbonette] used an Arduino MKR1000, laying out a few different configuration options for building your button. He has also gone to great lengths to help all comers tackle the Arduino-Dash API communication process by building an AmazonDRS Arduino Library, which handles all the “boring details,” so you can focus on the hardware. With the warning that the software-side setup is tedious the first time around, [Carbonette] has included a detailed manual for setting up the aforementioned AmazonDRS library, some example code, and a breakdown thereof. He also suggests implementing other features — such as a notification if the item is out of stock on Amazon — to tie the project together.

Continue reading “Dash With Arduino”

33C3: Hunz Deconstructs The Amazon Dash Button

The Amazon Dash button is now in its second hardware revision, and in a talk at the 33rd Chaos Communications Congress, [Hunz] not only tears it apart and illuminates the differences with the first version, but he also manages to reverse engineer it enough to get his own code running. This opens up a whole raft of possibilities that go beyond the simple “intercept the IP traffic” style hacks that we’ve seen.

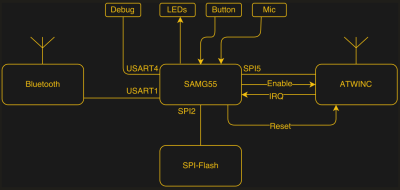
dash_block_diagramJust getting into the Dash is a bit of work, so buy two: one to cut apart and locate the parts that you have to avoid next time. Once you get in, everything is tiny! There are a lot of 0201 SMD parts. Hidden underneath a plastic blob (acetone!) is an Atmel ATSAMG55, a 120 MHz ARM Cortex-M4 with FPU, and a beefy CPU all around. There is also a 2.4 GHz radio with a built-in IP stack that handles all the WiFi, with built-in TLS support. Other parts include a boost voltage converter, a BTLE chipset, an LED, a microphone, and some SPI flash.

The strangest part of the device is the sleep mode. The voltage regulator is turned on by user button press and held on using a GPIO pin on the CPU. Once the microcontroller lets go of the power supply, all power is off until the button is pressed again. It’s hard to use any less power when sleeping. Even so, the microcontroller monitors the battery voltage and presumably phones home when it gets low.
Continue reading “33C3: Hunz Deconstructs The Amazon Dash Button”

Making VR A Little More Usable With A Pinch Gesture Ring

[Florian] wants to browse the web like an internet cowboy from a cyberpunk novel. Unfortunately, VR controllers are great for games but really incapacitate a hand for typing. A new input method was needed, one that would free his fingers for typing, but still give his hands detailed input into the virtual world.

Since VR goggles have… hopefully… already reached peak ridiculousness, his first idea was to glue a Leap Motion controller to the front of it. It couldn’t look any sillier after all.  The Leap controller was designed to track hands, and when combined with the IMU built into the VR contraption, did a pretty good job of putting his hands into the world. Unfortunately, the primary gesture used for a “click” was only registering 80% of the time.

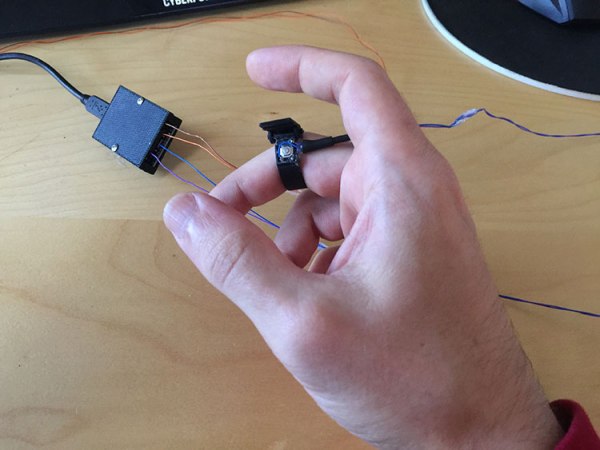
The gesture in question is a pinching motion, pushing the thumb and middle finger together. He couldn’t involve a big button without incapacitating his hands for typing. It took a few iterations, but he arrived at a compact ring design with a momentary switch on it. This is connected to an Arduino on his wrist, but was out of the way enough to allow him to type.

It’s yet another development marching us to usable VR. We personally can’t wait until we can use some technology straight out of  Stephenson or Gibson novel.

Amazon Dash Reboots Your Pi

We all know feature creep can be a problem in almost any project. A simple idea can often become unusable if a project’s scope isn’t clearly defined in the beginning. However, the opposite problem sometimes presents itself: forgetting to include a key feature. [Zach] had this problem when he built a Raspberry Pi magic mirror and forgot to build a physical reset/shutoff switch. Luckily he had a spare Amazon Dash button and re-purposed it for use with his Pi.

The Raspberry Pi doesn’t include its own on/off switch. Without installing one yourself, the only way to turn off the device (without access to the terminal) is to unplug it, which can easily corrupt data on the SD card. Since [Zach]’s mirror was already complete, he didn’t want to take the entire thing apart just to install a button. There’s already a whole host of applications for the Dash button, so with a little Node.js work on the Raspberry Pi he was able to configure a remote-reset button for his mirror.

This is a similar problem for most Raspberry Pi owners, so if you want to follow [Zach]’s work he has done a great job detailing his process on his project site. If you’re looking for other uses for these convenient network-enabled buttons, he also links to a Github site with lots of other projects. This pizza button is probably our favorite, though.

NFC Tags Add Old-School Functionality To New Phone

Back in the day, we had smartphones with physical buttons. Not just power, volume, and maybe another button on the front. Whole, slide-out QWERTY keyboards right on the underside of the phone. It was a lawless wasteland, but for those who yearn for the wild-west days of the late 2000s, [Liviu] has recreated the shortcut buttons that used to exist on the tops of these keyboards for modern-day smartphones.

There were lots of phones that had shortcut keys on their keyboards, but [Liviu] enjoyed using the ones that allowed him to switch between applications (or “apps” as the kids are saying these days) such as the calendar, the browser, or the mail client. To recreate this, he went with a few NFC tags. These devices are easily programmed via a number of apps from your app store of choice, and can be placed essentially anywhere. In order to make them visible to the phone at any time, though, he placed the tags inside a clear plastic case for his phone and can now use them anytime.

If you’ve never used or programmed an NFC tag, this would be a great project to get yourself acquainted with how they operate. Plus, you could easily upgrade this project to allow the tags to do any number of other things. You can take projects like this as far as you want.

Continue reading “NFC Tags Add Old-School Functionality To New Phone”

Coffee Alarm

Alarm Notifies The Office When The Coffee Is Ready

[Stian] thought it would be nice if his coworkers could be electronically notified when the latest batch of coffee is ready. He ended up building an inexpensive coffee alarm system to do exactly that. When the coffee is done, the brewer can press a giant button to notify the rest of the office that it’s time for a cuppa joe.

[Stian’s] first project requirement was to activate the system using a big physical button. He chose a button from Sparkfun, although he ended up modifying it to better suit his needs. The original button came with a single LED built-in. This wasn’t enough for [Stian], so he added two more LEDs. All three LEDs are driven by a ULN2003A NPN transistor array. Now he can flash them in sequence to make a simple animation.

This momentary push button supplies power to a ESP8266 microcontroller using a soft latch power switch. When the momentary switch is pressed, it supplies power to the latch. The latch then powers up the main circuit and continues supplying power even when the push button is released. The reason for this power trickery is to conserve power from the 18650 li-on battery.

The core functionality of the alarm uses a combination of physical hardware and two cloud-based services. The ESP8266 was chosen because it includes a built-in WiFi chip and it only costs five dollars. The microcontroller is configured to connect to the WiFi network with the push of a button. The device also monitors the giant alarm button.

When the button is pressed, it sends an HTTP request to a custom clojure app running on a cloud service called Heroku. The clojure app then stores brewing information in a database and sends a notification to the Slack cloud service. Slack is a sort of project management app that allows multiple users to work on projects and communicate easier over the internet. [Stian] has tapped into it in order to send the actual text notification to his coworkers to let them know that the coffee is ready. Be sure to watch the demo video below. Continue reading “Alarm Notifies The Office When The Coffee Is Ready”

Meter Backlight

Adding A Backlight To A Cheap Multimeter

We don’t all need super high quality electronic testing gear. Sometimes second-hand or inexpensive equipment is accurate enough to get the job done. Though it can be a bit annoying to miss out on some of those “luxury” features. [Ekriirke] had this problem with his cheap multimeter. He wished the LCD screen had a backlight for easier visibility, so rather than upgrade to a more expensive unit he just added one himself.

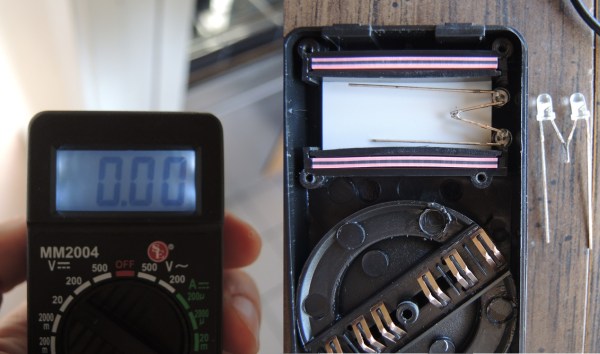
After opening up the multimeter [Ekriirke] found that it ran on a single 12V battery. He realized that the simplest thing to do would be to wire up four white LEDs in series. The four LEDs were arranged within the case off to each side of the LCD, one in each corner. The leads were bent at 90 degree angles and soldered together “dead bug” style. Thin strips of copper foil tape were attached to the PCB in such a way that the anode and cathode from the LEDs would make contact when the case was closed back up.

The tape wraps around to the other side of the PCB where there was more room for the next piece of the circuit. A capacitor, resistor, and transistor are used in conjunction with a momentary switch. This circuit allows [Ekriirke] to turn on the light for about ten seconds by pressing the button one time. The circuit also runs through the meter’s dial switch, preventing the LEDs from being turned on while the meter itself is turned off.

[via Reddit]