RoboTray Is A Secret Tea Butler

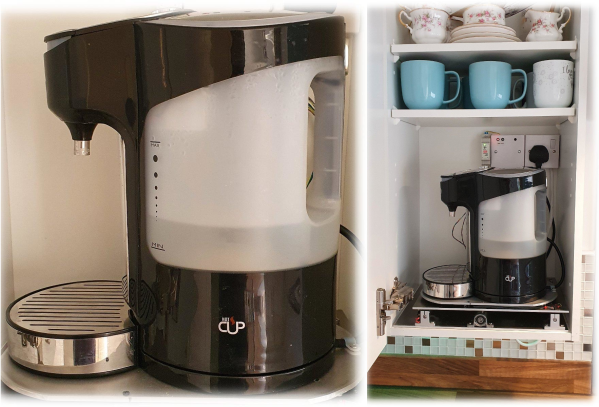
How far would you go for your cup of tea? [samsungite]’s missus doesn’t like clutter on her countertops, so away the one-cup kettle would go back into the cupboard for next time while the tea steeped. As long as there’s room for it in there, why not install it there permanently? That’s the idea behind RoboTray, which would only be cooler if it could be plumbed somehow.

RoboTray went through a few iterations, most importantly the switch from 6mm MDF to 4 mm aluminum plate. A transformer acts as a current sensor, and when the kettle is powered on, the tray first advances forward 7 cm using a 12 VDC motor and an Arduino. Then it pivots 90° on a lazy Susan driven by another 12 VDC motor. The kettle is smart enough to turn itself off when finished, and the Arduino senses this and reverses all the steps after a ten-second warning period. Check it out in action after the break.

If [samsungite] has any more Arduinos lying around, he might appreciate this tea inventory tracker.

Continue reading “RoboTray Is A Secret Tea Butler”

3D Printed Flip Dots

Displays have come a long way in the last few decades, but none can deliver the mesmerizing visual and audio experience of a large flip dot display. Both old panels and new panels can be expensive and difficult to source, so [Larry Builds] made his own flip dots with the help of 3D printing.

Flip dots are driven by a pair of electromagnetic posts that attract or repel a magnet embedded in the dot, and [Larry Builds] version is no different. For the electromagnets, he used M3 threaded rod with enamel wire wound around them using a drill. At first, he used a large magnet in the center of the 3D printed dot, but the magnetic field was large and strong enough to flip the surrounding dots in an array. He then changed the design to a small 4 mm diameter magnet in the edge that aligns directly with the electromagnets. This design looks very similar to those used by Breakfast for their massive installations. By modifying electromagnets and adding spacers around the magnets, he was able to reduce the operating current from 2 A to below 500 mA. [Larry Builds] also breadboarded a basic driver circuit consisting of H-bridges multiplexed to rows and columns with diodes.

We will be keeping a close eye on this project, and we look forward to seeing it evolve further. It’s definitely on our “things to build” list. We’ve embedded multiple videos after the break showing the progress thus far.

We’ve covered several interesting flip dot projects, including a water level indicator that doesn’t use any electronics and another that is crocheted. Continue reading “3D Printed Flip Dots”

LED Hack Teaches DJI Mini 2 Drone New Tricks

Despite its diminutive proportions, the thrust to weight ratio of the DJI Mini 2 is high enough that it can carry a considerable amount of baggage. So it’s no surprise that there’s a cottage industry of remotely controlled payload releases that can be bolted onto the bottom of this popular quadcopter. But [tterev3] wanted something that would integrate better with DJI’s software instead of relying on a separate transmitter.

As explained in the video below, his solution was to tap into the signals that control the RGB LED on the front of the drone. Since the user can change the color of the LED at any time with the official DJI smartphone application, decoding this signal to determine which color had been selected is like adding several new channels to the transmitter. In this case [tterev3] just needed to decode a single color to use as a “drop” signal, but it’s not hard to imagine how this concept could be expanded to trigger several different actions with a few more lines of code.

Examining the LED control signal.

[tterev3] wrote some software to decode the 48 bits of data being sent to the LED with a PIC18F26K40 microcontroller, which in turn uses an L9110H H-Bridge to control a tiny gear motor. To get feedback, he’s using a small magnet glued to the release arm and a Hall-effect sensor.

Concerned about how much power he could realistically pull from a connection that was intended for an LED, he gave the release its own battery that is slowly charged while the drone is running. You could argue that since the motor only needs to fire up once to drop the payload, [tterev3] probably could have gotten away with not recharging it at all during the flight. But as with the ability to decode additional color signals, the techniques being demonstrated here hold a lot of promise for future development.

Folks have been strapping additional hardware to commercial quadcopters for years, but modifications like this one that actually let the craft release its payload and fly away hold particular promise for environmental monitoring and building mesh communication networks.

Continue reading “LED Hack Teaches DJI Mini 2 Drone New Tricks”

Motor Controller Reverse Engineering Releases Smoke

It may have been designed for a sewing machine, but [Haris Andrianakis] found his imported DC brushed motor was more than up to the challenge of powering his mini lathe. Of course there’s always room for improvement, so he set out to reverse engineer the motor’s controller to implement a few tweaks he had in mind. Unfortunately, things took an unexpected turn when plugging his AVR programmer into the board’s ISP socket not only released the dreaded Magic Smoke, but actually tripped the breaker and plunged his bench into darkness.

Studying how the Hall-effect sensors in the motor are wired.

Upon closer inspection, it turned out the board has no isolation between the high voltage side and its digital logic. When [Haris] connected his computer to it via the programmer, the 330 VDC coming from the controller’s rectifier shorted through the USB bus and tripped the Earth-leakage circuit breaker (ELCB). The good news is that his computer survived the ordeal, and even the board itself seemed intact. But the shock must have been too much for the microcontroller he was attempting to interface with, as the controller no longer functioned.

Now fully committed, [Haris] started mapping out the rest of the controller section by section. In the write-up on his blog, he visually masks off the various areas of the PCB so readers have an easier time following along and understanding how the schematics relate to the physical board. It’s a nice touch, and a trick worth keeping in mind during your own reverse engineering adventures.

In the end, [Haris] seems to have a good handle on what the majority of the components are up to on the board. Which is good, since getting it working again now means replacing the MCU and writing new firmware from scratch. Or perhaps he’ll just take the lessons learned from this controller and spin up his own custom hardware. In either event, we’ll be keeping an eye out for his next post on the subject.

Finally, A Differently Useless Machine

Traditionally, the useless machine is a simple one that invites passersby to switch it on. When they do, the machine somehow, some way, turns itself off; usually with a finger or finger-like object that comes out from the box in what feels like an annoyed fashion. Honestly, that’s probably part of what drives people to turn them on over and over again.

But [Bart Blankendaal] has managed to turn the useless machine on its head. When this machine is switched to the on position, unseen forces inside the box will spin the toggle switch around 180° to the off position.

What’s really happening is that an Arduino is getting a signal from the toggle switch, and is then rotating it on a ball bearing with a stepper motor driven through an H-bridge.

It shouldn’t be too hard to make one of these yourself, given that [Bart] has provided the schematic and STLs. If we weren’t living in such touchy times, we might suggest building one of these into your Halloween candy distribution scheme somehow. Sell the switch as one that turns on a candy dispenser, and then actually dispense it after three or five tries.

Many see useless machines as tangible examples of existential quandary. Here is one that takes that sentiment a bit further by snuffing out a candle.

Continue reading “Finally, A Differently Useless Machine”

Abused Hard Drive Becomes POV Clock

We all know that there’s not much to do with an old hard drive. Once you render the platters unreadable and perhaps harvest those powerful magnets, there’s not much left of interest. Unless, of course, you turn the whole thing into a persistence-of-vision clock.

At least that’s what [Leo] did when he created “PendoLux”. The clock itself is pretty simple; like any POV project, it just requires a way to move an array of flashing LEDs back and forth rapidly enough that they can trick the eye into seeing a solid image. [Leo] put the read head mechanism of an old HDD into use for that, after stripping the platters and motor out of it first.

The voice coil and magnet of the head arm are left intact, while a 3D-printed arm carrying seven RGB LEDs replaces the old heads. [Leo] added a small spring to return the arm to a neutral position, and used an Arduino to drive the coil and flash the LEDs. Getting the timing just right was a matter of trial and error; he also needed to eschew the standard LED libraries because of his heavy use of interrupts and used direct addressing instead.

POV clocks may have dropped out of style lately — this hard drive POV clock and a CD-ROM version were posted years ago. But [Leo]’s clock is pretty good looking even for a work in progress, so maybe the style will be making a comeback.

Continue reading “Abused Hard Drive Becomes POV Clock”

Build Your Own Grid Tie Inverter

Inverters that convert DC into AC are pretty commonplace, some cars even have standard AC receptacles in them for you to plug in your favorite appliance. However, there’s a particular type of inverter called a grid tie inverter that allows you not only to make AC, but also inject it back through an AC outlet to power other devices in conjunction with the normal AC service. Why? Maybe you want to use your own generator or solar power. In some cases, the power company will pay you if you produce more power than you consume. Maybe you just want to know you can do it. That seems to be the motivation behind [fotherby’s] build, which is quite substantial.

The setup only handles about 60 watts, but it does all the functions you need: DC to AC conversion as well as phase and voltage matching. Actually, just converting DC to AC is almost trivial if you don’t care about the waveform. But in this case, you do care that you can create an AC signal to match the one already on the line.

Continue reading “Build Your Own Grid Tie Inverter”