A stepper-powered flip clock

Steppers And ESP32 Make This Retro-Modern Flip-Clock Tick

Before LEDs became cheap enough to be ubiquitous, flip-card displays were about the only way to get a digital clock. These entirely electromechanical devices had their own charm, and they have a certain retro cachet these days. Apart from yard sales and thrift stores, though, they’re a bit hard to source — unless you roll your own, of course.

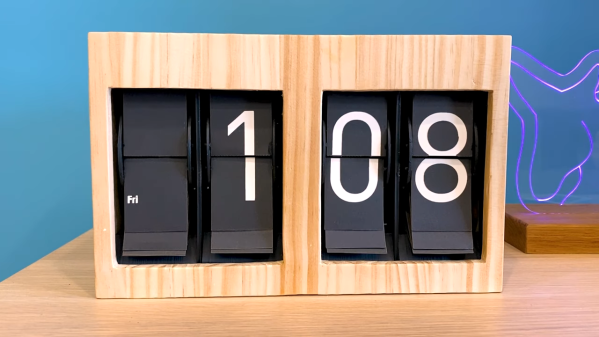
Granted, [David Huang]’s ESP32-based flip clock is worlds apart from the flip cards of the “I Got You, Babe” era. Unfortunately, the video below is all we have to go on to get the story behind this clock, but it’s pretty self-explanatory. [David] started the build by making the flip cards themselves, a process that takes some topological tricks as well as a laser cutter. 3D-printed spools are loaded with the cards, which are then attached to frames that hold a stepper motor and a Hall-effect sensor. The ESP32 drives the steppers via L298N H-bridge drivers, but it’s hard to say if there’s an RTC chip or if the microcontroller is just getting time via an NTP server.

[David] might not be the only one trying to recapture that retro look, but we’ve got to hand it to him — it’s a great look, and it takes a clever maker to not only build a clock like this, but to make a video that explains it all so clearly without a single word of narration.

Continue reading “Steppers And ESP32 Make This Retro-Modern Flip-Clock Tick”

Raspberry Pi Zero Takes The Wheel In Miniature Fighting Robot

Looking to capitalize on his familiarity with the Raspberry Pi, [Sebastian Zen Tatum] decided to put the diminutive Pi Zero at the heart of his “antweight” fighting robot, $hmoney. While it sounds like there were a few bumps in the road early on, the tuxedoed bot took home awards from the recent Houston Mayhem 2021 competition, proving the year of Linux on the battle bot is truly upon us.

Compared to using traditional hobby-grade RC hardware, [Sebastian] says using the Pi represented a considerable cost savings. With Python and evdev, he was able to take input from a commercial Bluetooth game controller and translate it into commands for the GPIO-connected motor controllers. For younger competitors especially, this more familiar interface can be seen as an advantage over the classic RC transmitter.

A L298N board handles the two N20 gear motors that provide locomotion, while a Tarot TL300G ESC is responsible for spinning up the brushless motor attached to the “bow tie” spinner in the front. Add in a Turnigy 500mAh 3S battery pack, and you’ve got a compact and straightforward electronics package to nestle into the robot’s 3D printed chassis.

In a Reddit thread about $hmoney, [Sebastian] goes over some of the lessons his team has learned from competing with their one pound Linux bot. An overly ambitious armor design cost them big at an event in Oklahoma, but a tweaked chassis ended up making them much more competitive.

There was also a disappointing loss that the team believes was due to somebody in the audience attempting to pair their phone with the bot’s Pi Zero during the heat of battle, knocking out controls and leaving them dead in the water. Hopefully some improved software can patch that vulnerability before their next bout, especially since everyone that reads Hackaday now knows about it…

While battles between these small-scale bots might not have the same fire and fury of the televised matches, they’re an excellent way to get the next generation of hackers and engineers excited about building their own hardware. We wish [Sebastian] and $hmoney the best of luck, and look forward to hearing more of their war stories in the future.

FET Based Motor Driver Is Better Than L298N

If you want to build a small robot with a motor, you are likely to reach for an L298N to interface your microcontroller to the motor, probably in an H-bridge configuration. [Dronebot] has used L298N chips like this many times. In the video below, he uses a TB6612FNG instead, taking advantage of the device’s use of MOSFETs. The TB6612 may be a little more expensive, but it’s clearly worth it.

You can get breakout boards for the tiny chips. [DroneBot] looks at several ready-to-go breakout boards. They are not drop-in compatible, though. For example, the L298N can operate motors from 4.5 to 46V while the TB6612 can go from 2.5 to 13.5V on the motor voltage. The L298N also handles more current. However, because of its relatively low efficiency, it needs a heat sink. The TB6612 boasts up to 95% efficiency and also has a low current standby mode. Of course, the TB6612 drops much less voltage which is great if you are using low voltage motor.

Continue reading “FET Based Motor Driver Is Better Than L298N”

A 3D Printed Robotic Chariot For Your Phone

As we’ve said many times in the past, the wide availability of low-cost modular components has really lowered the barrier to entry for many complex projects which previously would have been nigh-on impossible for the hobbyist to tackle. The field of robotics has especially exploded over the last few years, as now even $100 can put together a robust robotics experimentation platform which a decade ago might have been the subject of a DARPA grant.

But what if you want to go even lower? What’s the cheapest and easiest way to put together something like a telepresence robot? That’s exactly what [Advance Robotics] set out to determine with their latest project, and the gadget’s final form might be somewhat surprising. Leveraging the fact that nearly everyone has a device capable of video calls in their pocket, the kit uses simple hardware and 3D printed components to produce a vehicle that can carry around a smartphone. With the phone providing the audio and video link, the robot only needs to handle rolling around in accordance with the operators commands.

The robot chassis consists of a few simple 3D printed components, including the base which holds the phone and electronics, the wheels, and the two rear “spoons” which are used to provide a low-friction way of keeping the two-wheeled device vertical. To get it rolling, two standard DC gear motors are bolted to the sides. With the low cost of printer filament and the fact that these motors can be had for as little as $2 online, it’s hard to imagine a cheaper way to get your electronics moving.

As for the electronics, [Advance Robotics] is using the Wemos D1 Mini ESP8266 development board along with L298N motor controller, another very low-cost solution. The provided source code pulls together a few open source libraries and examples to provide a simple web-based user interface which allows the operator to connect to the bot from their browser and move it around with just a few clicks of the mouse.

If you like the idea of printing a rover to explore your living room but want something a bit more advanced, we’ve seen printable robotics platforms that are sure to meet your needs, no matter what your skill level is.

Continue reading “A 3D Printed Robotic Chariot For Your Phone”

ESP8266 Powered Tank With Voice Control

The high availability of (relatively) low cost modular components has made building hardware easier than ever. Depending on what you want to do, the hardware side of a project might be the hacker equivalent of building with LEGO. In fact, we wouldn’t be surprised if it literally involved building with LEGO. In any event, easy and quick hardware builds leave more time for developing creative software to run the show. The end result is that we’re starting to see very complex systems broken down into easy-to-replicate DIY builds that would have been nearly impossible just a few years ago.

[igorfonseca83] writes in to share with us his modular tank platform that uses the ESP8266 and a handful of software hacks to allow for voice control from the user’s mobile device. Presented as a step-by-step guide on Hackaday.io, this project is perfect for getting started in Internet-controlled robotics. Whether you just want to experiment with Google Assistant integration or use this as a blank slate to bootstrap a remotely controlled rover, this project has a lot to offer.

The chassis itself is a commercially available kit, and [igorfonseca83] uses a L298N dual channel H-bridge module to control its two geared motors. A Wemos D1 serves as the brains of the operation, and three 18650 3.7V batteries provide the juice to keep everything running. There’s plenty of expansion capability to add sensors and other gear, but for this project getting it rolling was the only concern.

Software wise, there are a number of pieces that work together to provide the Google Assistant control demonstrated in the video after the break. It starts by interfacing the ESP8266 board Adafruit.IO, which connects to IFTTT, and then finally Google Assistant. By setting up a few two variable phrases in IFTTT that get triggered by voice commands in Google Assistant, you can push commands back down to the ESP8266 through Adafruit.IO. It’s a somewhat convoluted setup, admittedly, but the fact that involves very little programming makes it an interesting solution for anyone who doesn’t want to get bogged down with all the minutiae of developing your own Internet control stack.

[igorfonseca83] is no stranger to building remotely controlled rovers. Last year we covered another of his creations which was commanded through a web browser and carried an Android phone to stream video of its adventures.

Continue reading “ESP8266 Powered Tank With Voice Control”

Watney: A Fully 3D Printed Rover Platform

We’re getting to the point that seeing 3D printed parts in a project or hack isn’t as exciting as it was just a few years ago. The proliferation of low-cost desktop 3D printers means that finding a printer to squirt out a few parts for your build isn’t the adventure it once was. Gone are the days of heading to a local hackerspace or college hoping their janky Mendel felt like working that day. But all that really means is that hackers and makers now have the ability to utilize 3D printing even more. Forget printing one or two parts of your design, just print the whole thing.

That’s exactly what [Nik Ivanov] did with Watney, his fully 3D printed rover project. After lamenting that many so-called 3D printed rovers were anything but, he set out to design one that was not only made primarily of printed parts, but was robust enough to put some real work in. Over the course of several design iterations, he built a very capable all-wheel drive platform that needs only some electronics and a handful of M3 screws to leap into action.

As long as you’ve got a 3D printer big enough to handle the roughly 120mm x 190mm dimensions of this bot’s body, you’re well on the way to owning your very own video rover. [Nik] recommends printing everything in PETG, no doubt for its increased strength when it comes to things like the drive gears. Plus it’s low warp, which is really going to help when printing the top and bottom sections of the body. TPU is advised for the tires, but if you don’t have any (or your printer chokes on flexible filaments) you can just wrap the wheels with wide rubber bands.

[Nik] is using a Raspberry Pi Zero W as the brains of the operation, but the beauty of an open platform like this is that you could easily swap out the controls for something else to meet your needs. In addition to the Pi, there’s a L298N H-bridge motor controller to interface with the dual geared motors, as well as a servo to provide tilt for the SainSmart camera module.

We’ve often been surprised at just how expensive commercial robotics platforms can be, so we’re keenly interested in seeing if the availability of designs like this spur on DIY rover development. Though if you’re looking for something a little more rough and tumble, we’ve seen a 3D printed rover that looks combat-ready.

Continue reading “Watney: A Fully 3D Printed Rover Platform”

Glorious Body Of Tracked ‘Mad Mech’ Started As Cardboard

[Dickel] always liked tracked vehicles. Taking inspiration from the ‘Peacemaker’ tracked vehicle in Mad Max: Fury Road, he replicated it as the Mad Mech. The vehicle is remote-controlled and the tank treads are partly from a VEX robotics tank tread kit. Control is via a DIY wireless controller using an Arduino and NRF24L01 modules. The vehicle itself uses an Arduino UNO with an L298N motor driver. Power is from three Li-Po cells.

The real artistic work is in the body. [Dickel] used a papercraft tool called Pepakura (non-free software, but this Blender plugin is an alternative free approach) for the design to make the body out of thin cardboard. The cardboard design was then modified to make it match the body of the Peacemaker as much as possible. It was coated in fiberglass for strength, then the rest of the work was done with body filler and sanding for a smooth finish. After a few more details and a good paint job, it was ready to roll.

There’s a lot of great effort that went into this build, and [Dickel] shows his work and process on his project page and in the videos embedded below. The first video shows the finished Mad Mech being taken for some test drives. The second is a montage showing key parts of the build process.

Continue reading “Glorious Body Of Tracked ‘Mad Mech’ Started As Cardboard”