Gamecube Dock For Switch Mods Nintendo With More Nintendo

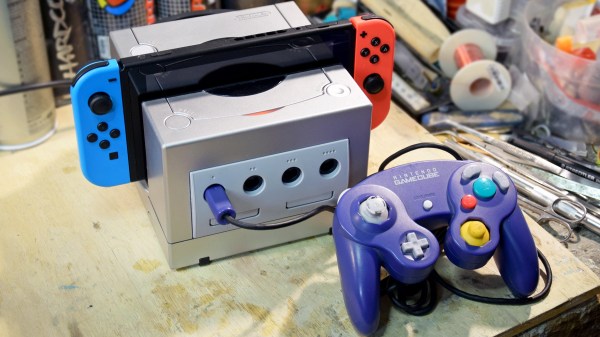
[Dorison Hugo] let us know about a project he just completed that not only mods Nintendo with more Nintendo, but highlights some of the challenges that come from having to work with and around existing hardware. The project is a Gamecube Dock for the Nintendo Switch, complete with working Gamecube controller ports. It looks like a Gamecube with a big slice out of it, into which the Nintendo Switch docks seamlessly. Not only that, but thanks to an embedded adapter, original Gamecube controllers can plug into the ports and work with the Switch. The original orange LED on the top of the Gamecube even lights up when the Switch is docked. It was made mostly with parts left over from other mods.

The interesting parts of this project are not just the attention to detail in the whole build, but the process [Dorison] used to get everything just right. Integrating existing hardware means accepting design constraints that are out of one’s control, such as the size and shape of circuit boards, length of wires, and often inconvenient locations of plugs and connectors. On top of it all, [Dorison] wanted this mod to be non-destructive and reversible with regards to the Nintendo Switch dock itself.

To accomplish that, the dock was modeled in CAD and 3D printed. The rest of the mods were all done using the 3D printed dock as a stand-in for the real unit. Since the finished unit won’t be painted or post-processed in any way, any scratches on both the expensive dock and the Gamecube case must be avoided. There’s a lot of under-cutting and patient sanding to get the cuts right as a result. The video (embedded below) steps through every part of the process. The final screws holding everything together had to go in at an odd angle, but in the end everything fit.

Continue reading “Gamecube Dock For Switch Mods Nintendo With More Nintendo”

Xbox Needs No TV

If you want a custom video game system, you could grab a used computer, throw an emulator on it, and build yourself a custom arcade cabinet. On the other hand, if you’d rather not deal with emulators, you can always use a console and modify it into your own tiny arcade cabinet using the original hardware. That’s what the latest project from [Element18592] does, using an Xbox 360 Slim and a small LCD screen to make a mini-arcade of sorts.

The build uses a 7″ TFT LCD and a Flexible Printed Circuit (FPC) extension board. The screen gets 12V power from the Xbox and another set of leads are soldered directly to the composite output on the motherboard. The project also makes use of a special switch which can enable or disable the built-in monitor and allow the Xbox to function with a normal TV or monitor.

Admittedly, he does point out that this project isn’t the most practical to use. But it is still a deceptively simple modification to make to the Xbox compared to some of the more complicated mods we’ve seen before. The fact that almost anyone could accomplish this with little more than some soldering is an impressive feat in the world of console mods.

Continue reading “Xbox Needs No TV”

Oscilloscope Mod For The Blues

Roughly 8% of males and 0.6% of females are red-green color blind, and yet many common oscilloscopes use yellow and green for the traces for their two-channel readouts. Since [Roberto Barrios] is afflicted by deuteranopia, a specific form of red-green colorblindness that makes differentiating between yellow and green hard, if not impossible, he got to work hacking his Agilent oscilloscope to make it more colorblind friendly.

Starting with a tip from [Mike] from the EEVblog forums, [Roberto Barrios] set out to rewire the LCD interface and swap the red and green signals. That way yellow will turn bluish (red component replaced by blue) and it could be seen as “very different now” from the green trace on the readouts. Sounds simple right? Well, slight issue: the 0.5 mm pitch of the connector. He did not want to design a PCB and wait a few weeks to receive it, so he decided on using 0.1 mm wires held together with Kapton tape to route each signal individually from one connector to the other. After an hour under the microscope, it was done. And boy, his work is impressive, go check it out.

Voila! It worked splendidly. Now [Roberto Barrios] can use his scope. And, the stock UI is mostly grey or white, so swapping the red and blue channels did not change much the appearance of the interface. Moreover, the switch had a small unintentional bonus, the loading screen is much cooler now with an edgy red sky. Further, [Roberto Barrios] “would not be [himself] if [he] could resist changing the CH1 button backlight LED to blue, to match the new trace color. So, no [he] couldn’t.”

This was a well done and very functional oscilloscope mod, but if you need more frivolity in your life, fear not: we’ve got your back with real-time Quake played on an oscilloscope.

Learn Some Plastic Techniques With This SNES WiiMote Mod

Not all hacks have to be deeply technical. Sometimes a good show of skill is just as impressive. [lyberty5] takes two completely different hunks of plastic and somehow epoxies them into a convincing and, most impressively, reliable chimera.

While the WiiMote’s motion controls certainly caused a lot of wordy debate on the Internet when it was debuted. While everyone and their grandmother who owned a game company rushed out to copy and out-innovate it once they saw Nintendo’s hoard of dragon gold. Most game designers had other thoughts about the concept, mostly that it wouldn’t do for a platformer. So the gamer caught in the middle of it all had to rotate their grip-optimized rectangle 90 degrees and blister their thumbs on tiny buttons to play. Continue reading “Learn Some Plastic Techniques With This SNES WiiMote Mod”

Steampunk IMacs With Real Turning Gears

Macs have always been favorites of case modders, with projects ranging from turning a Mac Plus into an aquarium to retrofuturistic machines that look like they came from the set of [Terry Gilliam]’s Brazil. Some of these casemods are of the steampunk variety, an aesthetic that usually means gluing gears to wood. [Valeriy] and [Cyrill] are bucking that trend with a beautiful iMac crafted from wood, brass, and leather (Russian, Google Translate)

The machine in question is a late-model, impossibly thin iMac. Unlike the old all-in-one computers with clunky CRTs, there’s not much space to dig around inside this iMac, and doing so would probably ruin the machine, anyway. Instead of a complete disassembly a wooden frame was constructed around the display, the aluminum base was covered in veneer, and the back of the iMac was covered in leather.

This is a steampunk computer, though, and that means gears. In this case, the gears and steam elements actually do something. The front of the computer is adorned with a decent replica of the drivetrain of a locomotive that spins with the help of an electric motor. There’s a USB port attached to the front, ensconced in a cylindrical enclosure that opens when a switch is flipped.

If a complete reworking of a modern iMac isn’t enough, the build also included the steampunkification of the Apple Bluetooth keyboard. That in itself is an amazing build, but to see the entire thing in action, you’ll have to check out the video below.

Continue reading “Steampunk IMacs With Real Turning Gears”

NES Controller

Turning A Classic NES Controller Into A Bluetooth Controller

[Pietronet] is like many of us in that he enjoys playing some classic console video games from time to time. He usually plays them on his PC using a Wiimote as a controller. The Wiimote has most of the classic buttons in a comfortable configuration. Plus, it’s got Bluetooth built-in, which makes it easy to pair up to your PC. [Pietronet] decided to take it a step further, though. He managed to cram all of the guts from a Wiimote inside of the original NES controller for a more authentic feel.

The first step was to crack open the Wiimote and locate pads for each button. Once they were located, [Pietronet] used a Dremel to cut the board into a smaller size. He cut off part of the circuit board that contained the directional pad as well as the connector for the nunchuck. Next he had to solder very thin wires to each of the button pads he located earlier.

The original NES controller has a very limited number of buttons, and [Pietronet] wanted to modify the original controller as little as possible. Therefore, he attached a magnetic reed switch to the Wiimote’s sync button. This way if he ever needs to sync the Wiimote to a new console, he can do it by holding a magnet in the right place. This is a function that isn’t often used, so the inconvenience should be negligible.

The next step was to connect the buttons from the original NES controller up to the wires that were added to the Wiimote. [Pietronet] left the original circuit board mostly intact. He did have to cut a small chunk of it away in order to make room for two AAA batteries, but this didn’t affect the functionality of the controller.

The inside of the NES controller had to be cleaned out of various standoffs and plastic bits to make room for all of the extra components. The Wiimote has an LED to indicate that the controller is connected properly. [Pietronet] soldered a red SMD LED in its place on the end of two thin wires. This LED was then placed on the bottom left side of the directional pad. It’s visible through a translucent filter. This allows [Pietronet] to see when the NES controller is synced up properly.

The case fits back together and everything is held in place. The result is what looks and feels like a classic NES controller, only this one has Bluetooth connectivity and a vibration motor. Check out the video demonstration below to get an idea of what it looks like in use. Continue reading “Turning A Classic NES Controller Into A Bluetooth Controller”

Dreamcast Controller

A SEGA Dreamcast Controller With A Built-in Screen

[Fibbef] was hard at work on a project for a build-off competition when he accidentally fried the circuit board. Not one to give up easily, he opted to start a new project with only two days left in the competition. He managed to modify a SEGA Dreamcast controller to hold a color screen in that short amount of time.

The Dreamcast controller’s shape is somewhat conducive to this type of mod. It already has a small window to ensure the view of the visual memory card is not obstructed. Unfortunately [Fibbef’s] screen was a bit too large for this window. That meant he would have to expand the controller and the circuit board.

After taking the controller apart, he desoldered the memory card connectors. He then cut the circuit board cleanly in half vertically. He had to re-wire all of the traces back together by hand. It turned out initially that he had messed something up and accidentally fried the right half of the controller. To fix it, he cut a second controller in half and soldered the two boards together.

With some more horizontal space to work with on the PCB side of things, [Fibbef] now needed to expand the controller’s housing. He cut the controller into several pieces, making sure to keep the start button centered for aesthetics. He then used duct tape to hold popsicle sticks in place to make up for the missing pieces of the case. All of the sticks were then covered with a thick layer of ABS cement to make for a more rigid enclosure. All of this ended up being covered in Bondo, a common trick in video game console mods. It was then sanded smooth and painted with black primer to make for a surprisingly nice finish.

The screen itself still needed a way to get power and a video signal. [Fibbef] built an adapter box to take both of these signals and pass them to the controller via a single cable. The box as a USB-A connector for power input, and a composite connector for video. There’s also a USB-B connector for the output signals. [Fibbef] uses a standard printer USB cable to send power and video signals to the controller. The end result looks great and serves to make the Dreamcast slightly more portable. Check out the demo video below to see it in action. Continue reading “A SEGA Dreamcast Controller With A Built-in Screen”