Open-Source Firmware For Soldering Irons

For most of us, the first soldering iron we pick up to start working on electronics has essentially no features at all. Being little more than resistive heaters plugged straight into the wall with perhaps a changeable tip, there’s not really even a need for a power switch. But doing anything more specialized than through-hole PCB construction often requires a soldering iron with a little more finesse, though. Plenty of “smart” soldering irons are available for specialized soldering needs now, and some are supported by the open-source IronOS as well.

The project, formerly known as TS100, is a versatile soldering iron control firmware that started as an alternative firmware for only the TS100 soldering iron. It has since expanded to have compatibility with several other soldering irons and hosts a rich set of features, including temperature control, motion activation, and the ability to temporarily increase the temperature when using the iron. The firmware is also capable of working with irons that use batteries as well as irons that use USB power delivery.

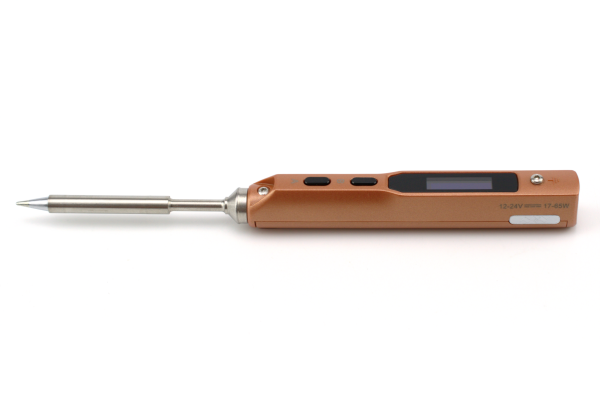
For anyone with a modern smart soldering iron, like the Pinecil or various Miniware iron offerings, this firmware is a great way of being able to gain fine control over the behavior of one’s own soldering iron, potentially above and beyond what the OEM firmware can do. If you’re still using nothing more than a 30W soldering iron that just has a wall plug, take a look at a review we did for the TS100 iron a few years ago to see what you’re missing out on.

Photo via Wikimedia Commons

A Usable Arduino Debugging Tool

For as popular as the Arduino platform is, it’s not without its problems. Among those is the fact that most practical debugging is often done by placing various print statements throughout the code and watching for them in the serial monitor. There’s not really a great way of placing breakpoints or stepping through code, either. But this project, known as eye2see, hopes to change that by using the i2c bus found in most Arduinos to provide a more robust set of debugging tools.

The eye2see software is set up to run on an Arduino or other compatible microcontroller, called the “probe”, which is connected to the i2c bus on another Arduino whose code needs to be debugged. Code running on this Arduino, which is part of the eye2see library, allows it to send debugging information to the eye2see probe. With a screen, the probe can act as a much more powerful debugger than would otherwise typically be available, being able to keep track of variables in the main program, setting up breakpoints, and outputting various messages on its screen.

The tool is not without its downsides, though. The library that needs to run on the host Arduino slows down the original program significantly. But for more complex programs, the tradeoff with powerful debugging tools may be worth it until these pieces of code can be removed and the program allowed to run unencumbered. If you’d like to skip needing to use a second Arduino, we’ve seen some other tools available for debugging Arduino code that can run straight from a connected PC instead.

Rock Tumbler Doubles As Ice Cream Maker

When working with limited space or even with limited funding, finding a tool that can do many things for less space or cost than its separate counterparts is a tempting option. The most common downside is that these tools often can’t perform as well as the single-purpose tools they replace, with the obvious example being a pocket-sized multitool or Swiss Army knife. Even things like combination drill and driver tools, adjustable crescent wrenches, or even a kitchen stand mixer can’t quite perform as well as their dedicated counterparts. So when we find a tool that can do two things equally well, like this rock tumbler that can also make a delicious bowl of ice cream, it’s definitely noteworthy.

The project comes to us by way of [North_Stordeur] whose main goal was to create a delicious bowl of ice cream but was deterred by the cost of purpose-built ice cream makers. Making ice cream isn’t a particularly complex process, though, and [North_Stordeur ] realized that grinding down ice for ice cream shares similarities with tumbling and polishing rocks. Normally, the rocks to be polished are placed in a drum with grit and a liquid, then the drum is placed on the tumbler and spun, which causes the rocks to bounce around inside the drum with the grit and smooth out relatively quickly. Replacing sugar for grit, ice for rocks, and milk for the liquid, the ice eventually is worn all the way down, creating an excellent bowl of ice cream.

Truly, the only downside we could see with a build like this is that the drum in the National Geographic rock tumbler that [North_Stordeur] chose for this project looks like it would only make a single serving at a time. However, with picky eaters around who like their own additions to ice cream, this might be a perk as everyone can make exactly the style they like with their own choice of flavors. It’s an excellent discovery for anyone already grinding and polishing rocks or someone who has already built a DIY ball mill for any number of other uses.

Opening Up ASIC Design

The odds are that if you’ve heard about application-specific integrated circuits (ASICs) at all, it’s in the context of cryptocurrency mining. For some currencies, the only way to efficiently mine them anymore is to build computers so single-purposed they can’t do anything else. But an ASIC is a handy tool to develop for plenty of embedded applications where efficiency is a key design goal. Building integrated circuits isn’t particularly straightforward or open, though, so you’ll need some tools to develop them such as OpenRAM.

Designing the working memory of a purpose-built computing system is a surprisingly complex task which OpenRAM seeks to demystify a bit. Built in Python, it can help a designer handle routing models, power modeling, timing, and plenty of other considerations when building static RAM modules within integrated circuits. Other tools for taking care of this step of IC design are proprietary, so this is one step on the way to a completely open toolchain that anyone can use to start building their own ASIC.

This tool is relatively new and while we mentioned it briefly in an article back in February, it’s worth taking a look at for anyone who needs more than something like an FPGA might offer and who also wants to use an open-source tool. Be sure to take a look at the project’s GitHub page for more detailed information as well. There are open-source toolchains if you plan on sticking with your FPGA of choice, though.

How Much Programming Can ChatGPT Really Do?

By now we’ve all seen articles where the entire copy has been written by ChatGPT. It’s essentially a trope of its own at this point, so we will start out by assuring you that this article is being written by a human. AI tools do seem poised to be extremely disruptive to certain industries, though, but this doesn’t necessarily have to be a bad thing as long as they continue to be viewed as tools, rather than direct replacements. ChatGPT can be used to assist in plenty of tasks, and can help augment processes like programming (rather than becoming the programmer itself), and this article shows a few examples of what it might be used for.

AI comments are better than nothing…probably.

While it can write some programs on its own, in some cases quite capably, for specialized or complex tasks it might not be quite up to the challenge yet. It will often appear extremely confident in its solutions even if it’s providing poor or false information, though, but that doesn’t mean it can’t or shouldn’t be used at all.

The article goes over a few of the ways it can function more as an assistant than a programmer, including generating filler content for something like an SQL database, converting data from one format to another, converting programs from one language to another, and even help with a program’s debugging process.

Some other things that ChatGPT can be used for that we’ve been able to come up with include asking for recommendations for libraries we didn’t know existed, as well as asking for music recommendations to play in the background while working. Tools like these are extremely impressive, and while they likely aren’t taking over anyone’s job right now, that might not always be the case.

One-Size-Fits-All Wrench Points To A Nut Job

When [Hand Tool Rescue] came across a 1919 patent for a one size fits all wrench, he couldn’t help but recreate it. Described in the patent as “a new, original, ornamental design for a wrench”, the wrench had a slot for possibly every fastener that the inventor could think of. Not only did it have slots for several hexagonal fasteners, but many others for octagonal, square and even a pentagonal fastener.

[Hand Tool Rescue] reckons there are 47 slots for various sizes and types of fasteners, not counting the ones whose purpose he could not fathom. Just in case he missed any fastener sizes, the original designer decided to add an alligator wrench at the other end of the handle, potentially negating the need for any of the other slots. The tool even features a sharp edge along one of the sides, possibly for use as a scraper of some kind.

Why such a crazy design was patented, or what were the functions of some of its slots are questions that will likely remain unanswered. At best, we can all take guesses at solving the mystery of this tool. [Hand Tool Rescue] scales the original drawing such that one of the slots has a width of 1 inch, and then uses that as a template to recreate the wrench. He starts with a slab of 3/8th inch thick, grade 4140 steel, which has a high strength to weight ratio and can be case hardened after machining, making it suitable for this ornamental project.

He then embarks on his journey of excessive milling, drilling, filing, band sawing and shaping (using a slotting attachment), totaling about 11 hours worth of drudgery. Of course, one could argue that it would have been much easier, and accurate, to have used modern machining methods. And we are spoilt for choices here among laser cutting, water jet cutting or even EDM machining, any of which would have done the job faster, cleaner and more precisely. But we guess [Hand Tool Rescue] wanted to stick to traditional methods as would have been available in 1919 to an inventor who wanted to make a prototype of his awesome, all in one wrench.

If you can help explain the overall function of this wrench, or identify some of the more vague slots in it, then [Hand Tool Rescue] would be happy to get the feedback. And talking about less desirable wrenches, check out how this Sliding Wrench Leaves a Little to be Desired.

Continue reading “One-Size-Fits-All Wrench Points To A Nut Job”

DIY Magnet Handling Tool Puts An End To Placement Errors

I’m sure we can all agree that the worst time to find out a magnet is the wrong way around is after glue has been applied. With that in mind, [erick.siders] created the parametric Magnet Placer tool.

Color-coded tools, one for each polarity.

Picking up and placing magnets into assemblies can be an error-prone process, because magnet polarity cannot be directly identified or sensed by either sight or fingertips. This tool helps by acting a lot like a suction pickup tool — press the plunger down, and a magnet can be picked up, release the plunger, and the magnet lets go. Simple, and effective.

Since the tool is polarity-dependent (depending on which orientation the pickup magnet is mounted into the internal plunger), [erick.siders] suggests printing two tools and color-coding them. That way, one can choose the right tool based on the situation and be confident that the magnets are right-side-up, every time.

The tools use a long metric bolt, a magnet, and a spring, but none of those parts are particularly critical. We also love the way that the end result has no gaps or openings into the moving parts, which means nothing can get caught on or inside anything during use or storage.

It’s a parametric design and the CAD files (in both Fusion 360 and STEP flavors) are provided, so modification should be a breeze. And if you happen to be using PrusaSlicer, remember you can now drop STEP format files directly in for slicing.