Open-Source Parametric CAD In Your Browser

Until recently, computer-aided design (CAD) software was really only used by engineering companies who could afford to pay thousands of dollars a year per license. The available software, while very powerful, had a very high learning curve and took a lot of training and experience to master. But, with the rise of hobbyist 3D printing, a number of much more simple CAD programs became available.

While these programs certainly helped makers get into 3D modeling, most had serious limitations. Only a few have been truly open-source, and even fewer have been both open-source and parametric. Parametric CAD allows you to create 3D models based on a series of parameters, such as defining a cube by its origin and dimensions. This is in contrast to sculpting style 3D modeling software, which is controlled much more visually. The benefit of parametric modeling is that parameters can be changed later, and the model can be updated on the fly. Features can also be defined mathematically, so that they change in relation to each other.

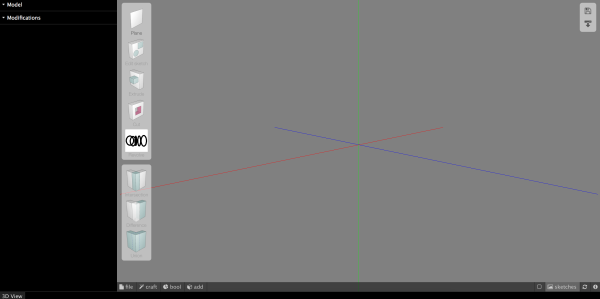
While still in its infancy, JS.Sketcher is seeking to fill that niche. It is 100% open-source, runs in your browser using only JavaScript, and is fully parametric (with both constraints and editable dimensions). At this time, available features are still pretty limited and simple. You can: extrude/cut, revolve, shell, and do boolean operations with solids. More advanced features aren’t available yet, but hopefully will be added in the future.

Continue reading “Open-Source Parametric CAD In Your Browser”

Mark 8 2016 Style

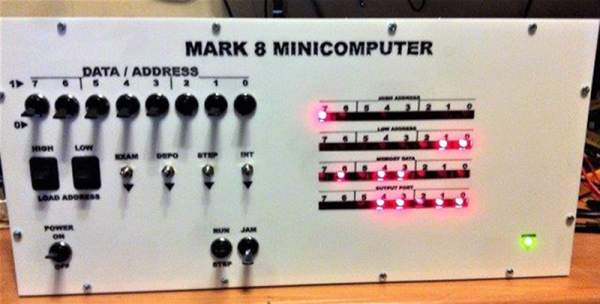
In the mid-1970’s there were several U.S.-based hobby electronics magazines, including Popular Electronics and Radio Electronics. Most people know that in 1975, Popular Electronics ran articles about the Altair 8800 and launched the personal computer industry. But they weren’t the first. That honor goes to Radio Electronics, that ran articles about the Mark 8 — based on the Intel 8008 — in 1974. There are a few reasons, the Altair did better in the marketplace. The Mark 8 wasn’t actually a kit. You could buy the PC boards, but you had to get the rest of the parts yourself. You also had to buy the plans. There wasn’t enough information in the articles to duplicate the build and — according to people who tried, maybe not enough information even in the plans.

[Henk Verbeek] wanted his own Mark 8 so he set about building one. Of course, coming up with an 8008 and some of the other chips these days is quite a challenge (and not cheap). He developed his own PCBs (and has some extra if anyone is looking to duplicate his accomplishment). There’s also a video, you can watch below.

Continue reading “Mark 8 2016 Style”

Simon Says Smile, Human!

The bad news is that when our robot overlords come to oppress us, they’ll be able to tell how well they’re doing just by reading our facial expressions. The good news? Silly computer-vision-enhanced party games!

[Ricardo] wrote up a quickie demonstration, mostly powered by OpenCV and Microsoft’s Emotion API, that scores your ability to mimic emoticon faces. So when you get shown a devil-with-devilish-grin image, you’re supposed to make the same face convincingly enough to fool a neural network classifier. And hilarity ensues!

Continue reading “Simon Says Smile, Human!”

Raspberry Pi And Alexa Make Teddy Ruxpin Smarter Than The Average Bear

Behold the unholy union of Amazon’s Alexa and that feature-limited animatronic bear from the 80s, Teddy Ruxpin. Alexa Ruxpin?

As if stuffing Alexa inside a talking fish weren’t bad enough, now Amazon’s virtual assistant can talk to you through the creepy retro plush thanks to [Tinkernut]’s trip down memory lane. Having located a Teddy Ruxpin on eBay for far less than the original $70 that priced it out from under his childhood Christmas tree, [Tinkernut] quickly learned that major surgery would be necessary to revive the Ruxpin. The first video below shows the original servos being gutted and modern micro servos grafted in, allowing control of the mouth, eyes, and nose via an Arduino.

With the bear once again in control of its faculties, [Tinkernut] embarked on giving it something to talk about. A Raspberry Pi running AlexaPi joined the bear’s recently vacated thorax with the audio output split between the bear’s speaker and the analog input on the Arduino. The result is a reasonable animation, although we’d say a little tweaking of the Arduino script might help the syncing. And those eyes and that nose really need to get into the game as well. But not a bad start at all.

This isn’t the first time that Teddy Ruxpin has gone under the knife in the name of hacks, and it likely won’t be the last. And the way toy manufacturers are going, they might just beat us hackers to the punch.

Continue reading “Raspberry Pi And Alexa Make Teddy Ruxpin Smarter Than The Average Bear”

These Ornaments Measure Christmas Cheer

The ornament projects we post around here tend to be simple, stand-alone projects. We are, however, well into the era of the Internet of Things (like it or not) and holiday ornaments need not be single, unconnected blinking objects. For Christmas this year, [Sean Hodgins]  came up with some connected DIY ornaments that respond to Christmas cheer.

[Sean Hodgins] had some beautiful PCBs done up in festive shapes and he hand-pastes and oven-solders the SMD components on both sides. Each one is battery powered and controlled by an ESP8266. LEDs and a button on the front of each ornament comprise the user interface. When the button is pressed, data is sent to a Phant server and a “Christmas Cheer” counter is incremented. Other ornaments, so long as they can connect to the Phant server, will periodically check the counter. If the Christmas Cheer has increased, the ornaments will play a tune and flash some lights.

The ornaments are open-source — [Sean Hodgins] posted the code and PCB designs on GitHub. They look great, and would be a good way to let people know you’re thinking of them over the holidays. Check out this light-up menorah or these lighted acrylic ornaments for more holiday fun!

Continue reading “These Ornaments Measure Christmas Cheer”

Instant Camera With This Year’s Hottest Dithering Technique

Digital cameras are great, because you can take thousands of pictures without running out of film. But there’s something to be said for having a tangible image you can hold in your hand. The Polaroid cameras of yesteryear were great for this, but now they’re hard to find and the price per photograph is ludicrously expensive.

dither
Dithering allows the camera to print a much better image.

Over the past few years, a few people have sought a way to create printed photographs at a lower cost. One of the best ways to do this is to find something much cheaper than Polaroid film — like thermal paper.

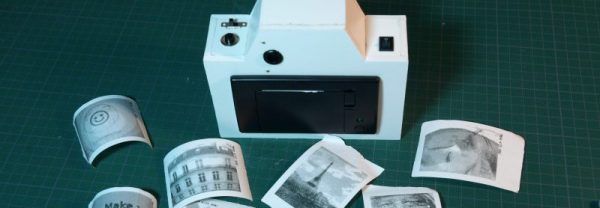
[Fabien-Chouteau]’s thermal printing camera isn’t the first — you’ve got the Gameboy Camera/Printer and a few others to thank for that. But it’s a great example of the form. The camera combines an Adafruit thermal receipt printer with an OpenMV camera, both easily sourced, if not exactly cheap. It even adds a ST7735 LCD for live display of the camera’s image, just like consumer-grade cameras!

It’s not just a slapped together kludge of parts bin components, however. While the thermal printer is only capable of printing black or white pixels, its resolution is much higher than the image from the camera. This allows the camera to use a 3×3 block of printed pixels to represent a single pixel from the camera, and with some fancy dithering techniques, can emulate shades of grey quite effectively. It’s tricks like this that really add polish to a project, and make a big difference to the picture quality at the end of the day.

It’s not the first thermal printer camera we’ve seen – [Ch00f]’s woodgrain instant camera build highlighted the issues of careful camera selection when pursuing this type of build.

Video after the break.

Continue reading “Instant Camera With This Year’s Hottest Dithering Technique”

Dead-Bug Logic Probe In A Magic Marker

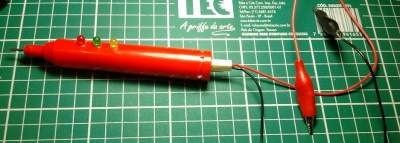
Logic probes are simple but handy tools that can be had for a couple of bucks. They may not be the sexiest pieces of test gear, nor the most versatile, but they have their place, and building your own logic probe is a great way to understand the tool’s strength and weaknesses.

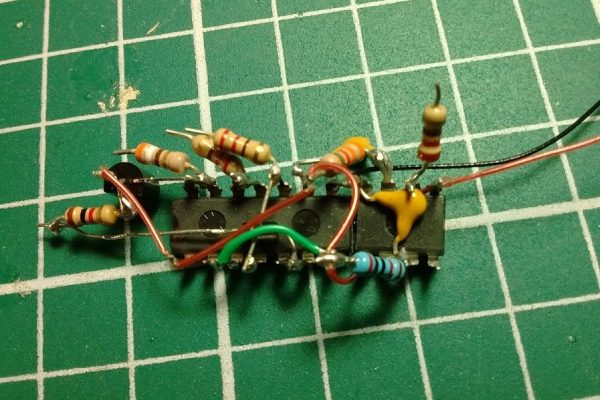
[Jxnblk]’s take on the logic probe is based on a circuit by [Tony van Roon]. The design hearkens back to a simpler time and is based on components that would have been easy to pick up at any Radio Shack once upon a time. The logic section is centered on the venerable 7400 quad 2-input NAND gate in the classic 14-pin DIP format. The gates light separate LEDs for high and low logic levels, and a 555 timer chip in a one-shot configuration acts as a pulse stretcher to catch transients. The DIP packages lend themselves to quick and dirty “dead bug” construction, and the whole thing fits nicely into a discarded marking pen.

dead-bug-logic-probe-in-marker-body

It’s a simple build and a nice form factor for a useful tool, but for an even slimmer package like an old syringe you’ll probably have to go with SMD components. And when you graduate from the simple logic probe, you might want to check out the capabilities of this smart probe.