Finding A Use For Surplus Filament Spools

If you’re a heavy user of a 3D printer, or a welder, you’ll know the problem of empty spools. You’ve used up all the filament or the welding wire, and you’re left with a substantial plastic spool. It’s got to be useful for something, you think, and thus it’s Too Good To Throw Away. Before you know it you have a huge pile of the things all looking for a use that you know one day you’ll find.

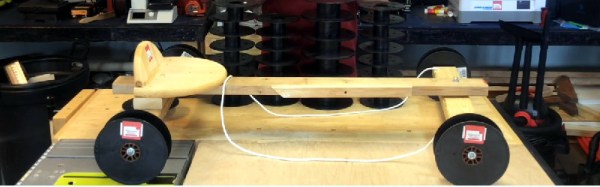
If you follow the example of [Chuck Hellebuyck], you could use them as wheels for a small go-kart (YouTube link). He 3D-printed some hub adapters for the spools to use skate bearings, mounted them of threaded axles to a classic wooden go-kart frame, and set off downhill wearing his stock-car racing helmet.

Of course, [Chuck]’s go-kart is a bit of fun, but it’s probably fair to say that 3D printer spools are not the ideal wheel. Those rims aren’t particularly durable, and with no tires he’s in for a bumpy ride. Perhaps a tire could be found to fit and a tube placed within it, but that would start to sound expensive against those cheap off-the-shelf wheelbarrow items.

But the project does raise the interesting question: what exactly do you do with your empty spools? There have to be some awesome uses for them, so please share yours in the comments. Meanwhile follow Chuck’s go-kart adventures in the video below the break.

Continue reading “Finding A Use For Surplus Filament Spools”

Hackaday Prize Entry: A 3D Printed Prosthetic Foot

For the last few years of the Hackaday Prize, there have been more than a few prosthetic devices presented. Almost without exception, the target for these projects are prosthetic hands. That’s a laudable goal, but mechanically, at least, feet are much more interesting. A human foot must sustain more than the weight of the human it’s attached to, and when it comes to making this out of plastic and metal, that means some crazy mechanics.

This Hackaday Prize entry is a complete reversal of all the prosthetic limbs we’ve seen before. It’s a prosthetic foot, and in the tradition of easily made and easily modified prosthetic arms, this prosthetic foot is mostly 3D printed.

A foot will take a lot more abuse and weight than a hand, and because of this 3D printing all the parts might not seem like the best idea. Exotic filaments exist, though, and the team behind this project does have access to a few pieces of test equipment in a materials engineering lab. With the right geometry, everything seems to support the load required.

There are some relatively new twists to this 3D printed prosthetic foot, including electronic control, a micro-hydraulic power plant, and sensors to measure and adjust the user’s gait. It’s all very cool, and deserves a lot more engineering than even the most complicated 3D printed prosthetic hand.

Weather Ticker Shows How Easy It Can Be

[Petru] seems to have designed his weather ticker project with beginners in mind. Leveraging the inexorable forces of both the Raspberry Pi and cheap online auction house modules, it’s nearly the Hackaday equivalent of painting by numbers. But not everyone is a Picasso, and encouraging beginners to get their feet wet by painting happy little trees is a good cause.

Behind the simplicity is actually a clever architecture. An installation script makes installing the right Raspbian distro simple, and installs a few scripts that automatically update the user code from a GitHub repository. To change the code running on the machine, you can upload a new version to GitHub and press the reset button. (We would also want a way to push up code changes locally, for speed reasons.) Something like this is a great idea for a permanent Pi-based IoT device.

But as a first project, the hope is that something like this will encourage folks who find code too abstract, but who are nonetheless drawn by the allure of blinking lights, to play around with code. And unsurprisingly, this has already been entered in our Enlightened Raspberry Pi Contest which focuses on the simple-yet-impressive stuff you can do with a tiny computer and some electronics.

A Compact Star Tracking Tripod

The next giant leap for mankind is to the stars. While we are mostly earthbound — for now — that shouldn’t stop us from gazing upwards to marvel at the night sky. In saying that, if you’re an amateur astrophotographer looking to take long-exposure photos of the Milky Way and other stellar scenes, [Anthony Urbano] has devised a portable tracking setup to keep your photos on point.

When taking pictures of the night sky, the earth’s rotation will cause light trails during long exposures. Designed for ultra-portability, [Urbano’s] rig uses an Arduino UNO controlled Sanryusha P43G geared stepper motor coupled to a camera mounting plate on a small tripod. The setup isn’t designed for anything larger than a DSLR, but is still capable of taking some stellar pictures.

Continue reading “A Compact Star Tracking Tripod”

Dirt Cheap Muon Detector Puts Particle Physics Within DIY Reach

Subatomic physics is pretty neat stuff, but not generally considered within the reach of the home-gamer. With cavernous labs filled with racks of expensive gears and miles-wide accelerators, playing with the subatomic menagerie has been firmly in the hands of the pros for pretty much as long as the field has been in existence. But that could change with this sub-$100 DIY muon detector.

[Spencer Axani] has been fiddling with the idea of a tiny muon detector since his undergrad days. Now as an MIT doctoral candidate, he’s making that dream a reality. Muons are particles that are similar to electrons but more massive and less likely to be affected by electromagnetic fields. Muons rain down on the Earth’s surface at the rate of 10,000 per square meter every minute after being created by cosmic rays interacting with the atmosphere and are capable of penetrating deep into the planet. [Spencer]’s detector is purposely kept as low-budget as possible, using cheap plastic scintillators and solid-state photomultipliers hooked up to an Arduino. The whole project is as much STEM outreach as it is a serious scientific effort; the online paper (PDF link) stresses the mechanical and electronics skills needed to complete the build. At the $100 price point, this build is well within the means of most high school STEM programs and allows for a large, distributed array of muon detectors that has the potential for some exciting science.

We’ve covered quite a few subatomic detection projects before, from the aforementioned large-scale builds to more modest efforts. But we like this project because it has the potential to inspire a lot of citizen scientists.

Thanks for the tip, [deralchemist]

Look What Showed Up For Bring-A-Hack At OSH Park

Hackaday was in Portland last weekend for the Open Hardware Summit. I did a brief recap earlier this week but this post has been on my mind the entire time. The night before the summit, OSH Park (the Purveyors of Perfect Purple PCBs which we all know and love) hosted a Bring-A-Hack at their headquarters. [Laen] knows how to throw a party — with a catered spread and open bar which all enjoyed. The place was packed with awesome hackers, and everyone had something amazing to show off.

In fact, there were far too many people showing off hardware for me to capture all in one evening. But join me after the jump for six or seven examples that really stuck out.

Continue reading “Look What Showed Up For Bring-A-Hack At OSH Park”

Hacker Helps His Mother Lift Her Walker When He’s Not There

[typo]’s mother gets around with a walker. It’s a great assistive device until she has to lift the heavy thing up into her car. Noting that this was a little cruel he did as any hacker would and found a way to automate the process.

The build is pretty cool. She had to give up her passenger seat, but it’s a small price to pay for independence. He removed the door paneling on the passenger side. Then he welded on a few mounting points. Next he had to build the device.

The well-built device has a deceptively simple appearance. The frame is made from CNC milled panels and the ever popular aluminum extrusion. It uses a 12V right angle drive and some belting to lift the chair. There’s no abundance of fancy electronics here. A toggle switch changes the direction of the motor. There are some safety endstops and an e-stop.

Now all she has to do is strap the walker to the door. She picks the direction she wants the lift to go and presses a button. After which she walks the short distance to the driver’s seat, and cruises away.