Absolute Power

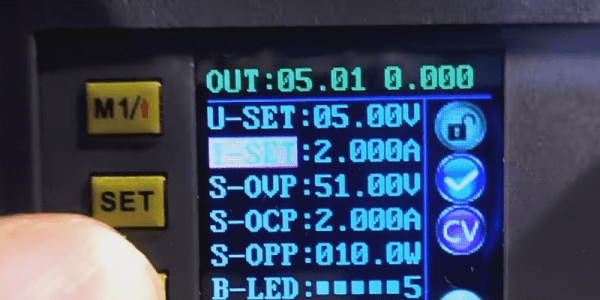
We recently noticed a very cool-looking series of power supply modules on a few of the Chinese deal web sites. Depending on the model, they provide a digitally-controlled voltage with metering. You need to provide at least a volt or so over the maximum desired output voltage. You can see a video from [iforce2d] below. The module in the video is rated for 5A at 50V maximum, but there are other sizes available. For those interested in graphs and numbers [lgyte] did a lot of characterization of these modules.

There was a time when importing goods from far away places was somewhat of an art. Finding suppliers, working out payment, shipping, and customs meant you had to know what you were doing. Today, you just surf the web, find what you want, pay with PayPal, and stuff shows up on your doorstep from all four corners of the globe.

There is one problem, though. We see a lot of cool stuff from China and some of it is excellent, especially for the price. Frankly, though, some of it is junk. It is hard to tell which is which. What’s more is even though in theory you might be able to return something, usually the freight charges make that impractical. So when you get a dud, you are likely to just eat it and chalk it up to experience. So the question is: how good (or bad) or these power supply modules?

Continue reading “Absolute Power”

Probing high voltage

Measuring High Voltage In Millimeters (and Other HV Probe Tricks)

I work a lot with high voltages and others frequently replicate my projects, so I often get asked “What voltage is needed?”. That means I need to be able to measure high voltages. Here’s how I do it using a Fluke high voltage probe as well as my own homemade probe. And what if you don’t have a probe? I have a solution for that too.

How Long Is Your Spark?

The simplest way to measure high voltage is by spark length. If your circuit has a spark gap then when a spark occurs, that’s a short-circuit, dumping all your built up charge. When your spark gap is at the maximum distance at which you get a spark then just before the spark happens is when you have your maximum voltage. During the spark the voltage rapidly goes to zero and depending on your circuit it may start building up again. The voltage before the spark occurred is related to the spark length, which is also the spark gap width.

The oscilloscope photo below shows this changing voltage. This method is good for a rough estimate. I’ll talk about doing more precise measurements when I talk about high voltage probes further down.

Continue reading “Measuring High Voltage In Millimeters (and Other HV Probe Tricks)”

This Old Mouse Keeps Track Of Filament Usage

Keeping track of your 3D-printer filament use can be both eye-opening and depressing. Knowing exactly how much material goes into a project can help you make build-versus-buy decisions, but it can also prove gut-wrenching when you see how much you just spent on that failed print. Stock filament counters aren’t always very accurate, but you can roll your own filament counter from an old mouse.

[Bin Sun]’s build is based around an old ball-type PS/2 mouse, the kind with the nice optical encoders. Mice of this vintage are getting harder to come by these days, but chances are you’ve got one lying around in a junk bin or can scrounge one up from a thrift store. Stripped down to its guts and held in place by a 3D-printed bracket, the roller that used to sense ball rotation bears on the filament on its way to the extruder. An Arduino keeps track of the pulses and totalizes the amount of filament used; the counter handily subtracts from the totals when the filament is retracted.

Simple, useful, and cheap — the very definition of a hack. And even if you don’t have a 3D-printer to keep track of, harvesting encoders from old mice is a nice trick to file away for a rainy day. Or you might prefer to just build your own encoders for your next project.

Continue reading “This Old Mouse Keeps Track Of Filament Usage”

Retrotechtacular: The Incredible Machine

They just don’t write promotional film scripts like they used to: “These men are design engineers. They are about to engage a new breed of computer, called Graphic 1, in a dialogue that will test the ingenuity of both men and machine.”

This video (embedded below) from Bell Labs in 1968 demonstrates the state of the art in “computer graphics” as the narrator calls it, with obvious quotation marks in his inflection. The movie ranges from circuit layout, to animations, to voice synthesis, hitting the high points of the technology at the time. The soundtrack, produced on their computers, naturally, is pure Jetsons.

Highlights are the singing “Daisy Bell” at 9:05, which inspired Stanley Kubrick to play a glitchy version of the track as Dave is pulling Hal 9000’s brains out, symbolically regressing backwards through a history of computer voice synthesis which at that point in time was the present. (Whoah!)
Continue reading “Retrotechtacular: The Incredible Machine”

Laser Cut LEGO In MDF

It’s hard not to be a fan of LEGO. The humble plastic bricks from Denmark enabled many a young engineer to bring their architectural and mechanical fantasies to life. But one limitation was that you were stuck using the bricks LEGO designed. Thankfully, [John Sokol] has come up with a way to laser cut his own LEGO-compatible bricks, and provided the tools so you can do the same.

After hacking an OpenSCAD script to generate just the top pins of the block, [John] exported an SVG into Inkscape so that he could scale the pins properly before exporting a final PNG for the lasercutter. Using RDWorks, [John] was able to find an engraving setting that worked well with dry-erase whiteboard MDF — an unusual material for a brick, but functional nonetheless. The key here is that the engraving setting takes away just enough material to create a raised pin on the part, without cutting all the way through the MDF or burning the surface.

Despite some damage when removing the work piece from the laser cutter, the part mates up well with the official LEGO brand parts. We’d be interested to see how the MDF cut parts hold up over time compared to real LEGO bricks made in ABS, which seem to last forever.

This isn’t the first make-your-own-LEGO hack we’ve seen – maybe you’d like to 3D print your own bricks on a printer made of LEGO?

Voice Activated Fireplace Is As Cool As It Gets

A fireplace can add a cozy, relaxed atmosphere  — and a touch of style — to any home. Redditor [hovee] saw the opportunity to add some flair to his gas fireplace by making it voice activated. Check out the video of it in action below.

Google Home and Google Assistant provides the voice recognition component. A Raspberry Pi 3 with Home Assistant does the legwork. An iTach TCP/IP-to-Contact-Closure relay toggles the fireplace, and an IFTTT account connected to Google Assistant brings it all together.

[hovee] then ran some thick 16/2 wire from the relay network port to the fireplace’s remote receiver circuit to actually turn it on. Some custom code and configuration of the Home Assistant files was necessary, but [hovee] has shown his work, with some tips besides, if you want to throw together a similar setup. It’s a help if your fireplace has a ‘remote’ setting, and a double bonus if there is documentation for the fireplace to be found that will help with the build process.

Once done, all you need to do is kick back with your favorite beverage in the lap of home automated luxury. Just be sure you have a backup to turn off your fireplace just in case your setup goes the way of Skynet. While you’re at it, you can set up your fireplace to save energy as well.

[via /r/homeautomation]

Continue reading “Voice Activated Fireplace Is As Cool As It Gets”

USB Etch-a-Sketch-Style Mouse Is More Analog Than You’d Think

[Mitxela] wanted to build a different kind of mouse, one that worked like an Etch-a-Sketch toy with one X knob and one Y knob. Armed with some rotary encoders and a microcontroller, that shouldn’t be hard. But when you use a pin-limited ATtiny85, you are going to need some tricks.

The encoders put out a two-bit Gray code and close a button when you depress them. Plus you need some pins for the V-USB stack to handle the USB interface. [Mitxela] decided to convert the encoders  to output analog voltages using a simple resistor DAC. That would only require two analog inputs, and another anlaog input could read both switches.

One problem: there still wasn’t quite enough I/O. Of course, with AVRs you can always repurpose the reset pin as an analog pin, but you lose the ability to program the device at low voltage. And naturally, there’s a workaround for this too, allowing you to keep the reset pin and still read its analog value. You just have to make sure that value doesn’t go below about 2.5V so the device stays out of reset. Once that was in place, the rest went easy, as you can see in the video below.

Continue reading “USB Etch-a-Sketch-Style Mouse Is More Analog Than You’d Think”