Hackaday Prize Entry: Open Bike Shoe

Shoes are some of the most complex pieces of equipment you can buy. There’s multiple materials ranging from foam to weird polyesters in a simple sneaker, and if you dig into shoes for biking, you’ll find some carbon fiber. All these layers are glued together, stitched, and assembled into a functional piece of exercise equipment, with multiple SKUs for each size. It’s really amazing.

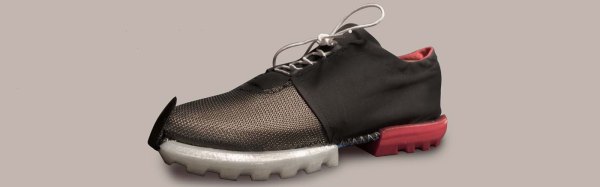
Accordingly, [marcs] created N+ Open Bike Shoe Platform, the purpose of which is to create open source,  customizable, and repairable shoe platform based on 3D printing, though with other techniques like rubber molding and sewing fabric uppers are included as well.

The project breaks down its signature shoe into all its various parts: heel, toe tread, insole, upper, and so on. With each part individually customizable, the shoe can be tailored to suit each individual, all while part of a cradle-to-grave lifecycle that allows shoe parts to be replaced, repaired, or recycled.

What Is Entropy And How Do I Get More Of It?

Let’s start off with one of my favorite quotes from John von Neumann: “Any one who considers arithmetical methods of producing random digits is, of course, in a state of sin. For, as has been pointed out several times, there is no such thing as a random number — there are only methods to produce random numbers, and a strict arithmetic procedure of course is not such a method.”

What von Neumann is getting at is that the “pseudo” in pseudorandom number generator (PRNG) is really a synonym for “not at all”. Granted, if you come in the middle of a good PRNG sequence, guessing the next number is nearly impossible. But if you know, or can guess, the seed that started the PRNG off, you know all past and future values nearly instantly; it’s a purely deterministic mathematical function. This shouldn’t be taken as a rant against PRNGs, but merely as a reminder that when you use one, the un-guessability of the numbers that it spits out is only as un-guessable as the seed. And while “un-guessability” isn’t a well-defined mathematical concept, or even a real word, entropy is.

That’s why entropy matters to you. Almost anything that your computer wants to keep secret will require the generation of a secret random number at some point, and any series of “random” numbers that a computer generates will have only as much entropy, and thus un-guessability, as the seed used. So how does a computer, a deterministic machine, harvest entropy for that seed in the first place? And how can you make sure you’ve got enough? And did you know that your Raspberry Pi can be turned into a heavy-duty source of entropy? Read on!

Continue reading “What Is Entropy And How Do I Get More Of It?”

DIY Pyrography Power Supply

Ever wanted to try your hand at wood burning? If you already threw away your first soldering iron—you know the one: plugged straight in to the wall, no temperature control, came with a thick piece of tin foil to rest it on—don’t despair. Pyrography pens don’t cost that much. The variable power supply they plug into, though: that’s another story. Those cost more than they probably should.

[td0g] took the plunge into pyrography a while back, and wanted to build his own controller from an old ATX power supply. Why not? It should be more than capable of doing the job. Even the most heavy-duty pyrography pens only draw 10A, and the 3.3V line showed to be rated for 30A. All [td0g] had to do was add a PWM with a MOSFET and a ‘Tiny85.

The project nearly became Fail of the Week fodder after [td0g] saw huge voltage spikes across the MOSFET. A 47kΩ resistor took care of those, and a heat sink salvaged from the junk bin will prolong the transistor’s life. [td0g] added a push button that cycles through five heat settings, and an LED to show the status. After that, all he had to do was add a male RCA input to connect the pens he already has.

Okay, so you wouldn’t be caught dead dropping money on some fancy power supply for this new hobby. Don’t want to buy pens, either? Roll your own from a plasma arc lighter.

Silicon Valley Was Built On Tubes Of Glass

Lee de Forest

Bill Shockley brought the transistor to a pasture in Palo Alto, but he didn’t land there by chance. There was already a plot afoot which had nothing to do with silicon, and it had already been a happening place for some time by then.

Often overshadowed by Edison and Menlo Park or Western Electric and its Bell Labs, people forget that the practical beginning of modern radio and telecommunications began unsuspectingly in the Bay Area on the shoestring-budgeted work benches of Lee de Forest at Federal Telegraph.

As the first decade of the 20th century passed, Lee de Forest was already a controversial figure. He had founded a company in New York to develop his early vacuum tubes as detectors for radio, but he was not very good at business. Some of the officers of the company decided that progress was not being made fast enough and drained the company of assets while de Forest was away. This led to years of legal troubles and the arrest of many involved due to fraud and loss of investors’ money.

Continue reading “Silicon Valley Was Built On Tubes Of Glass”

Finally – A Big-Screen Vectrex

The Vectrex is in no way the most popular console of all time, but it is one of the more unique. Eschewing typical raster-based rendering, it instead relies on a vector-based display. Since the average home television of the era would be completely unable to display such signals, the Vectrex had its screen built in. This got [Arcade Jason] wondering – would it be possible to hook the Vectrex up to a bigger screen?

First, a suitable monitor had to be found. The 19V2000 turned out to be a good candidate – much larger at 19 inches, and found in a variety of arcade cabinets from years past. From there, the project became a matter of identifying the signal outputs of the Vectrex. [Arcade Jason] took the liberty of modifying the levels of the signals on the Vectrex board itself, and then fixing the now-overscanned image on the original screen by adjusting the onboard trimpots. With the Vectrex’s X and Y signals now boosted somewhat, they were wired up to the inputs of the larger arcade screen. For the Z signal, things got even hackier – a Walmart “Computer Amplifier”, typically used for speakers, was instead pressed in to service to amplify the signal.

There are plenty of wires running all over the carpet in this video, but the fact is, it works brilliantly. Future plans involve upgrading to an even larger 23 inch monitor, and possibly even experiments with color vector displays. It just goes to show that the Vectrex, even today, maintains a die-hard following.

Perhaps you’d like to try this, but need to fix your original Vectrex screen first? Never fear – that’s possible, too.


Pi Handheld With A Mindblowing Enclosure

The Raspberry Pi is possibly the world’s most popular emulation platform these days. While it was never intended to serve this purpose, the fact remains that a small, compact computer with flexible I/O is ideally suited to it. We’ve featured a multitude of builds over the years using a Pi in a mobile form factor to take games on the go. [Michael]’s build, however, offers a lot more than a few Nintendo ROMs and some buttons from eBay. It’s a tour de force in enclosure design.

The build starts with the electronics. In 2017 it’s no longer necessary to cobble together five different accessory boards to handle the controls, battery charging, and display. Boards like Kite’s Super All In One exist, handling everything necessary for a handheld game console. With this as a starting point, he then set out to recreate Nintendo’s classic Game Boy, with a few tweaks to form and function.

It’s a textbook example of smart planning, design, and execution. We are taken through the process of creating the initial CAD drawings, then combining 3D printed parts with wood and carbon fibre for a look that is more akin to a high-end piece of hi-fi gear than anything related to gaming. The attention to detail is superb and the write-up makes it look easy, while [Michael] shares tips on how to safely cut carbon fibre to make your own buttons.

The final results are stunning, and it’s a great example of why a fine piece of wood is always a classy way to go for an enclosure. For another great example, try this walnut keyboard, or check out the roots of the Raspberry Pi Game Boy movement.

[Jeri] Builds A Magnetic Loop Antenna

Most new hams quickly learn that the high-frequency bands are where the action is, and getting on the air somewhere between 40- and 160-meters is the way to make those coveted globe-hopping contacts. Trouble is, the easiest antennas to build — horizontal center-fed dipoles — start to claim a lot of real estate at these wavelengths.

So hacker of note and dedicated amateur radio operator [Jeri Ellsworth (AI6TK)] has started a video series devoted to building a magnetic loop antenna for the 160- and 80-meter bands. The first video, included after the break, is an overview of the rationale behind a magnetic loop. It’s not just the length of the dipole that makes them difficult to deploy for these bands; as [Jeri] explains, propagation has a lot to do with dipole height too. [Jeri] covers most of the mechanical aspects of the antenna in the first installment; consuming a 50-foot coil of 3/4″ copper tubing means it won’t be a cheap build, but we’re really looking forward to seeing how it turns out.

We were sorry to hear that castAR, the augmented reality company that [Jeri] co-founded, shut its doors back in June. But if that means we get more great projects like this and guided tours of cool museums to boot, maybe [Jeri]’s loss is our gain?

Continue reading “[Jeri] Builds A Magnetic Loop Antenna”