Beat This Mario Block Like It Owes You Money

People trying to replicate their favorite items and gadgets from video games is nothing new, and with desktop 3D printing now at affordable prices, we’re seeing more of these types of projects than ever. At the risk of painting with too broad a stroke, most of these projects seem to revolve around weaponry; be it a mystic sword or a cobbled together plasma rifle, it seems most gamers want to hold the same piece of gear in the physical world that they do in the digital one.

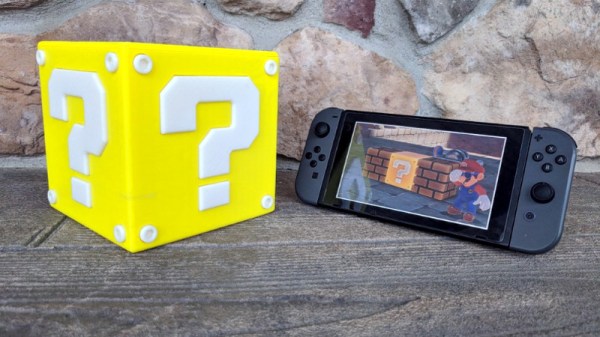
But [Jonathan Whalen] walks a different path. When provided with the power to manifest physical objects, he decided to recreate the iconic “Question Block” from the Mario franchise. But not content to just have a big yellow cube sitting idly on his desk, he decided to make it functional. While you probably shouldn’t smash your head into the thing, if you give it a good knock it will launch gold coins into the air. Unfortunately you have to provide the gold coins yourself, at least until we get that whole alchemy thing figured out.

Printing the block itself is straightforward enough. It’s simply a 145 mm yellow cube, with indents on the side to accept the question mark printed in white and glued in. A neat enough piece of decoration perhaps, but not exactly a hack.

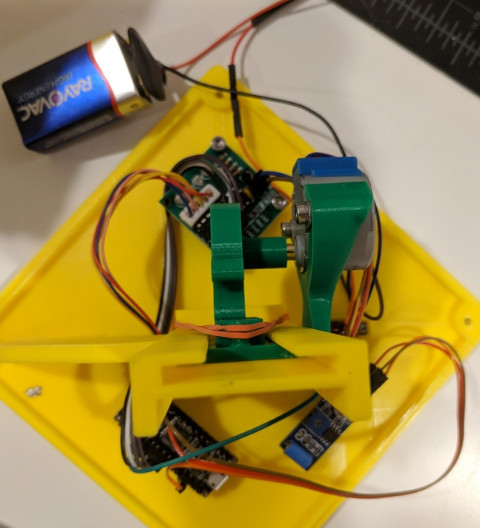
The real magic is on the inside. An Arduino Nano and a vibration sensor are used to detect when things start to get rough, which then sets the stepper motor into motion. Through an ingenious printed rack and pinion arrangement, a rubber band is pulled back and then released. When loaded with $1 US gold coins, all you need to do is jostle the cube around to cause a coin to shoot out of the top.

If this project has got you interested in the world of 3D printed props from the world of entertainment, don’t worry, we’ve got you covered.

Continue reading “Beat This Mario Block Like It Owes You Money”

Smart Outlet Cover Offers Lessons On Going From Project To Product

Going from idea to one-off widget is one thing; engineering the widget into a marketable product is quite another. So sometimes it’s instructive to take an in-depth look at a project that was designed from the get-go to be a consumer product, like this power indicating wall outlet cover plate. The fact that it’s a pretty cool project helps too.

Although [Vitaliy] has been working on this project for a while, he only recently tipped us off to it, and we’re glad he did because there’s a lot to learn here. His goal was to build a replacement cover for a standard North American power outlet that indicates how much power is being used by whatever is plugged into it. He set constraints that included having everything fit into the familiar outlet cover form factor, as well as to not require any modification to the existing outlet or rewiring, so that a consumer can just remove the old cover and put on the new one. Given the extremely limited space inside an outlet cover, these were significant challenges, but [Vitaliy] found a way. Current is sensed with two inductors positioned to sense magnetic flux within the outlet, amplified by a differential amp, and power use is calculated by an ATmega328 for display on 10 LEDs. Power for the electronics is tapped right from the outlet wiring terminals by spring clips, and everything fits neatly inside the cover.

It’s a great design, but not without issues. We look forward to seeing [Vitaliy] tackle those problems and bring this to market. For more on what it takes to turn a project into a product, check out our own [Lewin Day]’s story of bringing a guitar effects pedal to market.

Continue reading “Smart Outlet Cover Offers Lessons On Going From Project To Product”

Temperature Sensor And Simple Oscillator Make A Value-Added HF Beacon

Sometimes the best projects are the simple, quick hits. Easily designed, fast to build, and bonus points for working right the first time. Such projects very often lead to bigger and better things, which appears to be where this low-power temperature beacon is heading.

In the world of ham radio, beacon stations are transmitters that generally operate unattended from a known location, usually at limited power (QRP). Intended for use by other hams to determine propagation conditions, most beacons just transmit the operator’s call sign, sometimes at varying power levels. Any ham that can receive the signal will know there’s a propagation path between the beacon and the receiver, which helps in making contacts. The beacon that [Dave Richards (AA7EE)] built is not a ham beacon, at least not yet; operating at 13.56 MHz, it takes advantage of FCC Part 15 regulations regarding low-power transmissions rather than the Part 97 rules for amateur radio. The circuit is very simple — a one-transistor Colpitts oscillator with no power amplifier, and thus very limited range. But as an added twist, the oscillator is keyed by an ATtiny13 hooked to an LM335 temperature sensor, sending out the Celsius and Fahrenheit temperature in Morse every 30 seconds or so. The circuit is executed in Manhattan style, which looks great and leaves plenty of room for expansion. [Dave] mentions adding a power amp and a low-pass filter to get rid of harmonics and make it legal in the ham bands.

Beacons are just one of the ways for hams to get on the air without talking. Another fun way to analyze propagation is WSPR, which is little like an IoT beacon.

Continue reading “Temperature Sensor And Simple Oscillator Make A Value-Added HF Beacon”

Neural Networks… On A Stick!

They probably weren’t inspired by [Jeff Dunham’s] jalapeno on a stick, but Intel have created the Movidius neural compute stick which is in effect a neural network in a USB stick form factor. They don’t rely on the cloud, they require no fan, and you can get one for well under $100. We were interested in [Jeff Johnson’s] use of these sticks with a Pynq-Z1. He also notes that it is a great way to put neural net power on a Raspberry Pi or BeagleBone. He shows us YOLO — an image recognizer — and applies it to an HDMI signal with the processing done on the Movidius. You can see the result in the first video, below.

At first, we thought you might be better off using the Z1’s built-in FPGA to do neural networks. [Jeff] points out that while it is possible, the Z1 has a lower-end device on it, so there isn’t that much FPGA real estate to play with. The stick, then, is a great idea. You can learn more about the device in the second video, below.

Continue reading “Neural Networks… On A Stick!”

First Lithographically Produced Home Made IC Announced

It is now six decades since the first prototypes of practical integrated circuits were produced. We are used to other technological inventions from the 1950s having passed down the food chain to the point at which they no longer require the budget of a huge company or a national government to achieve, but somehow producing an integrated circuit has remained out of reach. It’s the preserve of the Big Boys, move on, there’s nothing to see here.

Happily for us there exists a dedicated band of experimenters keen to break that six-decade dearth of home-made ICs. And now one of them, [Sam Zeloof], has made an announcement on Twitter that he has succeeded in making a dual differential amplifier IC using a fully lithographic process in his lab. We’ve seen [Jeri Ellsworth] create transistors and integrated circuits a few years ago and he is at pains to credit her work, but her interconnects were not created lithographically, instead being created with conductive epoxy.

For now, all we have is a Twitter announcement, a promise of a write-up to come, and full details of the lead-up to this momentous event on [Sam]’s blog. He describes both UV lithography using a converted DLP projector and electron beam lithography using his electron microscope, as well as sputtering to deposit aluminium for on-chip interconnects. We’ve had an eye on his work for a while, though his progress has been impressively quick given that he only started amassing everything in 2016. We look forward to greater things from this particular garage.

Former Smoker Now Pats Pockets For Motivation

It’s hard to quit smoking. Trust us, we know. Half the battle is wanting to quit in the first place. Once you do, the other half is mostly fighting with yourself until enough time goes by that food tastes better, and life looks longer.

[Danko] recently quit smoking. And because idle hands are Big Tobacco’s tools, he kept himself busy through those torturous first few days by building a piece of pocket-sized motivation. This little board’s main purpose is to help him root for himself by showing the time elapsed since his final cigarette, the number of cigarettes he has avoided, and all the money he’s saved since then. At the press of a button, he can reflect on the exact moment he took the plunge into Cold Turkey Lake.

Sure, there are apps that’ll do the same thing. But anyone who’s ever tried to quit smoking knows how important it is to stay busy every minute while your brain deals with the lack of toxins. It runs on an ATtiny85 and a DS1307 RTC chip. Looks to us like [Danko] adapted a board from a different project, and we love it when that’s a possibility.

Not a smoker? Good for you. The next hardest thing humans motivate themselves to do is exercise. That’s a lifelong battle that can definitely be improved with some gamification.

Continue reading “Former Smoker Now Pats Pockets For Motivation”

Custom Chips As A Service

Ages ago, making a custom circuit board was hard. Either you had to go buy some traces at Radio Shack, or you spent a boatload of money talking to a board house. Now, PCBs are so cheap, I’m considering tiling my bathroom with them. Today, making a custom chip is horrifically expensive. You can theoretically make a transistor at home, but anything more demands quartz tube heaters and hydrofluoric acid. Custom ASICs are just out of reach for the home hacker, unless you’re siphoning money off of some crypto Ponzi scheme.

Now things may be changing. Costs are coming down, the software toolchain is getting there, and Onchip, the makers of an Open Source 32-bit microcontroller are now working on what can only be called a, ‘OSH Park for silicon’. They’re calling it Itsy-Chipsy, and it’s promising to bring you your own chip for as low as $100.

The inspiration for this business plan comes from services like MOSIS that allows university classes to design their own chips on multi-project wafers. This aggregates multiple chips onto one wafer, bringing the cost of a prototype down from tens of thousands of dollars to about five thousand dollars, or somewhere around a thousand dollars a chip.

Itsy-Chipsy is taking this batch processing one step further. This is a platform that combines multiple projects on one die. That thousand dollar chip is now sixteen different projects, tied together with regulators, current sources, clocks, and process monitors. Using a 2 mm by 2 mm chip size, Itsy-Chipsy gives chip designers 350 μm of silicon using a 180 nm CMOS process. That’s enough for a basic 32-bit RISC-V microprocessor in a QFN or DIP 40 for just one hundred dollars.

This project is a contender for The Hackaday Prize — the Prize ends in November and we’d be amazed to see results by then. The Onchip team is talking to foundries, though, and it looks like there’s interest for this model in the industry. We’d guess that the best case scenario is a crowdfunding campaign for an OSH Park-like chip fab sometime in 2019. Whenever it comes, this is something we’re eagerly awaiting.