A Practical Portable Wii Emerges From The Memes

A few months ago, [Shank] built what will almost certainly go down in history as the world’s smallest portable Nintendo Wii. As it turns out, the Wii motherboard is home to a lot of unnecessary hardware, and with a careful hand and an eye for detail, it’s possible to physically cut it down to a much smaller unit; allowing this particularly tenacious hacker to put an actual Wii, along with everything else required to make it portable, into an Altoids tin.

As you might expect, between the cramped controls, comically short battery life, and the fact that the whole thing got hot to the touch during use, it was a miserable excuse for a portable console. But the incredible response the project received inspired [Shank] to dust off an earlier project: a far more practical portable Wii that he calls PiiWii. This time around the handheld is a more reasonable size, a useful battery life, and proper controls. It even has an integrated “Sensor Bar” so you can use real Wii Remotes with it. It might not be the prettiest portable console conversion we’ve ever seen, but it certainly ranks up there as one of the most complete.

[Shank] actually “finished” the PiiWii some time ago, but in his rush to complete the project he got a little overzealous with the hot glue and ended up with a device that was difficult to diagnose and fix when things started to go wrong. He shelved the project and moved on to his Altoids tin build, which helped him refine his Wii shrinking skills. With a clearer head and some more practical experience under his belt, the PiiWii was revamped and is clearly all the better for it.

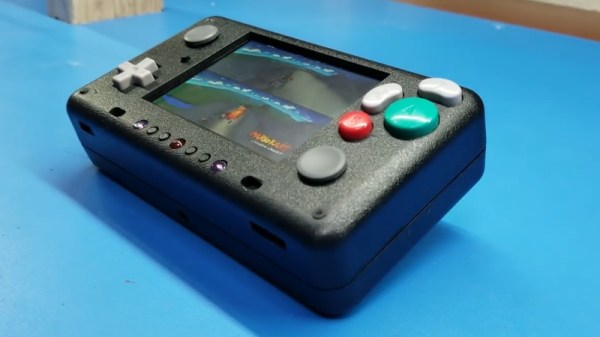
Unlike previous Wii portables we’ve seen, there’s no attempt at adding GameCube controller ports or video out capability. It’s built to be a purely handheld system, and that focus has delivered a system that’s roughly the size of the original Game Boy Advance. Beyond the cleverly sliced Wii motherboard, the inside of the PiiWii features a 3.5 inch display, a custom designed audio amplifier PCB, four 3400 mAh cells which deliver a run time of around four hours, a 3DS “slider” analog stick, and a generous helping of Kapton tape in place of hot glue.

If there’s any criticism of the PiiWii, it’s likely going to be about the system’s boxy exterior. But as [Shank] explains, there’s an excellent reason for that: it’s literally built into a project box. He simply took a commercially available ABS project box, the Polycase SL 57, and made all his openings on the front with a laser cutter. Other than the fact taking a laser to ABS releases hydrogen cyanide, he found it a good way to quickly knock out a custom enclosure.

Last year we took a look his ridiculously small Altoids tin Wii, and while that was an impressive project to be sure, we’re glad he revisited the PiiWii and showed that a portable Wii can be more than just a novelty. Compared to other systems, the Wii doesn’t seem to get the portable treatment that often, so we’re always glad to see somebody come in and do the concept justice.

Continue reading “A Practical Portable Wii Emerges From The Memes”

An Easy Way To MIDI Sync Your Eurorack Build

Eurorack synthesizer builds are known for a lot of things; simplicity isn’t necessarily one of them. However, not everything on a modular synthesizer build has to be inordinately complicated, a mess of wires, or difficult to understand. [little-scale] has built a neat and tidy module that might just find a place in your setup – the Chromatic Drum Gate Sync. The handy little device is based on a Teensy, and uses its USB MIDI libraries to make synchronizing hardware a snap.

The device has 12 channels, each responding to a single MIDI note. A note on message is used to set a gate high, and a note off message to set it low again. This allows very fine grained control of gates in a modular setup. The device can also output a variety of sync signals controlled by the USB MIDI clock – useful for keeping your modular rack in time with other digitally controlled synths.

It’s a build that espouses [little-scale]’s usual aesthetic – clean and tidy, with a focus on compactness. All the required details to build your own are available on Github.

We’ve seen the collision of [little-scale] and Teensy hardware before – with this rig playing 8 SEGA soundchips in unison.

DIY Ribbon Element Upgrades A Studio Microphone

For those with some experience with pro audio, the term “ribbon microphone” tends to conjure up an image of one of those big, chunky mics from the Golden Age of radio, the kind adorned with the station’s callsign and crooned into by the latest heartthrob dreamboat singer. This DIY ribbon mic is none of those things, but it’s still really cool.

Of course the ribbon mic isn’t always huge, and the technology behind it is far from obsolete. [Frank Olsen]’s ribbon mic starts out with gutting a run-of-the-mill studio mic of its element, leaving only the body and connector behind. The element that he constructs, mostly from small scraps of aluminum and blocks of acrylic, looks very much like the ribbon element in commercial mics: a pair of magnets with a thin, corrugated strip of foil suspended between them. The foil was corrugated by passing it through a jig that [Frank] built, which is a neat tool, but he says that a paper crimper used for crafting would work too. There’s some pretty fussy work behind the cartridge build, but everything went together and fit nicely in the old mic body. The video below was narrated using the mic, so we know it works.

Fun fact: the ribbon microphone was invented by Walter Schottky. That Walter Schottky. Need more on how these mics work? Our colleague [Al Williams] has you covered with this article on the basics.

Continue reading “DIY Ribbon Element Upgrades A Studio Microphone”

Superheterodyne Radios Explained

The general public thinks there is one thing called a radio. Sure, they know there are radios that pick up different channels, but other than that, one radio is pretty much like the other. But if you are involved in electronics, you probably know there are lots of ways a radio can work internally. A crystal set is very different from an FM stereo, and that’s different still from a communications receiver. We’d say there are several common architectures for receivers and one of the most common is the superheterodyne. But what does that mean exactly? [Technology Connection] has a casual explanation video that discusses how a superhet works and why it is important. You can see the video, below.

Engineering has always been about building on abstractions. This is especially true now when you can get an IC or module that does most of what you want it to do. But even without those, you would hardly start an electronics project by mining copper wire, refining it, and drawing your own wire. You probably don’t make many of your own resistors and capacitors, neither do you start your design at the fundamental electronic equations. But there’s one abstraction we often forget about: architecture. If you are designing a receiver, you probably don’t try to solve the problem of radio reception; instead you pick an architecture that is proven and design to that.

Continue reading “Superheterodyne Radios Explained”

Custom Mini 4WD Runs On Steam

Tamiya’s Mini 4WD toy line primarily consists of small 1:32 scale toy cars powered by AA batteries, which have no remote control and are guided around a plastic track by horizontally oriented drive guide wheels. Tuning and racing these cars is popular in many parts of the world, but this build is a little different.

After initial experiments with a modified Tamiya chassis are unsuccessful, a fresh build using a bespoke aluminium chassis is begun. A sturdy boiler is created, feeding into a piston which is used to drive all four wheels through a series of driveshafts.

It’s interesting to watch the iterative design process solve various problems such as piston wear and gearing. Performance is underwhelming for those used to the immense speed of the electric toys, but we’d love to see a competition series using steam powered racers.

We don’t see a whole lot of steam hacks around here, but the Hudspith steam bicycle is something to marvel at. Video after the break.

Continue reading “Custom Mini 4WD Runs On Steam”

Wooden Clock To FPGA Conversion

[John] wanted a project to help him learn more about FPGAs. So he started with his wooden clock — made with an Arduino — and ported it over to a Lattice FPGA using Icestorm. What’s nice is that he takes you through the steps he used to simulate the design using the Falsted simulator and then realizing it in the FPGA. Since he’s just starting out, it is a good bet he ran into the same rough edges you will (or did) and sometimes that can really help get you over the hump. You can see a video below, and the code for the project is on GitHub.

For example, after mocking up a circuit design in Falstad he realized he could make one large counter instead of several modules, and he contrasts that to a more modular approach. He also ran into a feature that was simple for the Arduino but difficult for the FPGA. He got it working, but it took some optimization effort to make everything fit in the relatively small FPGA he was using.

Continue reading “Wooden Clock To FPGA Conversion”

A Page-Turner On Kindle – One Step At A Time

You don’t have to be an avid bookworm to find use for an e-book reader. Take your local wedding band for example: with a big repertoire of songs to cover, you don’t really want to drag huge folders full of chords and lyrics around, tediously browsing through them to find the correct one for every new song. Even the biggest tree corpse enthusiast cannot deny the comfort of an e-book reader here. And since turning the page boils down to simply changing the content on a display, you don’t necessarily need to use your hands for that either. With that in mind, [mosivers] built a WiFi foot switch for his musician brother’s Kindle to flip backwards and forwards through the pages.

After jailbreaking the Kindle and installing busybox, [mosivers] set up a web server to serve two CGI scripts that write the previously recorded input events for forward and backward flipping respectively to /dev/input/event0, essentially simulating a touch screen press that way. The foot switch, as counterpart, houses a battery-powered ESP8266, acting as access point for the Kindle to connect to, and requesting those page flipping CGI scripts whenever one of its two buttons is pressed.

If you don’t like the idea of jailbreaking your device in order to change the pages without using your hands, you could of course consider combining a more mechanical solution with the foot switch concept. And in case you want to see more of [mosivers], have a look at his DIY talk box project we’ve covered earlier.