Virtual Racers Battle It Out On Portable WS2812 Track

Sure modern video games are impressive, but you certainly don’t need a 4K display or high speed Internet connection to have a good time. For a perfect example, take a look at this unique one-dimensional racing game put together by [mircemk]. This variation of [Gerardo Barbarov Rostan]’s Open LED Race project has been scaled down so it can be transported easily, though at least for now, you’ll still need to plug it into an external power supply.

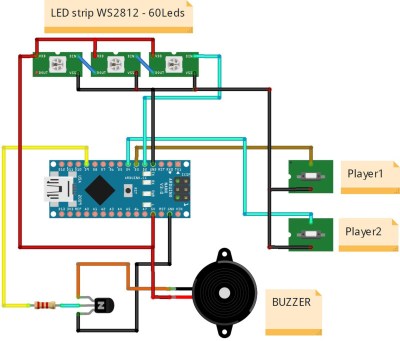
The game is pretty straightforward. By rapidly pressing their respective buttons, players race their virtual vehicles on a linear “track” made of 60 WS2812 RGB LEDs. In the most basic of terms, the faster they press their button, the faster the red or green illuminated LED that represents their car moves.
But in practice, things are made a bit more interesting with the addition of simulated gravity for the “hills” the racers will encounter. The cars also have a bit of inertia, and will coast along even when you aren’t mashing the button. There are even optional engine sounds, though as with the visual representation of the cars, a certain degree of imagination is required for the desired effect.

The hardware requirements for this game are minimal, and can easily be adapted to what you have in the parts bin. Beyond the strip of WS2812 LEDs, all you really need is a microcontroller and two buttons. Here [mircemk] is using an Arduino Nano, but you could press pretty much any MCU into service. To make this version as portable as possible, the buttons are built right into the PVC sheet enclosure, but putting them in some wired remotes would make for a bit more comfortable gameplay.

We’ve covered several projects that have aimed to turn the humble string of RGB LEDs into an interactive electronic game over the years. As long as you’ve got an open mind, you can find a whole world hidden inside some blinking lights.

Continue reading “Virtual Racers Battle It Out On Portable WS2812 Track”

Arduino Finds Treasure

A beach is always a relaxing summer vacation destination, a great place to hang out with a drink and a book or take a swim in the ocean. For those who need a more active beach-going activity with an electronics twist, though, metal detecting is always a popular choice too. And, of course, with an Arduino and some know-how it’s possible to build a metal detector that has every feature you could want from even a commercial offering.

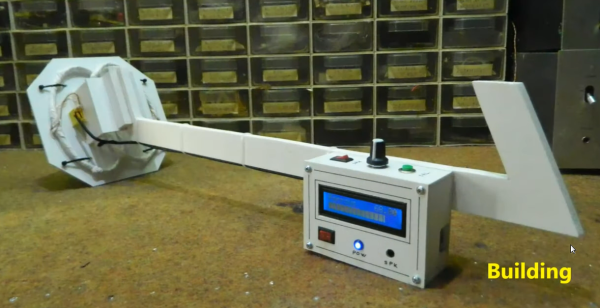
This build comes to us from [mircemk] who built this metal detector around an Arduino Nano and uses a method called induction balance detection to find metal. Similar to how radar works, one coil sends out a signal and the other listens for reflections back from metal objects underground. Building the coils and determining their resonant frequency is the most important part of this build, and once that is figured out the rest of the system can be refined and hidden treasure can easily be unearthed.

One of the more interesting features of this build is its ability to discriminate between ferrous and non-ferrous metals, and it can detect large metal objects at distances of more than 50 cm. There are improvements to come as well, since [mircemk] plans to increase power to the transmission coil which would improve the range of the device. For some of [mircemk]’s other metal detectors, be sure to check out this one which uses a smartphone to help in the metal detection process.

Continue reading “Arduino Finds Treasure”

How To Make Resin Prints Crystal Clear

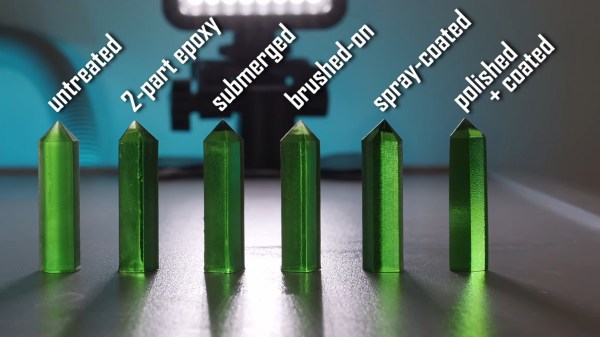
[Matou] has always been entranced by the beauty of natural crystal formations [and has long wished for a glowing crystal pendant]. Once he got a resin-based 3D printer, he was majorly disappointed to find out that although transparent resin prints look like delicious candy when they’re still wet, they turn cloudy and dull after being washed in an isopropyl bath and cured with UV light. There must be a way to either polish pieces back to clear, or keep them clear in the first place, [Matou] thought, and set about experimenting with some test crystals (video, embedded below).

As [Matou] found out, the dullness is caused by surface imperfections. Resin prints have layer lines, too, and although they may be super fine and invisible to the naked eye, they will still scatter light. The choices seem obvious — either polish the proud parts down with many grits of sandpaper, or fill the valleys with something to smooth everything out. As you’ll see in the video after the break, [Matou] tried it all, including a coat of the same resin that made the print. It’s an interesting look at the different ways to smooth out resin prints, though you may not be surprised to find that the one with the most work put into it looks the best.

We were hoping to see [Matou] try a green LED in the pendant, but it didn’t happen. If you’re dying to know what that looks like, you can get one of these pendants for yourself by supporting [Matou] on Patreon.

We think crystals are pretty cool, too — especially crystal radios. Here’s the hack-iest one of those we’ve ever seen, free of charge.

Continue reading “How To Make Resin Prints Crystal Clear”

Incredibly Slow Films, Now Playing In Dazzling Color

Back in 2018 we covered a project that would break a video down into its individual frames and slowly cycle through them on an e-paper screen. With a new image pushed out every three minutes or so, it would take thousands of hours to “watch” a feature length film. Of course, that was never the point. The idea was to turn your favorite movie into an artistic conversation piece; a constantly evolving portrait you could hang on the wall.

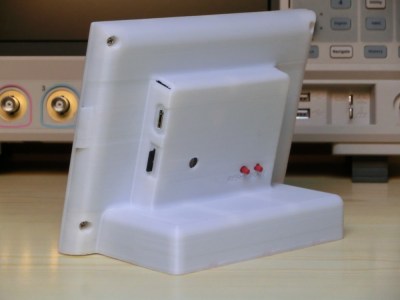
[Manuel Tosone] was recently inspired to build his own version of this concept, and now thanks to several years of e-paper development, he was even able to do it in color. Ever the perfectionist, he decided to drive the seven-color 5.65 inch Waveshare panel with a custom STM32 board that he estimates can wring nearly 300 days of runtime out of six standard AA batteries, and wrap everything up in a very professional looking 3D printed enclosure. The end result is a one-of-a-kind Video Frame that any hacker would be proud to display on their mantle.

The Hackaday.IO page for this project contains a meticulously curated collection of information, covering everything from the ffmpeg commands used to process the video file into a directory full of cropped and enhanced images, to flash memory lifetime estimates and energy consumption analyses. If you’ve ever considered setting up an e-paper display that needs to run for long stretches of time, regardless of what’s actually being shown on the screen, there’s an excellent chance that you’ll find some useful nuggets in the fantastic documentation [Manuel] has provided.

We always love to hear about people being inspired by a project they saw on Hackaday, especially when we get to bring things full circle and feature their own take on the idea. Who knows, perhaps the next version of the e-paper video frame to grace these pages will be your own.

Continue reading “Incredibly Slow Films, Now Playing In Dazzling Color”

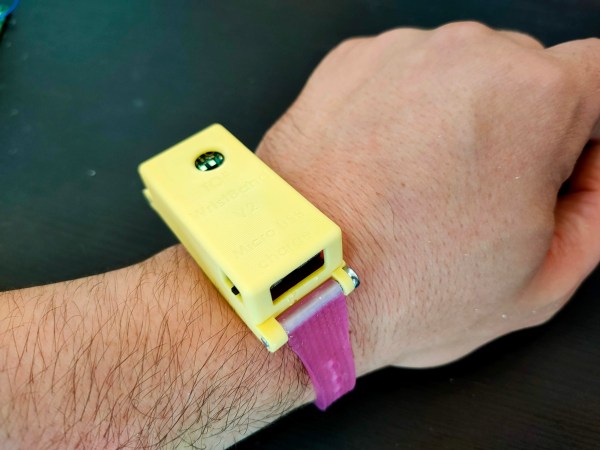
A rectangle-shaped wristband wearable, worn on a wrist

A Digital White Cane For The Visually Impaired

The white cane (and its many variants) is an everyday carry for many visually impaired people. This low-tech tool allows those afflicted by visual impairment to safely navigate the world around them, and has been ubiquitous in many parts of the world for decades. [Madaeon] has been hard at work going one step further in prototyping an open-source assistive wearable that could help in situations where a cane is not practical, or useful.

The T.O.F Wristband V2 alerts its wearer to nearby obstacles through vibrations, and is able to detect objects up to four meters away. As the wearer veers closer and closer to an obstacle, the vibration increases in frequency. A time-of-flight distance sensor is controlled by a Feather, and the whole system is powered by a small lithium-polymer battery. The prototype consists of just four components plus a 3D printed case and bracelet, which inevitably keeps down costs and complexity.

Version two of this project picks up where version one left off. In that project, [Madaeon] mentioned the possibility of squeezing this project down to the size of a ring. Perhaps with better battery technology, a ring-sized sensor might just be possible one day.

This isn’t the first wearable that has set out to assist the visually impaired. Back in 2019 we covered a laser-augmented glove that attempts something very similar.

By some estimates, nearly one billion people worldwide have some degree of visual impairment. Assistive devices like the T.O.F Wristband V2, and others like it, offer these people the potential for greater independence and an improved standard of living.

Continue reading “A Digital White Cane For The Visually Impaired”

Tesla’s Megapack Battery Burned For Days In Grid Storage Fire

Lithium rechargeable batteries have been heralded for their high-density energy storage, enabling all manner of technologies to come to fruition. From drones to practical electric cars to large-scale grid storage, the applications are endless.

The fire as seen from a drone overhead. Source: Twitter/@FireRescueVic

However, the lithium rechargeable battery has always had one major flaw–flammability. Pushed outside their operating range or otherwise tipped into thermal runaway, and they can burn ferociously as a result.

This came to pass in late July, at the Victorian Big Battery in Geelong, Australia, and it took significant effort to extinguish the blaze. Let’s take a look at the project and see how this came to occur.

Grid-Scale Storage

The Victorian Big Battery is a grid storage project similar in construction to the Hornsdale Power Reserve in neighboring South Australia. However, where the Hornsdale facility fields 194 MWh of capacity and 150MW peak power delivery, the new project aims to go much further. The Victorian project aims to install 450 MWh of capacity and deliver a peak power output of 300 MW.

Continue reading “Tesla’s Megapack Battery Burned For Days In Grid Storage Fire”

Who Needs Pin Headers?

[Martin] sent this query, along with the lead photo, into the tip line, and he makes a good point. Most development and evaluation boards have multiple rows of pin headers, often arriving loose in the package — soldering is left to the user. In an abundance of caution, we usually design our prototype boards with many pin headers for debugging and testing. But as [Martin] reminds us, there are other alternatives to solder.

  • Yours truly once worked with a prolific designer of PIC microprocessor boards. Long before the advent of solutions like the Tag Connect family, [Ralph] would program his boards by just inserting a pin header into the PCB and applying gentle pressure with his thumb until the code finished flashing.
  • You may have seen the staggered offset PCB patterns that hold your pin header securely while you solder. You could tweak this a little bit to put more pressure on the pins, making a solder-less connection that is sufficient for temporary testing.
  • Taking the opposite approach, you can get solderless connectors with press-fit pins, a method we tested a few years ago on a Raspberry Pi Zero. Anyone who has worked on Eurocard-based systems like VME can appreciate the time-savings and improved reliability of 96-pin DIN-41612 press-fit connectors.
  • Or, as [Martin] proposes, you could use one of these inexpensive pogo-pin clamps. These are available for less than $10 from your favorite Asian electronics distributor. They are about the size of a large clothespin, and are available in several different pin configurations.

These techniques won’t help you if you need to plug your board into another card, such as a hat onto a Raspberry Pi. But when you just want to grab a few signals for a serial port or probing some digital I/O signals, having a few of these clips in your tool box can save you the time and headache of soldering down a header. Do you have any tips for making soldering pin headers easier, or even avoiding them altogether? Let us know in the comments below.