Learning And Failing At Digital Electronics

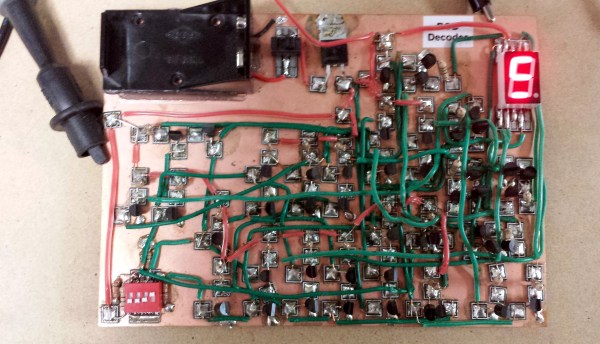
[spencerhamblin] is starting his explorations into digital electronics the hard way: reproducing a “simple” IC’s functionality by wiring up a board full of discrete transistors. In this case, the end product is a binary-to-seven-segment decoder built from scratch.

In engineering circles, this circuit is better known as a 7447 BCD to seven-segment decoder/driver, but just using a single chip has little pedagogical value. Building a simple circuit with 39 transistors, 31 resistors, and a handful of diodes is a good introduction to digital electronics, and after two attempts, [spencerhamblin] knocked it out of the park.

The build began with a piece of copper clad board, a bunch of cheap FETs from fleabay, and an incorrect schematic. While the first version of the project looked fantastic with Manhattan-style construction, and jumper wires everywhere, the schematic was fundamentally flawed and [spencer] got a little confused when converting the circuit to a common anode display.

Version two used a more standardized construction. This circuit was plotted in DipTrace, and the resulting PCB was sent off to OSHPark. The build was cleaner, but in capturing the schematic, [spencer] reversed the footprint of the seven segment display. That was easy enough to fix with a few short wires, and after a little bit of work [spencer] had a device that would convert binary to a seven segment display.

Introducing The BeagleBone Blue

The BeagleBone is a board that doesn’t get a lot of attention in a world of $5 Raspberry Pis, $8 single board computers based on router chipsets, and a dizzying array of Kickstarter projects promising Android and Linux on tiny credit card-sized single board computers. That doesn’t mean the BeagleBone still isn’t evolving, as evidenced by the recent announcement of the BeagleBone Blue.

The BeagleBone Blue is the latest board in the BeagleBone family, introduced last week at CES. The Blue is the result of a collaboration between UCSD Engineering and TI, and with that comes a BeagleBone built for one specific purpose: robotics and autonomous vehicles. With a suite of sensors very useful for robotics and a supported software stack ideal for robots and drones, the BeagleBone Blue is the perfect board for all kinds of robots.

On board the BeagleBone Blue is a 2 cell LiPo charger with cell balancing and a 6-16 V charger input. The board also comes with eight 6V servo outputs, four DC motor outputs and inputs for four quadrature encoders. Sensors include a nine axis IMU and barometer. Unlike all previous BeagleBones, the BeagleBone Blue also comes with wireless networking: 802.11bgn, Bluetooth 4.0 and BLE. USB 2.0 client and host ports are also included.

Like all of the recent BeagleBoards, including the recently released BeagleBone Green, the Blue uses the same AM3358 1 GHz ARM Cortex 8 CPU, features 512 MB of DDR3 RAM, 4GB of on board Flash, and features the main selling point of the BeagleBoard, two 32-bit programmable real-time units (PRUs) running at 200 MHz. The PRUs are what give the BeagleBone the ability to blink pins and control peripherals faster than any other single board Linux computer, and are extremely useful in robotics, the Blue’s target use.

Right now, the BeagleBone Blue isn’t available, although we do know you’ll be able to buy one this summer. Information on pricing and availability – as well as a few demos – will come in February.

3D Printed Tourbillon Clock

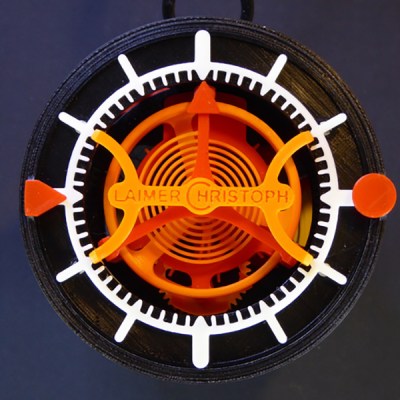
3D printed clocks have been done before, but never something like this. It’s a 3D printed clock with a tourbillon, a creative way to drive an escapement developed around the year 1800. Instead of a pendulum, this type of clock uses a rotating cage powered by a spring. It’s commonly found in some very expensive modern watches, but never before has something like this been 3D printed.

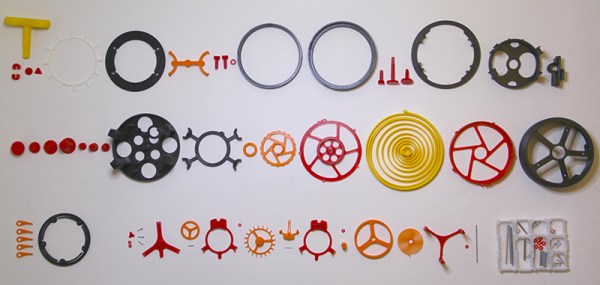
3D Printed Clock[Christoph Lamier] designed this tourbillon clock in Autodesk Fusion 360, with 50 printable parts, and a handful of pins, screws, and washers. The most delicate parts – the hairspring, anchor, escapement wheel, and a few gears were printed at 0.06 layer height. Everything else was printed at a much more normal resolution with 0.1mm layer height.


Because nearly the entire clock is 3D printed, this means the spring is 3D printed as well. This enormous 2 meter-long spiral of printed plastic could not have been printed without altering a few settings on the printer. The setting in question is Cura’s ‘combing’ or the ‘avoid crossing perimeters’ setting. If you don’t disable this setting, the print time increases by 30%, and moving the print head causes the plastic to ooze out over the spring.

There’s a 26-minute long video of the 3D printed tourbillon clock in action that is horrendously boring. It does demonstrate this clock works, though. You can check out the more interesting videos below.

Continue reading “3D Printed Tourbillon Clock”

Hackaday Links: January 10, 2016

Everybody loves cheap stuff, and we hate telling everyone about coupon codes. That said, TI has a new LaunchPad development board they’re promoting. It’s based on the MSP432, the ARM extension of their MSP430 line. The MSP432 is an ARM Cortex M4F, low power, and planned for production later this year.

Here’s your daily CES garbage post. Through a collaboration between Sony and Nissan, a car has become a video game controller controller. A controller plugs into the ODB II port, reads throttle, brake, and steering wheel positions (and buttons on the dash/steering wheel, I guess), and translates that into controller input for a PlayStation 4. What games do they play with a car? You would think Gran Turismo, Rocket League, or other games with cars in them. Nope. Football.

Dangerous Prototypes is a legal Chinese company! [Ian] didn’t say anything about the process about becoming a legal Chinese company because he wrote a blog post, not a book. Shenzhen Dangerous Prototypes Electronics Technology Limited allows them to have an office in the Shenzhen electronics market, hire local and foreign hackers, host Hacker Camp Shenzhen, and allow people to apply for ‘Authorized Authority’ visa letters for the people who need them. Great news for a great company.

The Forge hackerspace in Greensboro, NC is growing. In just over a year they have 160 members and they’ve already outgrown their 3,400 square foot space. Now they’re moving to a larger space that’s twice the size and they’re looking for donations.

People have been taking old iPad screens and turning them into HDMI displays for years now. [Dave] got his mitts on a panel from a Macbook Pro 17″, and turned it into a monitor. It required a $50 LVDS adapter, but the end result is great – a 1920×1200 panel that looks pretty good.

Putting A Trackball Inside A Controller

Gaming on a PC is obviously superior and you would be a fool to argue otherwise. The keyboard and mouse is the obviously superior input device, but there are times when you just want to play games on a couch. [Gabriel] has an interesting solution to this input problem in the second version of his KeyBall Controller. It’s a controller, but it leverages the superior layout and precision of the keyboard and mouse combo, without making any compromises.

[Gabriel]’s KeyBall Controller began its life as several generic console controllers. The main body of is mostly a clone of the original Xbox S controller. Inside, there are parts from a clone SNES controller, a PSX controller, a generic USB trackball, and an iPazzPort USB handheld keyboard.

The construction of the KeyBall follows in the tradition of the best case modders we’ve ever seen: cutting plastic, gluing plastic, applying epoxy putty, and lots of sanding. The electronics for the controller also follow in the most hallowed traditions of case modders: perfboard, hot glue, and many fine strands of wire. Inside the controller is a USB hub to connect all the different USB devices.

It’s a great device that finally solves the problem of putting a traditional keyboard and mouse layout in the palms of your hands.

Building Triodes With Blinker Fluid

The triode is one of the simplest kinds of vacuum tubes. Inside its evacuated glass envelope, the triode really is just a few bits of wire and metal. Triodes are able to amplify signals simply by heating a cathode, and modulating the flow of electrons to the anode with a control grid. Triodes, and their semiconductor cousin the transistor, are the basis of everything we do with electricity.

Because triodes are so fantastically simple, they’re the parts most commonly crafted by the homebrew tube artisans of today. You don’t need a glass blowing lathe to make the most basic vacuum tube, though: [Marcel] built one from the light bulb used in a car’s tail light.

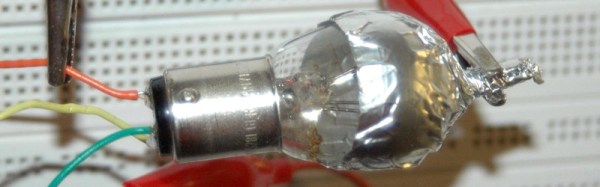
The light bulb in your car’s tail light has two filaments inside: one for the normal tail light, and a second one that comes on when you brake. By burning out the dimmer filament, [Marcel] created the simplest vacuum tube device possible. In his first experiment, he turned this broken light bulb into a diode by using the disconnected filament as the anode, and the burning filament as the cathode. [Marcel] attached a 1M resistor and measured 30mV across it. It was a diode, with 30μA flowing.

The triode is just a diode with a grid, but [Marcel] couldn’t open up the light bulb to install a piece of metal. Instead, he wrapped the bulb in aluminum foil. After many attempts, [Marcel] eventually got some amplification out of his light bulb triode.

The performance is terrible – this light bulb triode actually has an “amplification” of -108dB, making it a complete waste of energy and time. It does demonstrate the concept though, even though the grid isn’t between the anode and cathode, and this light bulb is probably filled with argon. It does work in the most perverse sense of the word,  and makes for a very interesting build.

CES: Self-Flying Drone Cars

CES, the Consumer Electronics Show, is in full swing. Just for a second, let’s take a step back and assess the zeitgeist of the tech literati. Drones – or quadcopters, or UAVs, or UASes, whatever you call them – are huge. Self-driving cars are the next big thing. Flying cars have always been popular. On the technical side of things, batteries are getting really good, and China is slowly figuring out aerospace technologies. What could this possibly mean for CES? Self-flying drone cars.

The Ehang 184 is billed as the first autonomous drone that can carry a human. The idea is a flying version of the self-driving cars that are just over the horizon: hop in a whirring deathtrap, set your destination, and soar through the air above the plebs that just aren’t as special as you.

While the Ehang 184 sounds like a horrendously ill-conceived Indiegogo campaign, the company has released some specs for their self-flying drone car. It’s an octocopter, powered by eight 106kW brushless motors. Flight time is about 23 minutes, with a range of about 10 miles. The empty weight of the aircraft is 200 kg (440 lbs), with a maximum payload of 100 kg (220 lbs). This puts the MTOW of the Ehang 184 at 660 lbs, far below the 1,320 lbs cutoff for light sport aircraft as defined by the FAA, but far more than the definition of an ultralight – 254 lbs empty weight.

In any event, it’s a purely academic matter to consider how such a vehicle would be licensed by the FAA or any other civil aviation administration. It’s already illegal to test in the US, authorities haven’t really caught up to the idea of fixed-wing aircraft powered by batteries, and the idea of a legal autonomous aircraft carrying a passenger is ludicrous.

Is the Ehang 184 a real product? There is no price, and no conceivable way any government would allow an autonomous aircraft fly with someone inside it. It is, however, a perfect embodiment of the insanity of CES.