Mustachioed Rover Simultaneously Manly, Adorable

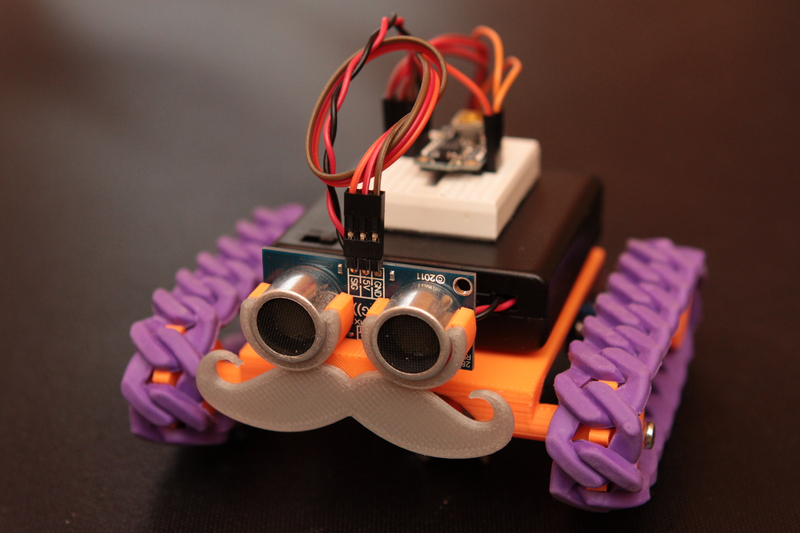
[Rick], an Adafruit learning system contributor, is excited by the implications of STEM’s reach into K-12 education. He was inspired to design Red Rover, a low-cost robot that can be easily replicated by anyone with access to a 3-D printer.
This adorable autonomous rover is based on the adafruit Trinket microcontroller, but will also rove under the power of an Arduino micro. It really is quite simple—the Trinket drives two continuous rotation micro servos and pretty much any flavor of rangefinder you like. [Rick] tested it with Parallax PING))), Maxbotix, and Grove sensors, and they all worked just fine.

What’s truly awesome about Red Rover are the track treads. [Rick] initially experimented with flexible filament. While he had good results, it was not a cost-effective solution. What you see in the picture and the short video after the break are actually rubber bracelets from Oriental Trading.

The plastic part count comes in at seven, all of which can be printed together at once. [Rick]’s gallery includes both small and large chassis and three different servo mounts. The Red Rover guide builds on other adafruit guides for Trinket general use, servo modification, and Trinket-specific servo control.

Update: Added [Rick]’s demo video after the break!

Continue reading “Mustachioed Rover Simultaneously Manly, Adorable”

Once, Twice, Three Times A Nixie

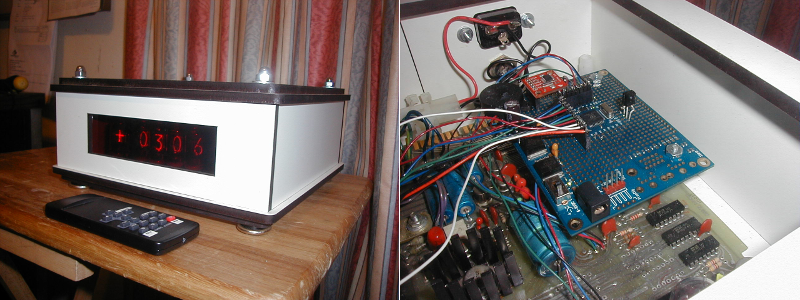
Try as he might, [Localroger] can’t seem to throw away a certain board that started life in one of the first digital industrial scales, the NCI DigiFlex model 5775. He recently gave it a third career as a nixie clock with an alarm.

[Localroger] says the board dates to about 1975. It’s all TTL, no microprocessor anywhere. He was headed to the Dumpster with it in the mid-1980s, but realized that he could hack it into something useful. Since the display wasn’t multiplexed, it would be fairly easy. He used it as a BCD tester for about 10 years until the method fell out of fashion.

After a decade on the shelf, [Localroger] started off for the Dumpster once more with the board. The nixie tube display cried out for another chance to glow, so he decided to repurpose it into a remote-controlled bedside clock with an alarm. He installed a Parallax Propeller Protoboard with headers for easy removal and subsequent servicing of the 5775 board. He added a few things to the protoboard: a piezo element for the alarm, a SparkFun RTC module, an IR receiver, and vertically-oriented header so the PropPlug can be plugged in from the top. But that’s not all. [Localroger] designed a custom melamine-finished MDF enclosure and laser cut it, giving the edges a nice contrast. It’s so tough, he can put his ceramic lamp on top of it to save space on the nightstand.

Nixie tubes are becoming more scarce all the time. If you can’t find any, we humbly suggest rolling your own.

[Thanks Localroger!]

Retrotechtacular: Wax On, Wax Off: How Records Are Made

In this 1942 tour of the RCA Victor plant in Camden, NJ, we see the complete record making process from the master cut production to the shipping of multiple 78RPM shellac pressings. The film centers around a recording of Strauss’ Blue Danube waltz as performed by the 1940s equivalent of studio musicians, the Victor Salon Orchestra.

The master record starts life as a thin layer of molten wax poured on to a hot circular plate in a dust-free room.  Bubbles and impurities are blow torched out, and the wax is left to cool under a steel dome. This perfect disc is carefully passed to the recording studio through a special slot, where it is laid carefully beneath the cutting stylus.

Unlike today’s multi-track recording sessions, the master was cut from the performance of a complete band or orchestra all playing as they would in concert. The sound engineer was responsible for making fast changes on the fly to ensure sonic  and groove width consistency. 

After cutting, the delicate wax undergoes several phases of electrolysis that form the metal master. It is bombarded first with pure gold and then twice with copper sulfate to build a sturdy disc. The copper ionization process also ensures high fidelity in the final product.

Although mighty, this master won’t last long enough to make all the necessary pressings, so a mother matrix is made. This is a negative image of the master. The mother is formed by electrolytically bathing the master in nickel, and then adding a thin film of some indeterminate substance. Another copper bath, and mother emerges. As soon as possible, the master is separated and whisked away to the storage vault.

Since a positive image is needed for pressing, a stamping matrix is made. Mother gets a nickel bath for durability, and then a copper bath to form the stamping matrix. Many stampers are created so that several records can be pressed at once. These images get a chromium plating to help them last through many pressings.

Continue reading “Retrotechtacular: Wax On, Wax Off: How Records Are Made”

Acoustic Wayfinder For The Visually Impaired

Ideally, technology is supposed to enhance our lives. [Shane and Eileen], two seniors at Cornell have found a great way to enhance the lives of visually impaired individuals with their acoustic wayfinding device. In brainstorming for their final project, [Shane and Eileen] were inspired by this Hackaday post about robots as viable replacements for guide dogs. They sought to provide wearable, hands-free guidance and detection of (primarily) indoor obstacles—namely chairs, benches, and other inanimate objects below eye level.

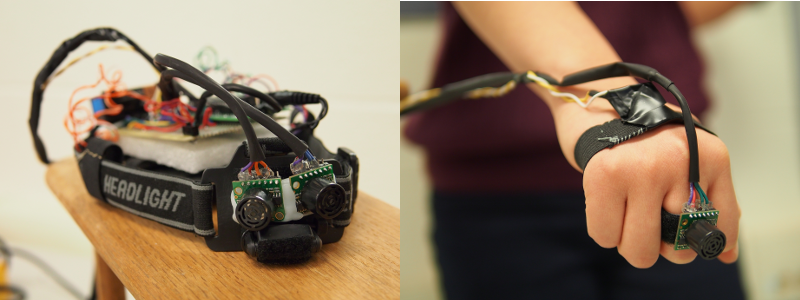
The wayfinder comprises two systems working in tandem: a head-mounted navigation unit and a tactile sensor worn on the user’s finger. Both systems use Maxbotix LV-MaxSonar-EZ0 ultrasonic rangefinder modules to detect obstacles and vibrating mini-disc motors to provide haptic feedback at speeds proportionate to the user’s distance from an obstacle.

The head unit uses two rangefinders and two vibrating motors. Together, the rangefinders have a field of view of about 120 degrees and are capable of detecting obstacles up to 6.45 meters away. The tactile sensor comprises one rangefinder and motor and is used in a manner similar to a Hoover cane. The user sweeps their hand to detect objects that would likely be out of the range of the head unit. Both parts are ergonomic and  size-adjustable.

At power up, [Shane and Eileen]’s software performs a calibration of the tactile sensor to determine the distance threshold in conjunction with the user’s height. They’ve used an ATMega 1284 to drive the system, and handled real-time task scheduling between the two subsystems with the TinyRealTime kernel. A full demonstration video is embedded after the break.

Continue reading “Acoustic Wayfinder For The Visually Impaired”

UFO-looking RGB LED RC Plane Lights Up The Night, Uses All The Acronyms

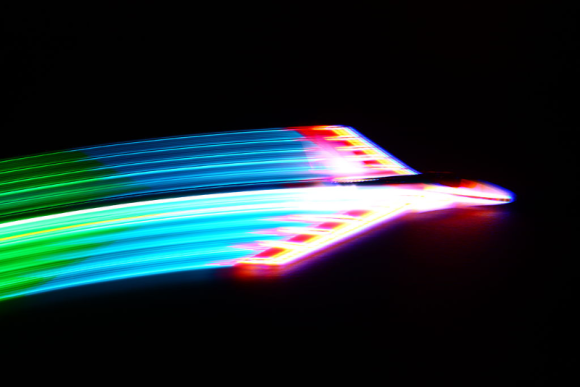
[Roballoba] decided to combine his love for RC planes, things that light up, and photography, and we’re glad he did. He shares his method in this Instructable for illuminating a bare styrofoam replacement fuselage for a Parkzone Stryker RC plane.  There are many more amazing pictures there as well.

He used low-tack tape to lay out the LED strips on the fuselage, solder the connections, and test them. Once he was satisfied with the arrangment, he flipped the strips face down so the foam diffuses the light. The lights are powered by a 12V Li-Po battery he soldered to a deans connector. Finally, [Roballoba] covered  and heat sealed everything with Doculam, a very cost-effective laminate that offers great protection and security.

He used some LED corn lights as afterburners, which is a nice touch of realism. There is a video after the break where [Roballoba] shows us the connections up close and then runs through some light show options.  Another video of a nighttime flight is waiting for you in the write up.

Spent too much money on eggnog and a new console this year to be able to replicate this build? $30 will snag what you need for this smartphone-controlled paper plane we featured a few weeks back. You could always BeDazzle it.

Continue reading “UFO-looking RGB LED RC Plane Lights Up The Night, Uses All The Acronyms”

I Am NXT 3-Point Bend Tester. Please Insert Girder.

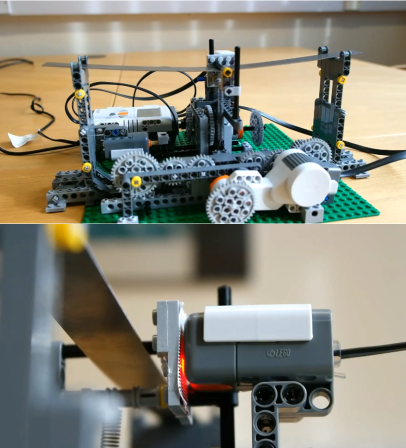
Learning with visuals can be very helpful.  Learning with models made from NXT Mindstorms is just plain awesome, as [Rdsprm] demonstrates with this LEGO NXT 3-point bend tester that he built to introduce freshmen to flexural deflection and material properties. Specifically, it calculates Young’s modulus using the applied force of a spring and the beam’s deflection. [Rdsprm] provides a thorough explanation in the About section of the YouTube video linked above, but the reddit comments are definitely a value-add.

[Rdsprm] built this from the Mindstorms education base set (9797) and the education resource set (9648). Each contestant endures a 5-test battery and should produce the same result each time. The motor in the foreground sets the testing length of the beam, and the second motor pulls the spring down using a gearbox and chain.

This method of deflection testing is unconventional, as [Rdsprm] explains. Usually, the beam is loaded incrementally, with deflection measured at each loading state. Here, the beam is loaded continuously. Vertical deflection is measured with a light sensor that reads a bar code scale on the beam as it passes by. The spring position is calculated and used to determine the applied force.

[Rdsprm] analysed the fluctuation in GNU Octave and has graphs of the light sensor readings and force-deflection. No beams to bend with your Mindstorms? You could make this Ruzzle player instead.

Continue reading “I Am NXT 3-Point Bend Tester. Please Insert Girder.”

LED Matrix Mask Will Scare Up Holiday Cheer

[Davide] sent us this fun LED matrix mask he built using an ATMega8 and 74LS595N shift registers. Each of the eyes is an 8×8 LED matrix, and the mouth is made from two 8x8s. [Davide] used a ULN2803A Darlington transistor array to drive the matrices.

When the user steps behind the mask, an IR sensor detects that a face is within range and activates the facial features. The code randomly runs the eye and mouth patterns. If the user starts speaking, a microphone element detects his voice and a separate speaking mouth pattern is executed.

The mask body and stand are découpaged with pages from Dylan Dog comics. [Davide] says he built the mask years ago, but decided to submit it to the 2013 Inverart Art Fair in Milan. As you can probably imagine, the mask has been a big hit with the kids so far. Stick around to see [Davide]’s Santa-fied demonstration after the jump. [Davide] didn’t give us any details on that sweet hat, unfortunately.

If you require a better degree of protection or more LEDs, check out this LED helmet.

Continue reading “LED Matrix Mask Will Scare Up Holiday Cheer”