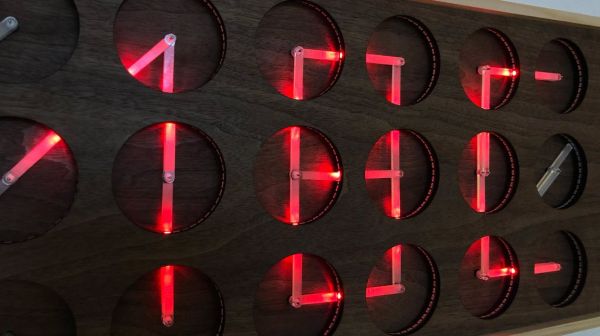
We’ve gotten used to seeing “meta clocks,” clocks that use an array of analog clock faces and piece together characters using the hands of the clocks. They’re very clever, and we always like to see them, especially when they come with detailed build instructions like this one does.
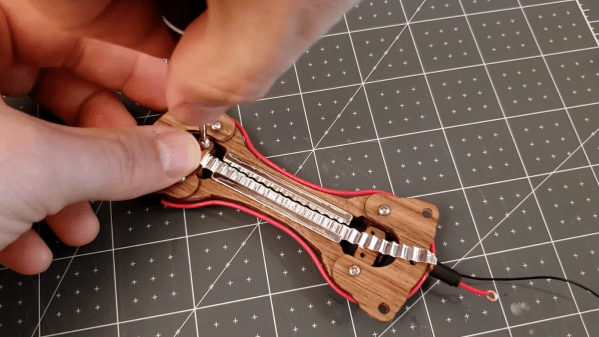
What’s also nice about [Erich Styger]’s “MetaClockClock” display is the twist on the original concept. Where most clock-of-clocks depend on the contrast between the hands and the faces of the analog movements, [Erich] added light to the mix. Hidden inside the bezel of each clock is a strip of RGB LEDs; coupled with the clear acrylic hands of the clock, which act as light pipes, each clock can contribute different shapes of different colors to the display. Each clock is built around a dual-shaft stepper motor of the kind used in car dashboard gauges; the motors each live on a custom PCB, while the LEDs are mounted on a ring-shaped PCB of their own. Twenty-four of the clocks are mounted in a very nice walnut panel, which works really well with the light-pipe hands. The video below shows just some of the display possibilities.
[Erich] has documented his build process in extreme detail, and has all the design files up on GitHub. We won’t say that recreating his build will be easy — there are a lot of skills needed here, from electronics to woodworking — but at least all the information is there. We think this is a beautiful upgrade to [Erich]’s earlier version, and we’d love to see more of these built.
Carbohydrate foams derived from dead trees are not the first material that springs to mind when considering building audio equipment. But really, there’s no reason not to explore new materials for jobs normally reserved for metal or plastic, and when pulled off right, as with this wooden ribbon microphone, the results can both look and sound great.
To be fair, there are plenty of non-wood components in [Frank Olson]’s replica of a classic RCA model 44 microphone. After all, it’s hard to get wood to exhibit the electromagnetic properties needed to turn acoustic energy into electric currents. But that doesn’t mean that wood, specifically walnut veneer, isn’t front and center in this design. [Frank] worked with thin sheets of veneer; cut into shape with a commercial vinyl cutter and stacked up with alternating grains, the wood was glued up with copious cyanoacrylate adhesive to form a plywood of sorts. The dogbone-shaped body was fitted with two neodymium magnets, leaving a gap just wide enough for the microphone’s ribbon diaphragm. That was made from a thin piece of aluminum foil that was corrugated using a DIY crimp roller. Suspended between the magnets and connected to leads, the mic element was adorned with a wood and fabric windscreen and suspended from elastic bands in a temporary frame for testing. The narration on the video below was recorded with the mic, which sounds quite nice to our ears.
We’ve seen ribbon microphones before, as well as wooden microphones, but this is the first time we’ve seen a wooden ribbon microphone. It looks as though [Frank] has more work he wants to do to finish it off properly, and we eagerly await the finished product.
Nostalgia seems to be an inevitable consequence of progress. Advance any field far enough into the future, and eventually someone will look back with misty eyes and fond memories of the good old days and start the process of turning what would qualify as junk under normal conditions into highly desirable collectibles.
In some ways, those who have been bitten by the computer nostalgia bug are lucky, since the sheer number of artifacts produced during their period of interest is likely to be pretty high, making getting gear to lovingly restore relatively easy. But even products produced in their millions can eventually get difficult to find, especially once they get snapped up by eager collectors, leaving the rest to make do or do without.
Of course, if you’re as resourceful as Tube Time is, there’s another alternative: build your own retro recreations. He has embarked on some pretty intense builds to recapture a little of what early computer enthusiasts went through trying to build useful machines. He has built replicas of early PC sound cards, like an ISA-bus AdLib card, its MCA equivalent, and the “Snark Barker”— or is it the “Snood Bloober”? — which bears an uncanny resemblance to the classic Sound Blaster card from the 1980s.
Tube Time will join us for the Hack Chat this week to answer questions about all his retro recreations, including his newest work on a retro video card. Be sure to bring your questions on retro rebuilds, reverse engineering, and general computer nostalgia to the chat.
Click that speech bubble to the right, and you’ll be taken directly to the Hack Chat group on Hackaday.io. You don’t have to wait until Wednesday; join whenever you want and you can see what the community is talking about. Continue reading “Retro Recreations Hack Chat With Tube Time”→
It’ll be Pi Day when this article goes live, at least for approximately half the globe west of the prime meridian. We always enjoy Pi Day, not least for the excuse to enjoy pie and other disc-shaped foods. It’s also cool to ponder the mysteries of a transcendental number, which usually get a good treatment by the math YouTube community. This year was no disappointment in this regard, as we found two good pi-related videos, both by Matt Parker over at Standup Maths. The first one deals with raising pi to the pi to the pi to the pi and how that may or may not result in an integer that’s tens of trillions of digits long. The second and more entertaining video is a collaboration with Steve Mould which aims to estimate the value of pi by measuring the volume of a molecular monolayer of oleic acid floating on water. The process was really interesting and the results were surprisingly accurate; this might make a good exercise to do with kids to show them what pi is all about.
Remember basic physics and first being exposed to the formula for universal gravitation? We sure do, and we remember thinking that it should be possible to calculate the force between us and our classmates. It is, of course, but actually measuring the attractive force would be another thing entirely. But researchers have done just that, using objects substantially smaller than the average high school student: two 2-mm gold balls. The apparatus the Austrian researchers built used 90-milligram gold balls, one stationary and one on a suspended arm. The acceleration between the two moves the suspended ball, which pivots a mirror attached to the arm to deflect a laser beam. That they were able to tease a signal from the background noise of electrostatic, seismic, and hydrodynamic forces is quite a technical feat.
We noticed a lot of interest in the Antikythera mechanism this week, which was apparently caused by the announcement of the first-ever complete computational model of the ancient device’s inner workings. The team from University College London used all the available data gleaned from the 82 known fragments of the mechanism to produce a working model of the mechanism in software. This in turn was used to create some wonderful CGI animations of the mechanism at work — this video is well worth the half-hour it takes to watch. The UCL team says they’re now at work building a replica of the mechanism using modern techniques. One of the team says he has some doubts that ancient construction methods could have resulted in some of the finer pieces of the mechanism, like the concentric axles needed for some parts. We think our friend Clickspring might have something to say about that, as he seems to be doing pretty well building his replica using nothing but tools and methods that were available to the original maker. And by doing so, he managed to discern a previously unknown feature of the mechanism.
We got a tip recently that JOGL, or Just One Giant Lab, is offering microgrants for open-source science projects aimed at tackling the problems of COVID-19. The grants are for 4,000€ and require a minimal application and reporting process. The window for application is closing, though — March 21 is the deadline. If you’ve got an open-source COVID-19 project that could benefit from a cash infusion to bring to fruition, this might be your chance.
And finally, we stumbled across a video highlighting some of the darker aspects of amateur radio, particularly those who go through tremendous expense and effort just to be a pain in the ass. The story centers around the Mt. Diablo repeater, an amateur radio repeater located in California. Apparently someone took offense at the topics of conversation on the machine, and deployed what they called the “Annoy-o-Tron” to express their displeasure. The device consisted of a Baofeng transceiver, a cheap MP3 player loaded with obnoxious content, and a battery. Encased in epoxy resin and concrete inside a plastic ammo can, the jammer lugged the beast up a hill 20 miles (32 km) from the repeater, trained a simple Yagi antenna toward the site, and walked away. It lasted for three days and while the amateurs complained about the misuse of their repeater, they apparently didn’t do a thing about it. The jammer was retrieved six weeks after the fact and hasn’t been heard from since.
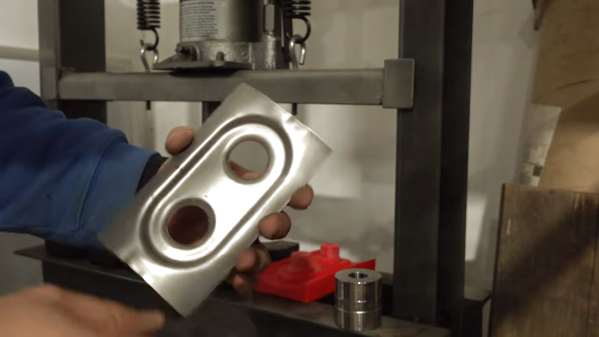
Press-forming is a versatile metal forming technique that can quickly and easily turn sheet metal into finished parts. But there’s a lot of time and money tied up in the tooling needed, which can make it hard for the home-gamer to get into. Unless you 3D-print your press-form tooling, of course.
Observant readers will no doubt recall our previous coverage of press-forming attempts with plastic tooling, which were met with varying degrees of success. But [Dave]’s effort stands apart for a number of reasons, not least of which is his relative newbishness when it comes to hot-squirt manufacturing. Even so, he still came up with an interesting gradient infill technique that put most of the plastic at the working face of the dies. That kept print times in the reasonable range, at least compared to the days of printing that would have been needed for 100% infill through the whole tool profile.
The other innovation that we liked was the idea to use epoxy resin to reinforce the tools. Filling the infill spaces on the tools’ undersides with resin resulted in a solid, strong block that was better able to withstand pressing forces. [Dave] didn’t fully account for the exothermic natures of the polymerization reaction, though, and slightly warped the tools. But as the video below shows, even suboptimal tools can perform, bending everything he threw at them, including the hydraulic press to some extent.
It sure seems like this is one technique to keep in mind for a rainy day. And hats off to [Dave] for sharing what didn’t work, since it points the way to improvements.
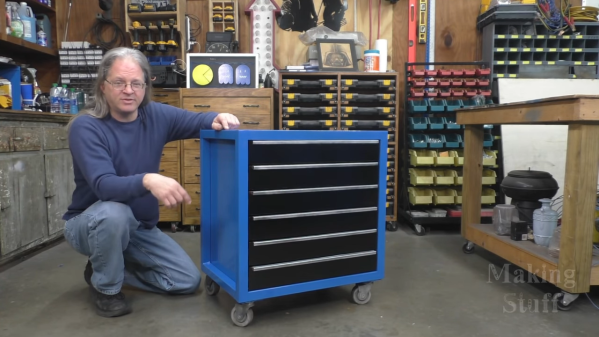
Yes, rolling tool cabinets in every conceivable shape, size, arrangement of drawers, and even color are readily available commercially, and you probably shouldn’t build your own. But as [Bob] from “Making Stuff” points out, where’s the fun in that?
Still, we can think of plenty of reasons to make your own rolling tool cabinets from scratch. Aside from the obvious benefits of practicing your metalworking skills and putting your tools to good use, rolling your own means you can get exactly what you want. Almost every tool cabinet we’ve purchased has ended up being just a bit sub-optimal in some way — too wide for the available space, or perhaps with drawers a touch too shallow to fit that one oddball tool. Being able to create your own cabinet means you can hit the specs exactly, and as [Bob] shows, it’s not even that hard if you have the right tools.
The build starts on [Bob]’s CNC plasma cutter, a shop-built machine that’s seen several upgrades over the years. The plasma cutter makes quick work of cutting the drawer blanks from sheet steel, complete with slots to make forming the sheets into drawers easy. The frame of the cabinet is steel tubing, which is welded up and filled in with more sheet steel. Full-extension ball-bearing slides are added to the sides to support the drawers; we have to admit that welding what appears to be zinc-coated steel makes us nervous, but we assume [Bob] took precautions against the potential for toxic fumes.
The video below shows the whole build process and shows off the very sharp-looking final product. It also puts us very much in the mood to build our own plasma cutter.
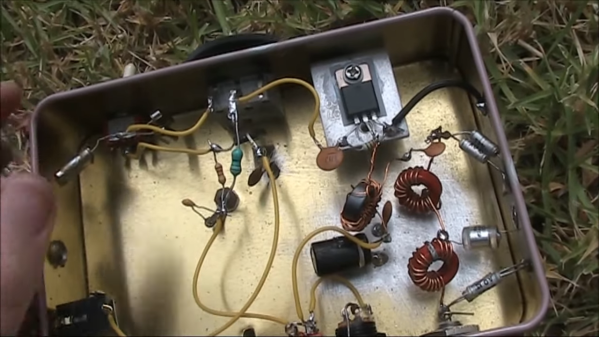
Artificially constrained designs can be among the most challenging projects to build, and the most interesting to consider. The amateur radio world is no stranger to this, with homebrew radio designs that set some sort of line in the sand. Such designs usually end up being delightfully minimalist and deeply instructive of first principles, which is one reason we like them so much.
The design dates back to at least the 1980s, when [G4RAW] laid down the challenge to whip up a working transmitter from junk bin parts and make a contact within 15 minutes — ten for the build and five for working the bands. [VK3YE] used the “oner” — one-transistor — design for his 10-minute transmitter, but invested some additional time into adding a low-pass filter to keep his signal clean, and a power amplifier to boost the output a bit.
Even with the elaborations, the design is very simple and easy to understand. Construction is the standard “ugly style” that hams favor for quick builds like this. There are no parts that would be terribly hard to find, and everything fits into a small metal box. The video below shows the design and build, along with some experiments with WebSDR receivers to check out range both with and without the power amplifier.
Seeing these kinds of builds really puts us in the mood for some low-power action. Could something like this pop up in “The $50 Ham” series? Quite possibly yes.