Balloons And Bubbles Make For Kid-Friendly Robot Deathmatch

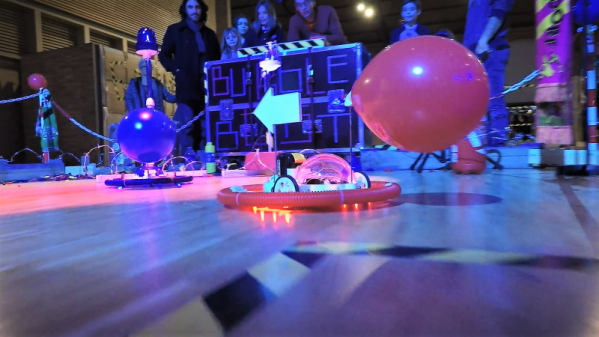
Because nothing says “fun for kids” like barbed wire and hypodermic needles, here’s an interactive real-world game that everyone can enjoy. Think of it as a kinder, gentler version of Robot Wars, where the object of the game is to pop the balloon on the other player’s robot before yours get popped. Sounds simple, but the simple games are often the most engaging, and that sure seems to be the case here.

The current incarnation of “Bubble Blast” stems from a project [Niklas Roy] undertook for a festival in Tunisia in 2017. That first version used heavily hacked toy RC cars controlled with arcade joysticks. It was a big hit with the crowd, so [Niklas] built a second version for another festival, and incorporated lessons learned from version 1.0. The new robots are built from scratch from 3D-printed parts. Two motors drive each bot, with remote control provided by a 433-MHz transceiver module. The UI was greatly improved with big trackballs, also scratch built. The game field was expanded and extra obstacles were added, including a barbed wire border as a hazard to the festooned bots. And just for fun, [Niklas] added a bubble machine, also built from scratch.

The game looks like a ton of fun, and seems like one of those things you’ve got to shoo the adults away from so the kids can enjoy it too. But if you need more gore from your robot deathmatch than a limp balloon, here’s a tabletop robot war that’s sure to please.

Continue reading “Balloons And Bubbles Make For Kid-Friendly Robot Deathmatch”

Mechanisms: Gears

Even before the Industrial Revolution, gears of one kind or another have been put to work both for and against us. From ancient water wheels and windmills that ground grain and pounded flax, to the drive trains that power machines of war from siege engines to main battle tanks, gears have been essential parts of almost every mechanical device ever built. The next installment of our series on Mechanisms will take a brief look at gears and their applications.

Continue reading “Mechanisms: Gears”

A Compensated Thermocouple Amp, Ready For Arduino

When you want to measure temperature with an Arduino or other microcontrollers, there are a ton of options for sensors. Temperature chips and sensor modules abound, some with humidity sensors built-in and all with easy interfacing and an expansive supporting code library. But dip one of those sensors into, say, molten aluminum, and you’ve got a problem.

If you’re measuring something hot, you need a thermocouple. Trouble is, the signal from a thermocouple is pretty small, and needs amplification and compensation before being fed into the ADC of a typical microcontroller. Unable to find a commercial amp to meet his needs, [MonkHelios] built his own thermocouple amp for microcontrollers. The design is centered around an LTC2053 instrumentation amp, which does the job of converting the K-type thermocouple’s 40.6μV/°C output to a nicely scaled 10mV/°C range, just right for ADC consumption. He also thoughtfully included an LT1025 cold-junction compensator; thermocouple amps are referenced to 0°C, so the compensator measures the actual temperature of the cold end of the junction and scales the output accordingly. The whole amp is nicely laid out on a DIY single-sided PCB with meticulously applied solder mask — this is one of the nicest home-etched boards we’ve seen in a long time.

[Bil Herd] designed a similar thermocouple amp not too long ago himself, so you might check that out too.  Or maybe you need the basics of instrumentation amps? Our “Beyond Measure” series will get you started.

LED Illusion Makes Colorful Water Drops Defy Gravity

The 60s and 70s were a great time for kitschy lighting accessories. Lava lamps, strobes, color organs, black light posters — we had it all. One particularly groovy device was an artificial rain display, where a small pump dripped mineral oil over vertical monofilament lines surrounding a small statue, with the whole thing lighted from above in dramatic fashion. If it sounds appalling, it was, and only got worse as the oil got gummy by accumulating dust and debris.

While this levitating water drops display looks somewhat similar, it has nothing to do with that greasy lamp of yore. [isaac879]’s “RGB time fountain” is actually a lot more sophisticated and pretty entrancing to watch. The time fountain idea is simple — drip water from a pump nozzle to a lower receptacle along a path that can be illuminated with flashing LEDs. Synchronizing the flashes to the PWM controlling pump speed can freeze the drops in place, or even make them appear to drip up. [isaac879] took the time fountain idea a step further by experimenting with RGB illumination, and he found that all sorts of neat effects are possible. The video below shows all the coolness, like alternating drops of different colors that look like falling — or rising — paint drops, and drops that merge together to form a new color. And behold, the mysterious antigravity cup that drips up and yet gets filled!

Allowances must be made for videos of projects that use strobes, of course. The effect of this time fountain and similar ones we’ve featured before is hard to capture, but this one still looks great to us.

Continue reading “LED Illusion Makes Colorful Water Drops Defy Gravity”

A DIY 5V-3V Switching Converter In The Space Of A TO-220 Package

We’re suckers for miniaturization projects. Stuff anything into a small enough package and you’ve probably got our attention. Make that something both tiny and useful, like this 5-volt to 3.3-volt converter in a TO-220 sized package, and that’s something to get excited about. It’s a switch mode power supply that takes the same space as a traditional linear regulator.

Granted, the heavy lifting in [Kevin Hubbard]’s diminutive buck converter is done by a PAM2305 DC-DC step-down converter chip which needs only a few supporting components. But the engineering [Kevin] put into this to squeeze everything onto a scrap of PCB 9-mm on a side is impressive. The largest passive on the board is the inductor in 0805. Everything else is in 0603, so you’ll be putting your SMD soldering skills to the test if you decide to make this. Check the video after the break for a speedrun through the hand soldering process.

The total BOM including the open-source PCB only runs a buck or two, and the end result is a supply with steady 750-mA output that can handle a 1-A surge for five seconds. We wonder if a small heatsink tab might not help that; along with some black epoxy potting, it would at least complete the TO-220 look.

[Kevin]’s Black Mesa Labs has a history of turning out interesting projects, from a legit video card for Arduino to a 100-watt hotplate for reflow work that’s the size of a silver dollar. We’re looking forward to whatever’s next — assuming we can see it.

Continue reading “A DIY 5V-3V Switching Converter In The Space Of A TO-220 Package”

Stephanie Kwolek: Saving Lives With Kevlar

Like most accidents, it happened in an instant that seemed to last an eternity. I had been felling trees for firewood all afternoon, and in the waning light of a cold November day, I was getting ready to call it quits.

Almost a really bad day in the woods.

There was one tiny little white pine sapling left that I wanted to clear, no thicker than my arm. I walked over with my Stihl MS-290, with a brand new, razor sharp chain. I didn’t take this sapling seriously — my first mistake — and cut right through it rather than notching it. The tree fell safely, and I stood up with both hands on the saw. Somehow I lost my footing, swiveled, and struck my left knee hard with the still-running chainsaw. It kicked my knee back so hard that it knocked me to the ground.

In another world, that would likely have a been a fatal injury. I was alone, far from the house, and I would have had mere minutes to improvise a tourniquet before bleeding out. But as fate would have it, I was protected by my chainsaw chaps, full of long strands of the synthetic fiber Kevlar.

The chain ripped open the chaps, pulled the ultra-strong fibers out, and instantly jammed the saw. I walked away feeling very stupid, very lucky, and with not a scratch on me. Although I didn’t realize it at the time,  I owed my life to Stephanie Kwolek.

Continue reading “Stephanie Kwolek: Saving Lives With Kevlar”

Nicely Engineered Boost Converter Powers Nixies From USB Charger

Love them or hate them, Nixies are here to stay. Their enduring appeal is due in no small part to the fact that they’re hardly plug-and-play; generating the high-voltage needed to drive the retro displays is part of their charm. But most Nixie power supplies seem to want 9 volts or more on the input side, which can make integrating them into the typical USB-powered microcontroller project difficult.

Fixing that problem is the idea behind [Mark Smith]’s 5-volt Nixie power supply. The overall goal is simple: 5 volts in, 170 volts out at 20 mA. But [Mark] paid special care to minimize the EMI output of the boost converter through careful design, and he managed to pack everything into a compact 14-cm² PCB. He subjected his initial design to a lot of careful experimentation to verify that he had met his design goals, and then embarked on a little tweaking mission in KiCad to trim the PCB’s footprint down by 27%. The three separate blog posts are well worth a read by anyone interested in learning about electronics design.

Now that [Mark] has his Nixie power supply, what will become of it? We can’t say for sure, but it’ll be a clock. It’s always a clock. Unless it’s a power meter or a speedometer.