Hackaday Prize: An Autonomous Beach Art Robot

Some people find it hard to look at a huge, flat expanse of floor or ground and not see a canvas. From the outfield grass of a baseball park to some poor farmer’s wheat field, trampling, trimming or painting patterns can present an irresistible temptation. But the larger the canvas the more challenging the composition will be, which is where this autonomous beach-combing art robot comes into play.

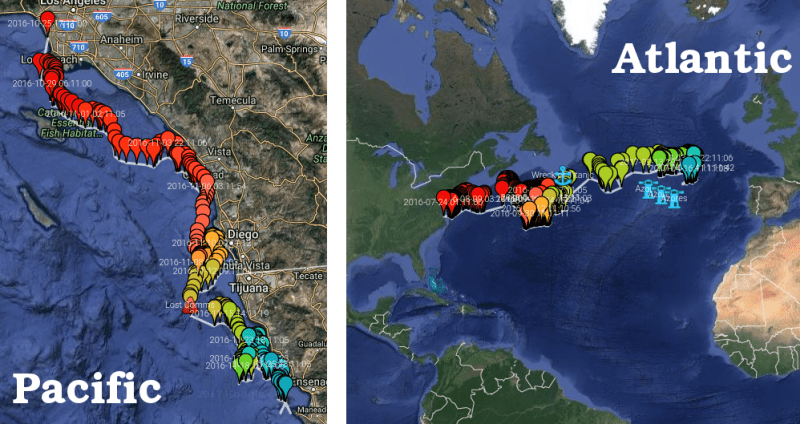
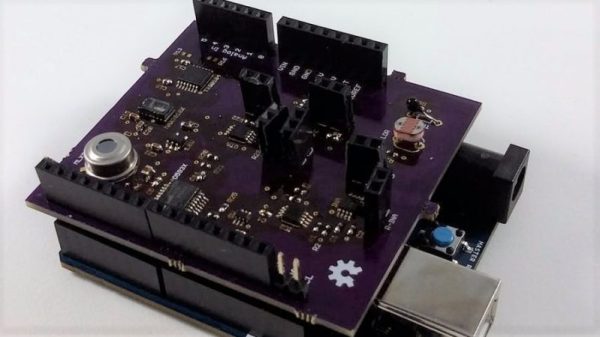
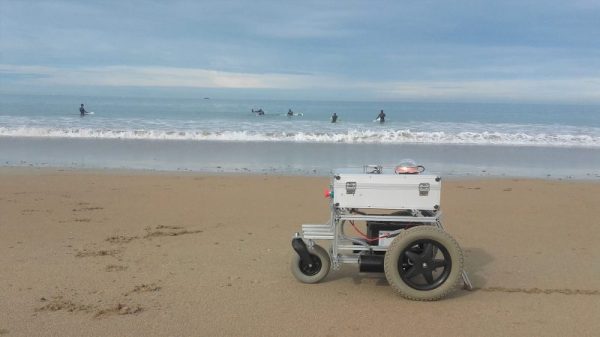
Very much still a work in progress, [pablo.odysseus]’ beach bot was built to take advantage of the kilometers-wide beaches left by the receding tides near his home. That immense canvas is begging to be groomed, and this bot is built for the task. The running gear itself is simple – an extruded aluminum chassis powered by wheelchair drives with added optical encoders and dragging a retractable rake  – but the bot is bristling with electronics dedicated to navigation.  A pair of Arduinos run the dual odometers, compass, and a GNSS receiver, as well as providing a smartphone interface for on-the-fly changes. The art is composed as a DXF file converted to latitude and longitude points and exported to Google Earth as a KML. That means the bot can just be brought to the beach and allowed to draw autonomously. An early test run is seen below the break; better “brushes” are in the works.

Watching the art unfold on a beach would be relaxing, like watching a zen garden being created. We’re looking forward to [pablo]’s progress on this one. Of course, art bots aren’t the only autonomous machines that big, wide beaches attract.

Continue reading “Hackaday Prize: An Autonomous Beach Art Robot”

Low-cost Drift Buoy Plies The Atlantic For Nearly A Year

Put a message in a bottle and toss it in the ocean, and if you’re very lucky, years later you might get a response. Drop a floating Arduino-fied buoy into the ocean and if you’ve engineered it well, it may send data back to you for even longer.

At least that’s what [Wayne] has learned since his MDBuoyProject went live with the launching of a DIY drift buoy last year. The BOM for the buoy reads like a page from the Adafruit website: Arduino Trinket, an RTC, GPS module, Iridium satellite modem, sensors, and a solar panel. Everything lives in a clear plastic dry box along with a can of desiccant and a LiPo battery.

The solar panel has a view through the case lid, and the buoy is kept upright by a long PVC boom on the bottom of the case. Two versions have been built and launched so far; alas, the Pacific buoy was lost shortly after it was launched. But the Atlantic buoy picked up the Gulf Stream and has been drifting slowly toward Europe since last summer, sending back telemetry. A future version aims to incorporate an Automatic Identification System (AIS) receiver, presumably to report the signals of AIS transponders on nearby ships as they pass.

We like the attention to detail as well as the low cost of this build. It’s a project that’s well within reach of a STEM program, akin to the many high-altitude DIY balloon projects we’ve featured before.

Continue reading “Low-cost Drift Buoy Plies The Atlantic For Nearly A Year”

To Deal With Plastic Trash, All You Need Is Bugs

Outlawed now in some places, or only available to tote your purchases at a ridiculous premium, the billions of “T-shirt” bags used every year present a serious waste management problem. Whether blowing across the landscape like synthetic tumbleweeds, floating in the ocean as ersatz jellyfish, or clogging up municipal waste streams, finding a way to deal with them could really make a difference. And finding a bug that eats polyethylene and poops antifreeze might be a great first step in bioremediating the mess.

As with many scientific discoveries, learning about the useful and unexpected eating habits of the larval stage of the Greater Wax Moth Galleria mellonella can be chalked up to serendipity. It began when biochemist [Federica Bertocchini] cleaned a wax moth infestation from her beehive. She put the beeswax-loving pests in a plastic bag, later finding they had chewed their way out. Intrigued, she and [Paolo Bombelli] ran some experiments using the bugs. They showed the mechanism wasn’t just mechanical and that the worms were digesting the polyethylene, to the tune of 92 mg consumed for 100 worms in 12 hours. That’s about 1,000 times faster than bioremediation with bacteria.

Furthermore, the bugs excrete ethylene glycol, a useful industrial chemical, in the process. Finally, to see if the process can scale, the researchers showed that a homogenate of wax moth larvae could digest PE sheets. This could lead to an industrial process if the enzymes involved can be isolated and engineered. The letter describing the process is a fascinating read.

While this one may not a classically hackish way to deal with plastic recycling, the potential for this method is huge. We look forward to seeing where this goes.

[Images: César Hernández/CSIC]

Get Up Close To Your Soldering With A Pi Zero Microscope

Do your Mark 1 Eyeballs no longer hold their own when it comes to fine work close up? Soldering can be a literal pain under such conditions, and even for the Elf-eyed among us, dealing with pads at a 0.4-mm pitch is probably best tackled with a little optical assistance. When the times comes for a little help, consider building a soldering microscope from a Pi Zero and a few bits and bobs from around the shop.

Affordable commercial soldering scopes aren’t terribly hard to come by, but [magkopian] decided to roll his own by taking advantage of the streaming capabilities of the Raspberry Pi platform, not to mention its affordability. This is a really simple hack — nothing is 3D-printed or custom milled. The stage base is a simple aluminum project box for heat resistance and extra weight, and the arm is a cheap plastic dial caliper. The PiCam is mounted to the sliding jaw of the caliper on a scrap of plastic ruler. The lens assembly of the camera needs to be hacked a little to change the focal length to work within 10 centimeters or so; alternatively, you could splurge and get a camera module with an adjustable lens. The Pi is set up for streaming, and your work area is presented in glorious, lag-free HDMI video.

Is [magkopian]’s scope going to give you the depth perception of a stereo microscope? Of course not. But for most jobs, it’ll probably be enough, and the fact that it can be built on the cheap makes it a great hack in our book.

Continue reading “Get Up Close To Your Soldering With A Pi Zero Microscope”

Model Sputnik Finds Its Voice After Decades Of Silence

As we approach the 60th anniversary of the human race becoming a spacefaring species, Sputnik nostalgia will no doubt be on the rise. And rightly so — even though Sputnik was remarkably primitive compared to today’s satellites, its 1957 launch was an inflection point in history and a huge achievement for humanity.

The Soviets, understandably proud of their accomplishment, created a series of commemorative models of Earth’s first artificial moon as gifts to other countries. How one came into possession of the Royal Society isn’t clear, but [Fran Blanche] found out about it through a circuitous route detailed in the video below, and undertook to reproduce the original electronics from the model that made the distinctive Sputnik beeps.

The Royal Society’s version of the model no longer works, but luckily it came with a schematic of the solid-state circuit used to emulate the original’s vacuum-tube guts. Intent on building the circuit as close to vintage as possible and armed with a bag of germanium transistors from the 60s, [Fran] worked through the schematic, correcting a few issues here and there, and eventually brought the voice of Sputnik back to life.

If you think we’ve covered Sputnik’s rebirth before, you may be thinking about our article on how some hams rebuilt Sputnik’s guts from a recently uncovered Soviet-era schematic. [Fran]’s project just reproduces the sound of Sputnik — no license required!

Continue reading “Model Sputnik Finds Its Voice After Decades Of Silence”

Laser Surgery: Expanding The Bed Of A Cheap Chinese Laser Cutter

Don’t you just hate it when you spend less than $400 on a 40-watt laser cutter and it turns out to have a work area the size of a sheet of copy paper? [Kostas Filosofou] sure did, but rather than stick with that limited work envelope, he modified his cheap K40 laser cutter so it has almost five times the original space.

The K40 doesn’t make any pretenses — it’s a cheap laser cutter and engraver from China. But with new units going for $344 on eBay now, it’s almost a no-brainer. Even with its limitations, you’re still getting a 40-watt CO2 laser and decent motion control hardware to play with. [Kostas] began the embiggening by removing the high-voltage power supply from its original space-hogging home to the right of the work area. With that living in a new outboard enclosure, a new X-Y gantry of extruded aluminum rails and 3D-printed parts was built, and a better exhaust fan was installed. Custom mirror assemblies were turned, better fans were added to the radiator, and oh yeah — he added a Z-axis to the bed too.

We’re sure [Kostas] ran the tab up a little on this build, but when you’re spending so little to start with, it’s easy to get carried away. Speaking of which, if you feel the need for an even bigger cutter, an enormous 100-watt unit might be more your style.

Continue reading “Laser Surgery: Expanding The Bed Of A Cheap Chinese Laser Cutter”

Hackaday Prize Entry: A Complete Suite Of Biomedical Sensors

The human body has a lot to tell us if we only have the instruments to listen. Unfortunately, most of the diagnostic gear used by practitioners is pricey stuff that’s out of range if you just want to take a casual look under the hood. For that task, this full-featured biomedical sensor suite might come in handy.

More of an enabling platform than a complete project, [Orlando Hoilett]’s shield design incorporates a lot of the sensors we’ve seen before. The two main modalities are photoplethysmography, which uses the MAX30101 to sense changes in blood volume and oxygen saturation by differential absorption and reflection of light, and biopotential measurements using an instrumentation amplifier built around an AD8227 to provide all the “electro-whatever-grams” you could need: electrocardiogram, electromyogram, and even an electrooculogram to record eye movements. [Orlando] has even thrown on temperature and light sensors for environmental monitoring.

[Orlando] is quick to point out that this is an educational project and not a medical instrument, and that it should only ever be used completely untethered from mains — battery power and Bluetooth only, please. Want to know why? Check out the shocking truth about transformerless power supplies.

Thanks to [fustini] for the tip.