RFID Doing More Than ID

RFID is a workhorse in industrial, commercial, and consumer markets. Passive tags, like work badges and key fobs, need a base station but not the tags. Sensors are a big market and putting sensors in places that are hard to reach, hostile, or mobile is a costly proposition. That price could drop, and the sensors could be more approachable with help from MIT’s Auto-ID Lab who are experimenting with sensor feedback to RFID devices.

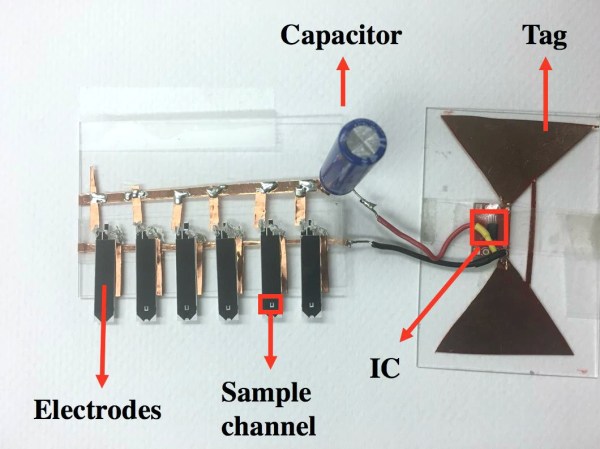
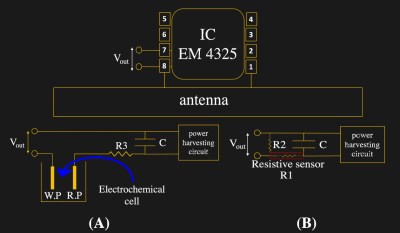
Let’s pretend you want to measure the temperature inside a vat of pressurized acid. You’d rather not drill a hole in it to insert a thermometer, but a temperature sensor sealed in Pyrex that wirelessly transmits the data and never runs out of power is a permanent and cheap solution. The researchers have their sights set on glucose sensing and that news come shortly after Alphabet gave up their RFID quest to measure glucose through contact lenses. Shown the top of this article is a prototype for a Battery Assisted Passive (BAP) RFID sensor that uses commodity glucose testing strips, sending data when the electrochemical reaction occurs. It uses six of these cells in parallel to achieve a high enough peak current to trigger the transmission. But the paper (10.1109/RFID.2018.8376201 behind paywall) mentions a few strategies to improve upon this. However, it does prove the concept that the current spike from the test strips determines the time the tag is active and that can be correlated to the blood glucose detected.

How many of our own projects would instantly upgrade with the addition of a few sensors that were previously unobtainable on a hacker budget? Would beer be brewed more effectively with more monitoring? How many wearables would be feasible with battery-free attachments? The sky is the figurative limit.

Thank you, [QES] for the tip [via TechXplore]

Pushbutton → Push Notification

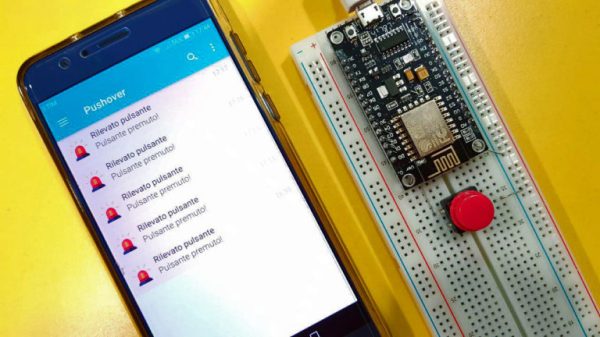
How many mundane devices upgrade to IoT because they let you monitor a single data point or a variable? That little nudge over the communication precipice allows you to charge 500% more. Now, if you are as handy as a Hackaday reader, you can throw a lazy afternoon at the problem and get the same effect from a “dumb” appliance. If IoT is as simple as getting a notification when your laundry is dry, or your water is boiling, all you really need is a WiFi device and a push notification, right? Does it need to be more complicated than that? [Gianni] believes it is that simple (machine translation) and has built up an easy-to-implement version on Raspberry Pi, Arduino, and ESP8266.

[Gianni] leverages the aptly named Pushover (a paid app with a 1-week trial period) to convert your bits, bytes, words, or strings to a push notification. This idea is born of the desire for a home security system which doesn’t require constant monitoring but instead alerts you to problems. The minimum requirement you need is for your phone to chime with a notification saying, “Your front window sensor has been tripped.” Now it is time to launch your IP camera app or call someone nearby.

It’s not revolutionary, it may be the “Hello World” of IoT, but that is all some people need. The general idea is the same no matter the framework you want to use. For instance, if you Google Suite account, you can set up a chatroom just for your alert notifications; Google’s quickstart takes about 3 minutes to test it out in Python. The same setup is also available for Slack, and [Tom Nardi] did a guide for doing this with Discord. These tackle the receiving side, but the sending side is really flexible too — that MQTT broker you built could easily be the source of the alerts.

Build a handful of these in a weekend and keep them nearby to step up your next project to IoT status with a couple of solder joints. Maybe it will be a motion sensor for your own security system.

POV Tops Hobbyist Abilities

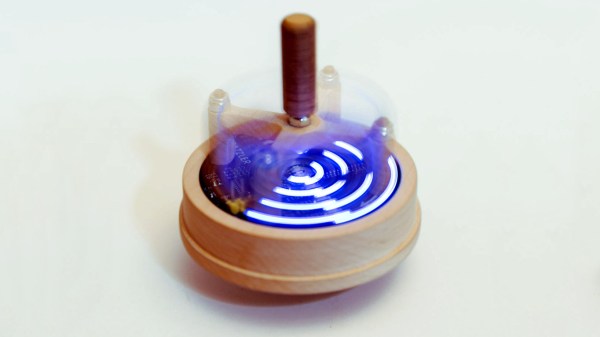
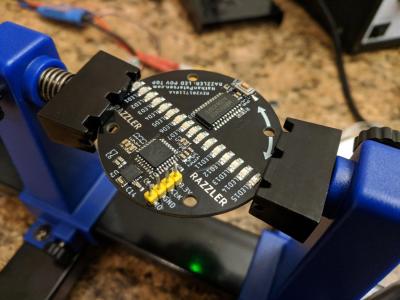
Sometimes a beautiful project is worth writing on that merit alone, but when it functions as designed,someone takes the time to create a thorough and beautiful landing page for their project, we get weak in the knees. We feel the need to grab the internet and point our finger for everyone to see. This is one of those projects that checks all our boxes. [Nathan Petersen] made a POV toy top called Razzler, jumping through every prototyping hoop along the way. The documentation he kept is what captured our hearts.

The project is a spinning top with an integrated persistence-of-vision (POV) display. That’s the line of LEDs that you see here. To sync up the patterns, the board includes an IMU, but detecting angular velocity with either gyroscope or accelerometer proved problematic. [Nathan’s] writeup of this is worth the read itself, but you’ll also enjoy the CNC workworking part of the project used to create the body of the spinning top.

This was [Nathan]’s first big solo project, and so many of the steps are explained by someone who just entered the deep-end very quickly. If you have experience, you may grin at the simplified reasonings, but for a novice, it makes for an approachable lesson. The way he selects hardware and firmware is pragmatic and perhaps even overkill, so you know he’s going into engineering. This overshot saved him when there were communication problems which needed a sacrifice of some processing power to run I2C on some GPIO.

We hope you enjoy reading about this combinations of POV, firmware (or is it?), and centrifugal force.

Portmanteau Spewing PunBot

When Python was created, [Guido van Rossum] knew that one day it would be fully realized and take its final form. Clearly, that day has arrived since there now exists a way to send a word query and receive a lengthy list of potential portmanteaus. Some may regard this as merely quaint, but it will be the most important thing to happen in binary until the singularity.

Perhaps we are overpromising a smidge, but it may be fun to spend an afternoon getting your own whimsicalibrated pun resource churning out some eye-roll-worthy word combos. The steps are broken up neatly and explained at a high level with links for more in-depth explanations so a novice can slog through it, but a whiz can wrap it up while the boss is looking the other way.

We truly live in the future, but we may continue writing our own brand of artisanal puns which are number one in someone’s book.

Bottom Of The Barrel Connector: Tell Us Your Socket Hacks

Sometimes you get an epiphany for a project that will change the world. A simple device, on a custom circuit board with inexpensive parts that will disrupt the status quo and make you a billion dollars in no time. Then there are the times where you need to throw scraps of copper at a prototyping board and strangle nine-volts out by any means necessary.

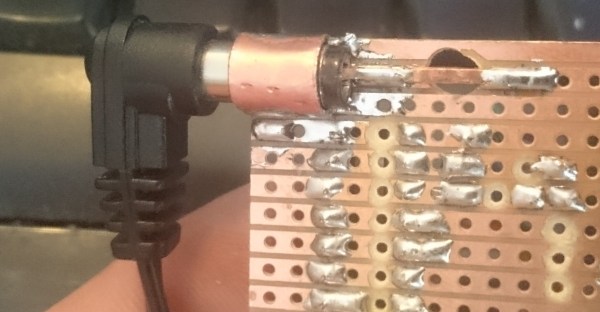
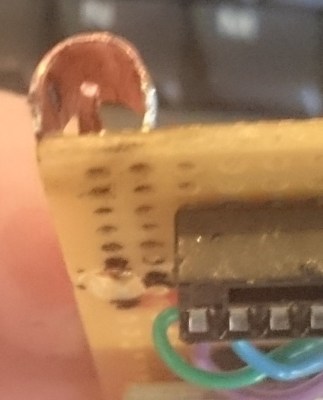
This is about the latter. In one of our Hack Chats, [Morning.Star] shared a couple of images wherein a barrel connector was needed, but there was no time to wait for one in the mail. Necessity birthed the most straightforward solution which did not involve shredding a power adapter’s plug. There is no link, [Stuart Longland] aka [Redhatter] screen-capped the image exchange and reminded us on the tip line.

Chances are you’ve faced this problem yourself. Everyone has a box of old wall warts somewhere, exhibiting a wide range of barrel connector sizes. If you can’t take the easy route of cutting off the connectors, what’s your go-to trick? Alligator clips are a horrid approach, and there aren’t really any clear winners that come to mind. [Morning.Star’s] hack is actually quite respectable! It appears to be a roll of copper (perhaps from tubing?) bent for a bit of spring tension on the outside of the barrel. The inside is contacted by thick copper wire with a kink to again provide spring action.

So, spill the beans. What’s your barrel connector trick and does it work reliably?

Arduino And Pi Share Boardspace

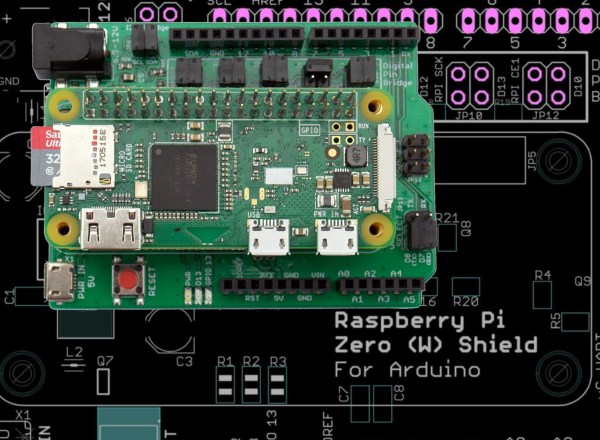
A Raspberry Pi Zero (W) and Arduino are very different animals, the prior has processing power and connectivity while the latter has some analog to digital converters (ADCs) and nearly real-time reactions. You can connect them to one another with a USB cable and for many projects that will happily wed the two. Beyond that, we can interface this odd couple entirely through serial, SPI, I2C, and logic-level signaling. How? Through a device by [cburgess] that is being called an Arduino shield that supports a Pi0 (W). Maybe it is a cape which interfaces with Arduino. The distinction may be moot since each board has a familiar footprint and both of them are found here.

Depending on how they are set up and programmed, one can take control over the other, or they could happily do their own thing and just exchange a little information. This board is like a marriage counselor between a Raspberry Pi and an Arduino. It provides the level-shifting so they don’t blow each other up and libraries so they can speak nicely to one another. If you want to dig a bit deeper into this one, design files and code examples are on available.

Perhaps we’ll report on this board at the heart of a pinball machine retrofit, a vintage vending machine restoration, or maybe a working prop replica from the retro bar in Back to the Future II.

Sanding Seashells By The Seashore

We all maintain this balancing act between the cool things we want, the money we can spend, and our free time. When the pièce de résistance is a couple of orders of magnitude out of our budget, the only question is, “Do I want to spend the time to build my own?” [Nick Charlton] clearly answered “Yes,” and documented the process for his Nautilus speakers. The speaker design was inspired by Bowers & Wilkins and revised from a previous Thingiverse model which is credited.

The sound or acoustic modeling is not what we want to focus on since the original looks like something out of a sci-fi parody. We want to talk about the smart finishing touches that transform a couple of 3D printed shells into enviable centerpieces. The first, and most apparent is the surface. 3D prints from consumer FDM printers are prone to layer lines, and that aesthetic has ceased to be trendy. Textured paint will cover them nicely and requires minimal elbow grease. Besides sand and shells go together naturally. At first glance, the tripod legs holding these speakers seemed like a classy purchase from an upscale furniture store, but they are, in fact, stained wood and ground-down bolts. Nicely done.

The moral is to work smarter, take pictures, then drop us a line.