The random logic section implmented using I2L

Space Invaders Sound Chip Went Old School With I2L

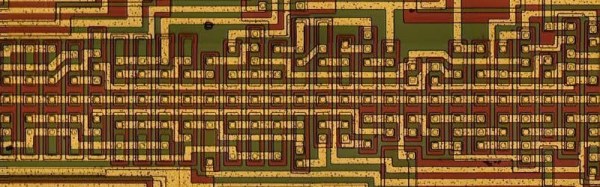
It must be everyone’s birthday today because [Ken Shirriff] has come out with a gift for us. He’s done another pass at reverse engineering the 76477 Space Invaders sound chip from the 1970s and found it’s full of integrated injection logic (I2L), making it a double treat: we get to explore the more of this chip which made sounds for so many of our favorite games, and we explore a type of logic which was to be the successor to TTL until CMOS came along.

I<sup>2</sup>L gate
I2L gate

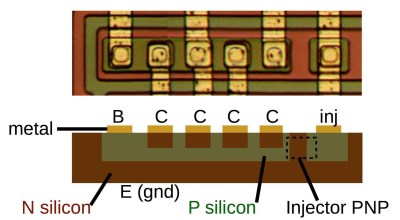
This article has a similar shape to his last one, first introducing I2L, followed by showing us what it looks like on the die, and then covering the different functional elements which make heavy use of it. The first of these is the noise generator made up of a section of shift registers and a ring oscillator. That’s followed by a noise filter which doesn’t use I2L but does use current mirrors. And lastly, he talks about the mixer which mixes output from the noise generator and elements covered in his previous article, the voltage-controlled oscillator, and the super-low frequency oscillator. Oddly enough, and as he points out, it isn’t an analog mixer. Instead, it just ANDs together the various inputs.

[Ken’s] no stranger to putting dies under the microscope. Check out our coverage of his talk at the 2016 Hackaday SuperConference where he shows us the guts of such favorites as the Z80 and the 555 timer IC.

Universal music translation network

Facebook’s Universal Music Translator

Star Trek has its universal language translator and now researchers from Facebook Artificial Intelligence Research (FAIR) has developed a universal music translator. Much of it is based on Google’s WaveNet, a version of which was also used in the recently announced Google Duplex AI.

Universal music translator architectureThe inspiration for it came from the human ability to hear music played by any instrument and to then be able to whistle or hum it, thereby translating it from one instrument to another. This is something computers have had trouble doing well, until now. The researchers fed their translator a string quartet playing Haydn and had it translate the music to a chorus and orchestra singing and playing in the style of Bach. They’ve even fed it someone whistling the theme from Indiana Jones and had it translate the tune to a symphony in the style of Mozart.

Shown here is the architecture of their network. Note that all the different music is fed into the same encoder network but each instrument which that music can be translated into has its own decoder network. It was implemented in PyTorch and trained using eight Tesla V100 GPUs over a total of six days. Efforts were made during training to ensure that the encoder extracted high-level semantic features from the music fed into it rather than just memorizing the music. More details can be found in their paper.

So if you want to hear how an electric guitar played in the style of Metallica might have been translated to the piano by Beethoven then listen to the samples in the video below.

Continue reading “Facebook’s Universal Music Translator”

Blown plastic from a plastics blow oven

Blowing Arcylic Canopies Using Stuff From Around The Shop

Blowing an acrylic sheet after heating it is an easy way to make a smooth and transparent canopy or bubble for anything from clams to light fixtures. [Michael Barton-Sweeney] does it using plastic blow ovens he made cheaply, mainly from stuff which most of us already have in our workshops.

Plastics blow oven
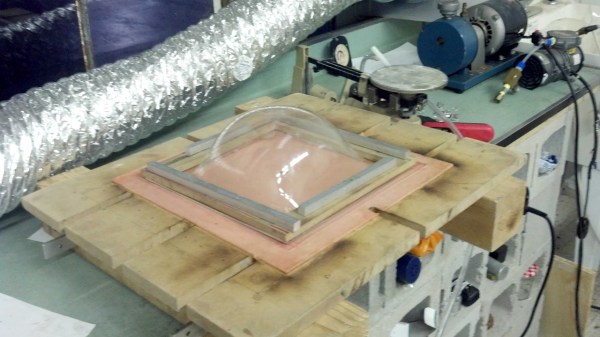
All you need is a way to heat the plastic, to then clamp it down around the edges, and finally to blow air into it as you would when blowing up a balloon. Of course, there are things to watch out for such as making sure the plastic is heated evenly and letting it cool slowly afterward but he covers all that on his hackaday.io page.

He’s also on his second plastics blow oven. The first one worked very well and is perhaps the easiest to make, building up an enclosure of CMUs (cinder blocks) and brick. He had success heating it with both propane and with electric current run through Kanthal wire. But the CMUs absorbed a lot of heat, slowing down the process. So for his second one he made a cast concrete enclosure with aluminum reflectors inside to focus the heat more to where needed.

We’re not sure of everything he’s blown acrylic bubbles for but we first learned of his ovens from the transparent clams in his underwater distributed sensor network. In fact, he was inspired to do plastics blowing from a childhood memory of the Air Force museum in Dayton, Ohio, where they visited the restoration hanger and watched the restorers blowing bubbles for a B-17 ball turret.

Though if you want to go smaller and simpler for something like a light fixture then you can get away with using a toaster oven, a PVC pipe, and a toilet flange.

Modular Robotics Made Easier With ROS

A robot is made up of many hardware components each of which requires its own software. Even a small robot arm with a handful of servo motors uses a servo motor library.

Add that arm to a wheeled vehicle and you have more motors. Then attach some ultrasonic sensors for collision avoidance or a camera for vision. By that point, you’ve probably split the software into multiple processes: one for the arm, another for the mobility, one for vision, and one to act as the brains interfacing somehow with all the rest. The vision may be doing object recognition, something which is computationally demanding and so you now have multiple computers.

Break all this complexity into modules and you have a use case for ROS, the Robot Operating System. As this article shows, ROS can help with designing, building, managing, and even evolving your robot.

Continue reading “Modular Robotics Made Easier With ROS”

Testing DIY battery pack on E-bike

[GreatScott] Tests His DIY Battery Pack On His E-Bike

[GreatScott] has now joined the ranks of Electric Bike users. Or has he? We previously covered how he made his own lithium-ion battery pack to see if doing so would be cheaper than buying a commercially made one. But while it powered his E-bike conversion kit on his benchtop, turning the motor while the wheel was mounted in a vice, that’s no substitution for a real-world test with him on a bike on the road.

Since then he’s designed and 3D printed an enclosure for his DIY battery pack and mounted it on his bike along with most of the rest of his E-bike kit. He couldn’t use the kit’s brake levers since his existing brake levers and gear-shift system share an enclosure. There also weren’t enough instructions in the kit for him to mount the pedal assistance system. But he had enough to do some road testing.

Based on a GPS tracker app on his phone, his top speed was 43 km/h (27 miles per hour). His DIY 5 Ah battery pack was half full after 5 km (3.1 miles) and he was able to ride 11.75 km (7.3 miles) on a single charge. So, success! The battery pack did the job and if he needs to go further then he can build a bigger pack with some idea of how it would improve his travel distance.

Sadly though, he had to remove it all from his bike since he lives in Germany and European rules state that for it to be considered an electric bike, it must be pedal assisted and the speed must the be progressively reduced as it reaches a cut-off speed of 25 km/h (15 miles per hour). In other words, his E-bike was more like a moped or small motorcycle. But it did offer him some good opportunities for hacking, and that’s often enough. Check out his final assembly and testing in the video below.

Continue reading “[GreatScott] Tests His DIY Battery Pack On His E-Bike”

Atltvhead - wearable interactive TV

RCA TV Gets New Life As Interactive Atltvhead

TVs are usually something you sit and passively watch. Not so for [Nate Damen’s] interactive, wearable TV head project, aka Atltvhead. If you’re walking around Atlanta, Georgia and you see him walking around with a TV where his head should be, introduce yourself! Or sign into Twitch chat and take control of what’s being displayed on the LEDs which he’s attached to the screen. Besides being wearable technology, it’s also meant to be an interactive art piece.

For this, his third version, the TV is a 1960’s RCA Victor Portable Television. You can see some of the TVs he found for previous versions on his hackaday.io page. They’re all truly vintage. He gutted this latest one and attached WS2812 LED strips in a serpentine pattern inside the screen. The LEDs are controlled by his code and the FastLED library running on an ESP8266. Power comes from four NiMH AA-format batteries, giving him 5 V, which he regulates down to 3.3 V. His phone serves as a WiFi hotspot.

[Nate] limits the commands so that only positive things can be displayed, a heart for example. Or you can tweak what’s being displayed by changing the brightness or make the LEDs twinkle. Judging by the crowds we see him attracting in the first video below, we’d say his project was a huge success. In the second video, Nate does a code walkthrough and talks about some of his design decisions.

Continue reading “RCA TV Gets New Life As Interactive Atltvhead”

Train object recognizer for cards

Using TensorFlow To Recognize Your Own Objects

When the time comes to add an object recognizer to your hack, all you need do is choose from many of the available ones and retrain it for your particular objects of interest. To help with that, [Edje Electronics] has put together a step-by-step guide to using TensorFlow to retrain Google’s Inception object recognizer. He does it for Windows 10 since there’s already plenty of documentation out there for Linux OSes.

You’re not limited to just Inception though. Inception is one of a few which are very accurate but it can take a few seconds to process each image and so is more suited to a fast laptop or desktop machine. MobileNet is an example of one which is less accurate but recognizes faster and so is better for a Raspberry Pi or mobile phone.

Collage of images for card dataset
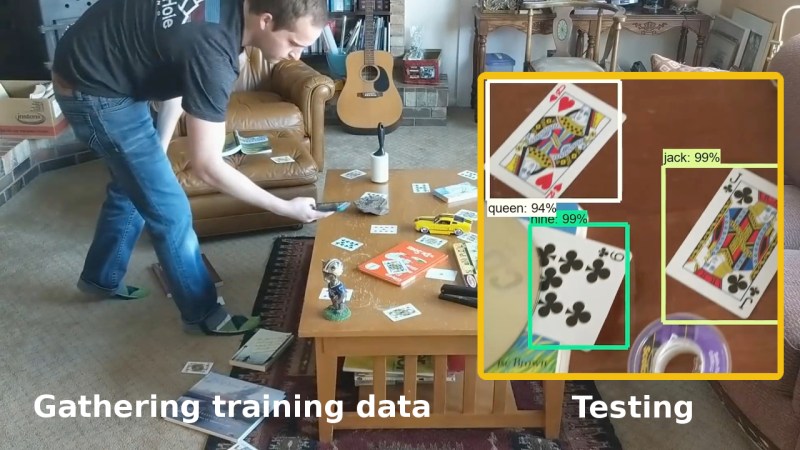
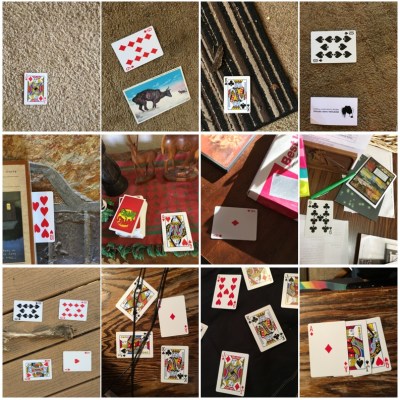
You’ll need a few hundred images of your objects. These can either be scraped from an online source like Google’s images or you get take your own photos. If you use the latter approach, make sure to shoot from various angles, rotations, and with different lighting conditions. Fill your background with various other things and even have some things partially obscuring your objects. This may sound like a long, tedious task, but it can be done efficiently. [Edje Electronics] is working on recognizing playing cards so he first sprinkled them around his living room, added some clutter, and walked around, taking pictures using his phone. Once uploaded, some easy-to-use software helped him to label them all in around an hour. Note that he trained on 24 different objects, which are the number of different cards you get in a pinochle deck.

You’ll need to install a lot of software and do some configuration, but he walks you through that too. Ideally, you’d use a computer with a GPU but that’s optional, the difference being between three or twenty-four hours of training. Be sure to both watch his video below and follow the steps on his Github page. The Github page is kept most up-to-date but his video does a more thorough job of walking you through using the software, such as how to use the image labeling program.

Why is he training an object recognizer on playing cards? This is just one more step in making a blackjack playing robot. Previously he’d done an impressive job using OpenCV, even though the algorithm handled non-overlapping cards only. Google’s Inception, however, recognizes partially obscured cards. This is a very interesting project, one which we’ll be keeping an eye on. If you have any ideas for him, leave them in the comments below.

Continue reading “Using TensorFlow To Recognize Your Own Objects”