Printing Photorealistic Images On 3D Objects

Hydrographic Printing is a technique of transferring colored inks on a film to the surface of an object. The film is placed on water and activated with a chemical that allows it to adhere to an object being physically pushed onto it. Researchers at Zhejiang University and Columbia University have taken hydrographic printing to the next level (pdf link). In a technical paper to be presented at ACM SIGGRAPH 2015 in August, they explain how they developed a computational method to create complex patterns that are precisely aligned to the object.

Typically, repetitive patterns are used because the object stretches the adhesive film; anything complex would distort during this subjective process. It’s commonly used to decorate car parts, especially rims and grills. If you’ve ever seen a carbon-fiber pattern without the actual fiber, it’s probably been applied with hydrographic printing.

print_t
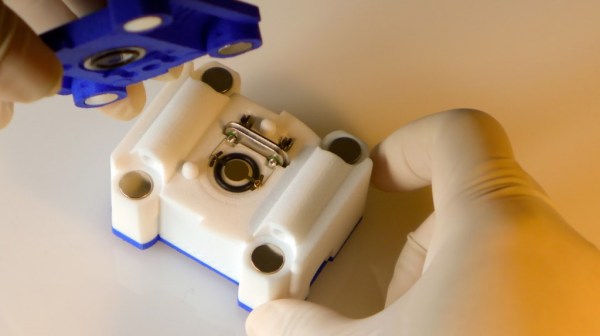
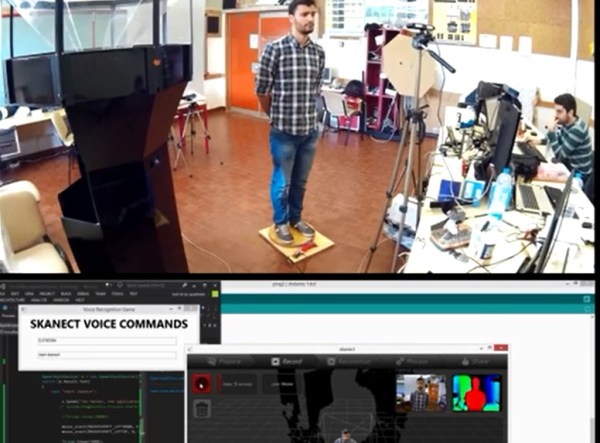
The physical setup for this hack is fairly simple: a vat of water, a linear motor attached to a gripper, and a Kinect. The object is attached to the gripper. The Kinect measures its location and orientation. This data is applied to a 3D-scan of the object along with the desired texture map to be printed onto it. A program creates a virtual simulation of the printing process, outputting a specific pattern onto the film that accounts for the warping inherent to the process. The pattern is then printed onto the film using an ordinary inkjet printer.

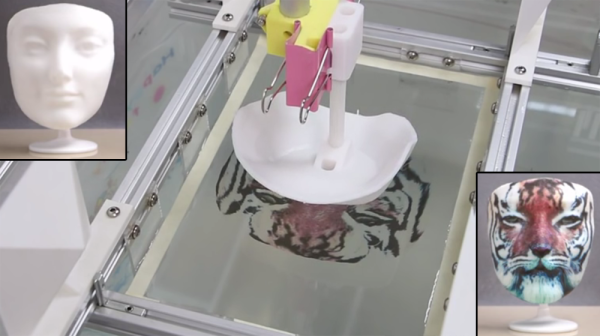
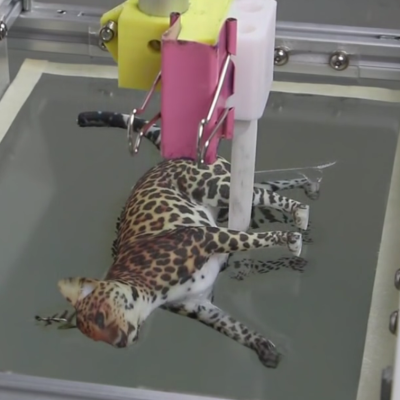
The tiger mask is our personal favorite, along with the leopard cat. They illustrate just how complex the surface patterns can get using single or multiple immersions, respectively. This system also accounts for objects of a variety of shapes and sizes, though the researchers admit there is a physical limit to how concave the parts of an object can be. Colors will fade or the film will split if stretched too thin. Texture mapping can now be physically realized in a simple yet effective way, with amazing results.

Continue reading “Printing Photorealistic Images On 3D Objects”

Your Body Is Your PIN With Bodyprint

[Christian Holz, Senaka Buthpitiya, and Marius Knaust] are researchers at Yahoo that have created a biometric solution for those unlucky folks that always forget their smartphone PIN codes. Bodyprint is an authentication system that allows a variety of body parts to act as the password.  These range from ears to fists.

Bodyprint uses the phone’s touchscreen as an image scanner. In order to do so, the researchers rooted an LG Nexus 5 and modified the touchscreen module. When a user sets up Bodyprint, they hold the desired body part to the touchscreen. A series of images are taken, sorted into various intensity categories. These files are stored in a database that identifies them by body type and associates the user authentication with them. When the user wants to access their phone, they simply hold that body part on the touchscreen, and Bodyprint will do the rest. There is an interesting security option: the two person authentication process. In the example shown in the video below, two users can restrict file access on a phone. Both users must be present to unlock the files on the phone.

How does Bodyprint compare to capacitive fingerprint scanners? These scanners are available on the more expensive phone models, as they require a higher touchscreen resolution and quality sensor. Bodyprint makes do with a much lower resolution of approximately 6dpi while increasing the false rejection rate to help compensate.  In a 12 participant study using the ears to authenticate, accuracy was over 99% with a false rejection rate of 1 out of 13.

Continue reading “Your Body Is Your PIN With Bodyprint”

Try Not To Fall Off The Backwards Brain Bike

[Destin] of SmarterEveryDay fame has a challenge for your brain : a bicycle where the handlebars turn the front wheel in the opposite direction of a typical bike (YouTube link). For example, turning the handlebars left turns the wheel right and vice versa. He warns you it’s harder than it looks.

The hack that pulls this off is a simple one compared to bike hacks we’ve previously covered. Gears on the head tube make this possible. It was built by his welder friends who challenged him to ride it. He couldn’t at first; determined to overwrite his brain’s memory of bike riding, he practiced until he finally succeeded. It took him eight months. When it was time to ride an old-fashioned bike, it only took him about twenty minutes to “un-learn” the Backwards Brain Bike. [Destin’s] biking illustrates neuroplasticity, memory, and learning in a fun way (fun for us; no doubt frustrating for him).

As a testament to the sponge-like brains of youth, [Destin’s] son learned to ride the Backwards Brain Bike in only two weeks.

Continue reading “Try Not To Fall Off The Backwards Brain Bike”

Extreme Vectrex Multicart Plays Bad Apple

[Sprite_TM] had a Vectrex console that he wanted to play with. Alas, his makeshift multicart had fallen into disrepair. Rolling up his hacking sleeves, he set about making a new one, a better one. His PCB design included his microcontroller of choice: the ST STM32F411, a 32-bit 100Mhz ARM Cortex M4, along with a 16MB SPI flash chip. [Sprite_TM] wanted to make programming games onto the multicart simple. Using the libopencm3 firmware library for the STM in conjunction with Elm-Chans FatFS, the multicart could be plugged into a computer’s USB port and have any game data dragged and dropped onto it like a USB stick. The PCB then connects directly into the Vectrex’s cartridge port. The first cartridge file is a basic menu that lists all of the game ROMs stored in the flash memory. When the user selects the game the STM loads that ROM file which the menu software then boots.

After loading his entire Vectrex ROM library onto the multicart, [Sprite_TM] realized he had far too much space left over – so he decided to add some extras. His first choice was Bad Apple (YouTube link), a music video made by fans of the Touhou Project game series. The video features black and white silhouettes of the many game characters in a shadow art style. Since its debut, Bad Apple has been ported from everything from the Sega Genesis (YouTube link) to laser scanners (YouTube link). It was time for the Vectrex to join the list.

After ripping the video from YouTube, [Sprite_TM] used MPlayer to save each frame as a PNG along with a wave file of the music. Next, he ran Potrace on the PNG files to get vector versions. Using a custom PHP script, the resulting JSON file was post-processed into relative vectors the Vectrex uses. Digital audio was possible by having the Vectrex’s 8-bit DA-converter perform double duty both for the video circuit and the audio. However, the volume must be turned to the max in order to hear the music. Incidentally, the DAC can only output audio in this scenario when vectors are not being drawn, so the event timing needed to be adjusted. The video and audio data was re-parsed after a modified version of VecX was used to get the timing events synchronized before transferring Bad Apple onto the multicart.

You can see the Vectrex version of Bad Apple after the break, along with a 3D-engine based on Doom levels. The engine is written in C and makes use of the Z-buffer, creating the effect of solid 3D-objects in front of each other.  There are no weapons or enemies to dispatch here, but the effect is impressive nonetheless.

Continue reading “Extreme Vectrex Multicart Plays Bad Apple”

Play Robotic Bongos Using Your Household Plants

[Kirk Kaiser] isn’t afraid to admit his latest project a bit strange, being a plant-controlled set of robotic bongos. We don’t find it odd at all.  This is the kind of thing we love to see. His project’s origins began a month ago after taking a class at NYC Resistor about creating music from robotic instruments. Inspired to make his own, [Kirk] repurposed a neighbor’s old wooden dish rack to serve as a mount for solenoids that, when triggered, strike a couple of plastic cowbells or bongo drums.

A Raspberry Pi was originally used to interface the solenoids with a computer or MIDI keyboard, but after frying it, he went with a Teensy LC instead and never looked back. Taking advantage of the Teensy’s MIDI features, [Kirk] programmed a specific note to trigger each solenoid. When he realized that the Teensy also had capacitive touch sensors, he decided to get his plants in on the fun in a MaKey MaKey kind of way. Each plant is connected to the Teensy’s touchRead pins by stranded wire; the other end is stripped, covered with copper tape, and placed into the soil. When a plant’s capacitance surpasses a threshold, the respective MIDI note – and solenoid – is triggered. [Kirk] quickly discovered that hard-coding threshold values was not the best idea. Looking for large changes was a better method, as the capacitance was dramatically affected when the plant’s soil dried up. As [Kirk] stood back and admired his work, he realized there was one thing missing – lights! He hooked up an Arduino with a DMX shield and some LEDs that light up whenever a plant is touched.

We do feel a disclaimer is at hand for anyone interested in using this botanical technique: thorny varieties are ill-advised, unless you want to play a prank and make a cactus the only way to turn the bongos off!

Continue reading “Play Robotic Bongos Using Your Household Plants”

Measure As Little As You Want With OpenQCM

The clever folks over at [Novaetech SRL] have unveiled openQCM, their open-source quartz crystal microbalance. A QCM measures very minute amounts of mass or mass variation using the piezoelectric properties of quartz crystal. When an object is placed on the surface of this sensor, the changes in the crystal’s resonant frequency can be detected and used to determine its mass in a variety of experimental conditions (air, vacuum, liquid). However, most QCM technology is proprietary and pricey – at least US$3000 for the microbalance itself. Any consumables, such as additional crystals, cost several hundred dollars more.

The openQCM has a sensitivity of 700 picograms. At its core is an Arduino Micro with a custom PCB. The board contains a 10K thermistor for temperature offset readings and the driver for a Pierce oscillator circuit. The quartz crystal frequency is determined by hacking the timer interrupts of the Arduino’s ATmega32u4. An external library called FreqCount uses the clock to count the number of pulses of the TTL signal in a 1 second time frame. This yields quartz crystal frequency resolution of 1Hz. The user interface is built in Java so that data can be read, plotted, and stored on your computer. The entire casing is 3D-printed, and it appears that the sensors are standard oscillator crystals without their cases.

Simplistic design makes assembly and maintenance a breeze. It only weighs 55 grams. Replacing the quartz crystal requires no special tools due to the clip system. The openQCM can be used as a single unit, or in multiples to form a network for all of your precise measurement needs. While they have kits available that will set you back US$500, all of the files and schematics for 3D-printing, assembly, and the PCB are available on the openQCM site for free.

Continue reading “Measure As Little As You Want With OpenQCM”

Take A Spin On This Voice-Controlled 3D Scanning Rig

[Aldric Negrier] wanted to make 3D-scanning a person streamlined and simple. To that end, he created this voice-controlled 3D-scanning rig.

[Aldric] used a variety of hacking skills to make this project, and his thorough Instructable illustrates this nicely. Everything from CNC milling to Arduino programming to 3D-printing was incorporated into the making of this rig. Plywood was used to construct the base and the large toothed gear. A 12″ Lazy Susan bearing was attached to this gear to allow smooth rotation. In order to automate the rig, a 12V DC geared motor was attached to a smaller 3D-printed gear and positioned on the base. When the motor is on, the smaller gear’s teeth take the larger gear for a spin. He used a custom dual H-bridge motor driver made by a friend, which is connected to an Arduino Nano. The Nano is also connected to a Bluetooth module and an ultrasonic range finder. When an object within 1-35cm is detected on the rig for 3 seconds, the motor starts to spin, stopping when the object is no longer detected. A typical scan takes about 60 seconds.

This alone would have been a great project, but [Aldric] did not stop there. He wanted to be able to step on the rig and issue commands while being scanned. It makes sense if you want to scan yourself – get on the rig, assume the desired position, and then initiate the scan. He used the Windows speech recognition SDK to develop an application that issues commands via Bluetooth to Skanect, a 3D-scanning software. The commands are as simple as saying “Start Skanect.” You can also tell the motor to switch on or off and change its speed or direction without breaking form. [Aldric] used an Asus Xtion for a 3D-scanner, but a Kinect will also work. Afterwards, he smoothed his scans using MeshMixer, a program featured in previous hacks.

Check out the videos of the rig after the break. Voice commands are difficult to hear due to the background music in one of the videos, but if you listen carefully, you can hear them. You can also see more of [Aldric’s] projects here or on this YouTube channel.

Continue reading “Take A Spin On This Voice-Controlled 3D Scanning Rig”