Chasing Down Bad Caps To Save A Troubled PSU

We know what you’re thinking. It’s a bad power supply, of course it was capacitors to blame. But even if we all intuitively know at this point that bad caps are almost always the culprit when a PSU gives up the ghost, it’s not always easy to figure out which one is to blame. Which is why this deep dive into a failed ETK450AWT by [eigma] is worth a look.

The first sign of trouble was when the computer would unexpectedly reboot with nothing in the system logs to indicate a problem. Eventually, [eigma] noticed a restart before the operating system even loaded, which confirmed the hardware was to blame. A quick look at the PSU output with a voltmeter showed things weren’t too far out of spec, but putting an oscilloscope on the 12 V line uncovered a nasty waveform that demanded further investigation.

Connecting all the dots.

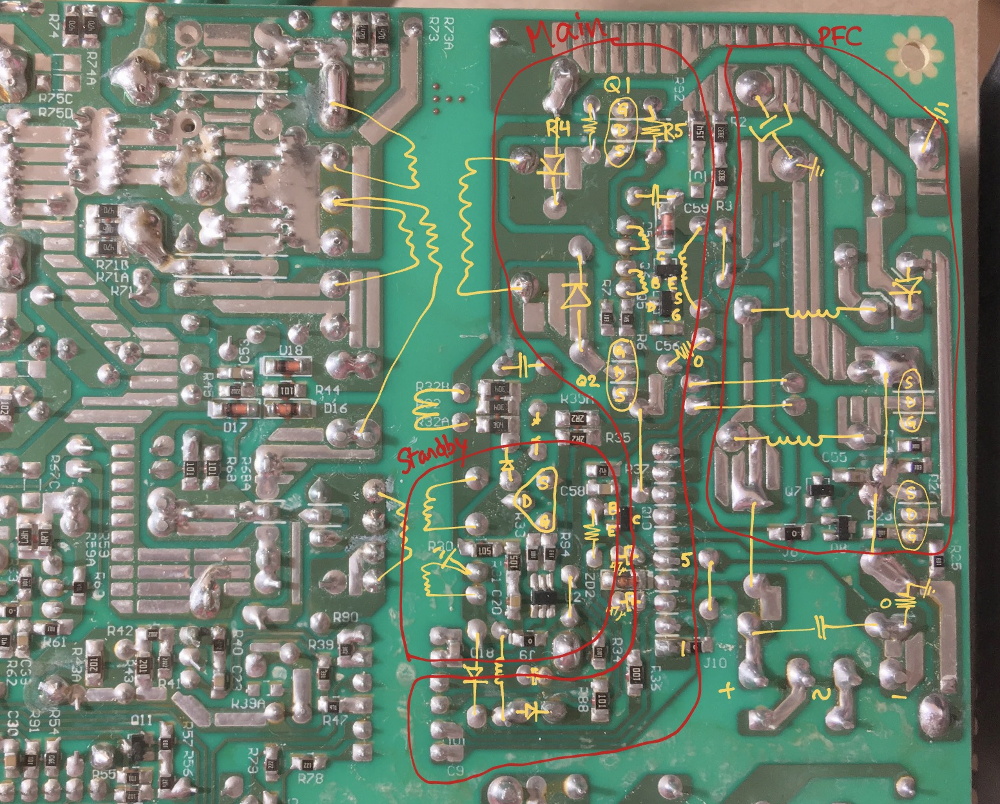
By carefully following traces and comparing with common PSU diagrams, [eigma] was able to identify the SG5616 IC that checks the various voltages being produced by the PSU and generates the PWR_OK signal which tells the motherboard that everything is working normally. As before, all of the DC voltages at this chip seemed reasonable enough, but the pin that was measuring AC voltage from the transformer was showing the same ripple visible on the 12 VDC line.

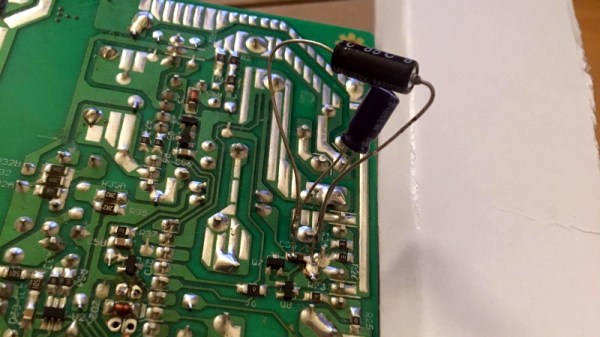
Even more digging uncovered that the transformer itself had a control IC nestled away. The 13 VDC required by this chip to operate is pulled off the standby transformer by way of a Zener diode and a couple capacitors, but as [eigma] soon found, the circuit was producing another nasty ripple. Throwing a few new capacitors into the mix smoothed things out and got the PSU to kick on, but that’s not quite the end of the story.

Pulling the capacitors from the board and checking their values with the meter, [eigma] found they too appeared to be within reasonable enough limits. They even looked in good shape physically. But with the help of a signal generator, he was able to determine their equivalent series resistance (ESR) was way too high. Case closed.

While swapping out blown capacitors in older electronics is something of a rite of passage for hardware hackers, this case is an excellent example of how even the simplest of fixes can be tricky to troubleshoot.

What’s The Deal With Chromium On Linux? Google At Odds With Package Maintainers

Linux users are more likely than most to be familiar with Chromium, Google’s the free and open source web project that serves as the basis for their wildly popular Chrome. Since the project’s inception over a decade ago, users have been able to compile the BSD licensed code into a browser that’s almost the same as the closed-source Chrome. As such, most distributions offer their own package for the browser and some even include it in the base install. Unfortunately, that may be changing soon.

A post made earlier this month to the official Chromium Blog explained that an audit had determined “third-party Chromium based browsers” were using APIs that were intended only for Google’s internal use. In response, any browser attempting to access features such as Chrome Sync with an unofficial API key would be prevented from doing so after March 15th.

To the average Chromium user, this doesn’t sound like much of a problem. In fact, you might even assume it doesn’t apply to you. The language used in the post makes it sound like Google is referring to browsers which are spun off of the Chromium codebase, and at least in part, they are. But the search giant is also using this opportunity to codify their belief that the only official Chromium builds are the ones that they provide themselves. With that simple change, anyone using a distribution-specific build of Chromium just became persona non grata.

Unhappy with the idea of giving users a semi-functional browser, the Chromium maintainers for several distributions such as Arch Linux and Fedora have said they’re considering pulling the package from their respective repositories altogether. With a Google representative confirming the change is coming regardless of community feedback, it seems likely more distributions will follow suit.

Continue reading “What’s The Deal With Chromium On Linux? Google At Odds With Package Maintainers”

Failed Test Could Further Delay NASA’s Troubled SLS Rocket

The January 16th “Green Run” test of NASA’s Space Launch System (SLS) was intended to be the final milestone before the super heavy-lift booster would be moved to Cape Canaveral ahead of its inaugural Artemis I mission in November 2021. The full duration static fire test was designed to simulate a typical launch, with the rocket’s main engines burning for approximately eight minutes at maximum power. But despite a thunderous start start, the vehicle’s onboard systems triggered an automatic abort after just 67 seconds; making it the latest in a long line of disappointments surrounding the controversial booster.

When it was proposed in 2011, the SLS seemed so simple. Rather than spending the time and money required to develop a completely new rocket, the super heavy-lift booster would be based on lightly modified versions of Space Shuttle components. All engineers had to do was attach four of the Orbiter’s RS-25 engines to the bottom of an enlarged External Tank and strap on a pair of similarly elongated Solid Rocket Boosters. In place of the complex winged Orbiter, crew and cargo would ride atop the rocket using an upper stage and capsule not unlike what was used in the Apollo program.

The SLS core stage is rolled out for testing.

There’s very little that could be called “easy” when it comes to spaceflight, but the SLS was certainly designed to take the path of least resistance. By using flight-proven components assembled in existing production facilities, NASA estimated that the first SLS could be ready for a test flight in 2016.

If everything went according to schedule, the agency expected it would be ready to send astronauts beyond low Earth orbit by the early 2020s. Just in time to meet the aspirational goals laid out by President Obama in a 2010 speech at Kennedy Space Center, including the crewed exploitation of a nearby asteroid by 2025 and a potential mission to Mars in the 2030s.

But of course, none of that ever happened. By the time SLS was expected to make its first flight in 2016, with nearly $10 billion already spent on the program, only a few structural test articles had actually been assembled. Each year NASA pushed back the date for the booster’s first shakedown flight, as the project sailed past deadlines in 2017, 2018, 2019, and 2020. After the recent engine test ended before engineers were able to collect the data necessary to ensure the vehicle could safely perform a full-duration burn, outgoing NASA Administrator Jim Bridenstine said it was too early to tell if the booster would still fly this year.

What went wrong? As commercial entities like SpaceX and Blue Origin move in leaps and bounds, NASA seems stuck in the past. How did such a comparatively simple project get so far behind schedule and over budget?

Continue reading “Failed Test Could Further Delay NASA’s Troubled SLS Rocket”

Repairing 200+ Raspberry Pis For A Good Cause

If somebody told you they recently purchased over 200 Raspberry Pis, you might think they were working on some kind of large-scale clustering project. But in this case, [James Dawson] purchased the collection of broken single-board computers with the intention of repairing them so they could be sent to developing countries for use in schools. It sounds like the logistics of that are proving to be a bit tricky, but we’re happy to report he’s at least made good progress on getting the Pis back up and running.

He secured this trove of what he believes to be customer returned Raspberries or the princely sum of £61 ($83 USD). At that price, even if only a fraction ended up being repairable, you’d still come out ahead. Granted all of these appear to be the original Model B, but that’s still a phenomenal deal in our book. Assuming of course you can find some reasonable way to triage them to sort out what’s worth keeping.

To that end, [James] came up with a Bash script that allowed him to check several hardware components including the USB, Ethernet, I2C, and GPIO. With the script on an SD card and a 3.5″ TFT plugged into the Pi’s header for output, he was able to quickly go through the box to get an idea of what sort of trouble he’d gotten himself into. He was only about half way through the process when he wrote this particular blog post, but by that point, he’d found just 40 Pis which wouldn’t start at all. He suspects these might be victims of some common issue in the power circuitry that he’ll investigate at a later date.

The majority of Pis he checked were suffering from nothing worse than some bent GPIO pins or broken SD card slots. Some of the more abused examples had their USB ports ripped off entirely, but were otherwise fine. Another 10 had dead Ethernet, and 4 appear to have damaged traces leading to their HDMI ports. While we’re interested in hearing if [James] can get those 40 dark Pis to fire back up, so far the results are quite promising.

Donating hardware is always a tricky thing, so for now [James] says he’ll be selling the repaired Pis on eBay and donating the proceeds to the Raspberry Pi Foundation so they can continue to develop hardware that will (potentially) accomplish their goal of giving students all over the world a functional computer.

ESP32 Inkplate Gives Kindle Displays A Second Chance

Over the years, we’ve seen plenty of hackers repurpose their Kindle or similar e-reader to reap the benefits of its electronic paper display. Usually this takes the form of some software running on the reader itself, since cracking the firmware is a lot easier than pulling out the panel and figuring out how to operate it independently. But what if somebody had already done that hard work for you?

Enter the Inkplate. By pairing a recycled Kindle display with an ESP32, Croatian electronics company e-radionica says they’ve not only created an open hardware e-paper display that’s easy for hackers and makers to use, but keeps electronic waste out of the landfill. Last year the $99 USD 6 inch version of the Inkplate ended its CrowdSupply campaign at over 920% of its original goal. The new 9.7 inch model is priced at $129, and so far managed to blow past its own funding goal just hours after the campaign went live. Clearly, the demand is there.

The new model’s e-paper display isn’t just larger, it also features a higher 1200 x 825 resolution and reduced refresh time. Outside of the screen improvements, you’ll also find more GPIO pins, an RTC module to keep more accurate time, and a USB Type-C port for both programming and power. You also get a choice of languages to use, with both Arduino and MicroPython libraries available for interfacing with the display. Interestingly, the Inkplate also features a so-called “Peripheral Mode” that allows you to draw graphics primitives on the screen using commands sent over UART.

While we’ve recently seen some very promising efforts to repurpose old e-paper displays, the turn-key solution offered by the Inkplate is admittedly very compelling. If you’re looking for an easy way to jump on the electronic paper bandwagon that works out of the box, this might be your chance.

[Thanks to Krunoslav for the tip.]

MouSTer Brings USB To Retro Computers

Folks who like the take the old Amiga out for the occasional Sunday drive usually do it because they have wistful memories of the simpler times. Back when you could edit documents or view spreadsheets on a machine that had RAM measured in kilobytes instead of gigabytes. But even the most ardent retro computer aficionado usually allows for a bit of modern convenience.

Enter the mouSTer. This tiny device converts a common USB HID mouse into something older computers can understand. It even supports using Sony’s PlayStation 4 controller as a generic game pad. While the firmware is still getting tweaked, the team has confirmed its working on several classic machines and believe it should work on many more. Considering the prices that some of these old peripherals command on the second hand market, using a USB mouse or controller on your vintage computer isn’t just more convenient, but will likely be a lot cheaper.

Confirmed retrocomputing superfan [Drygol] is a member of the team working on mouSTer, and in a recent post to his retrohax blog, he talks a bit about what’s happened since his last update over the summer. He also talks a bit about the challenges they’ve faced to get it into production. Even if you’re not into poking around on vintage computers, there are lessons to be learned here about what it takes to move from a handful of prototypes to something you can actually sell to the public.

We especially liked the details about the mouSTer enclosure, or lack thereof. Originally [Drygol] says they were going to have the cases injection molded, but despite initial interest from a few companies they talked to, nobody ended up biting because it needed to be done with relatively uncommon low pressure injection. While 3D printing is still an option, the team ended up using clear heatshrink tubing to create a simple conformal protective shell over the electronics. Personally we think it looks great like this, but it sounds like this is only a temporary solution until something a bit more robust can be implemented.

As you might imagine we’ve seen DIY projects that aimed to bring modern input devices to vintage computers like the Atari ST, but the diminutive proportions of the mouSTer and the fact that it’s a turn-key product is sure to appeal to those who want to minimize headaches when working with their classic gear.

Continue reading “MouSTer Brings USB To Retro Computers”

Third Time’s The Charm For This Capable Cyberdeck

For those who decide to build their own personal cyberdeck, it’s often as much about the journey as it is the final product. The recent write-up that [Sophie Wheeler] put together about the process that lead her to build her own bespoke mobile computer is a perfect example. She went through three distinct design phases to create something that had what she describes as a “retro-futuristic, hand-built, utilitarian aesthetic”, and we think you’ll agree the final product is right on target.

At Hackaday, we’re strong believers that you can learn just as much from a failed attempt as you will from a rousing success, which is why we especially appreciate the way [Sophie] has documented this project. The basic layout and general bill of materials for his hypothetical cyberdeck had been sorted out in her head for about a year, but it took a few attempts until everything came together in a way she was happy with. Rather than pretend those early missteps never happened, she’s decided to present each one and explain why it didn’t quite work out.

This laser-cut acrylic design was difficult to assemble.

Frankly both earlier attempts look pretty slick to us, but of course the only person who’s opinion really counts when it comes to a good cyberdeck is the one who’s building it. The original acrylic design was a bit too fiddly, and while the first attempt at 3D printing the computer’s frame and enclosure went much better, it still left something to be desired.

The final result is a clean and straightforward design that has plenty of room inside for a Raspberry Pi 4, UPSPack V3 power management board, 10,000 mAh battery, internal USB hub, and a AK33 mechanical keyboard. Topside there’s a 7” 1024×600 IPS LCD with touch overlay that’s naturally been offset in the traditional cyberdeck style, and on the right side of the enclosure there’s a bay that holds a KKMoon RTL-SDR. Though that could certainly be swapped out for something else should you decide to print out your own version of this Creative Commons licensed design.

In our 2020 review we noted the incredible influx of cyberdeck builds we’d seen over the last 12 months, and judging by just what we’ve seen in just these last few weeks, 2021 should be another bumper year for these unique computers.